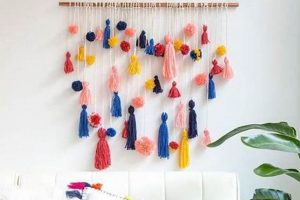
Creating three-dimensional wall dcor through individual crafting offers a means to personalize interior spaces. This practice involves employing various materials and techniques to produce visually and tactilely interesting surfaces on canvases or wall panels. Examples include using joint compound to sculpt raised designs, adhering fabric scraps to a surface for a layered effect, or employing natural elements like dried flowers to generate visual depth.
The appeal of this form of artistic expression lies in its accessibility and cost-effectiveness. Utilizing readily available materials and straightforward methods allows for the creation of unique decorative pieces without requiring specialized skills or expensive equipment. Historically, similar approaches have been employed as methods of personal expression and resourcefulness in home decoration, reflecting individual styles and available materials. The resultant pieces can serve as focal points within a room, enhancing its aesthetic appeal and reflecting the inhabitants’ personal tastes.
The following discussion will explore the diverse range of materials, techniques, and design considerations relevant to the successful execution of such projects. Detailed instructions will guide the user through various methods, emphasizing considerations for achieving desired aesthetic outcomes and ensuring longevity of the finished artwork.
Essential Considerations for Tactile Wall Decor Creation
The following section provides crucial guidelines for achieving optimal results when undertaking projects involving three-dimensional surface embellishments for walls. Careful attention to these points will enhance both the aesthetic quality and the durability of the finished piece.
Tip 1: Surface Preparation is Paramount: Prior to commencing any application, ensure the substrate is clean, dry, and free from loose debris. Priming the surface will enhance adhesion and prevent potential issues such as peeling or cracking over time. The appropriate primer should be selected based on the substrate material, such as canvas, wood, or drywall.
Tip 2: Material Compatibility is Critical: When combining different materials, confirm their compatibility to prevent adverse reactions. For example, certain adhesives may not be suitable for use with specific types of fabric or paint. Testing a small, inconspicuous area prior to full application is recommended.
Tip 3: Layering Techniques Enhance Depth: Employing multiple layers of materials or textures can create a more visually dynamic effect. Allow each layer to fully dry before applying the next to avoid smudging or distortion. Consider varying the thickness and texture of each layer for added visual interest.
Tip 4: Sealing for Longevity: Once the project is complete, apply a sealant to protect the surface from dust, moisture, and UV damage. The type of sealant should be chosen based on the materials used and the desired finish (matte, satin, or gloss). Ensure proper ventilation during application.
Tip 5: Design Considerations for Scale: The size and scale of the design should be proportionate to the wall on which it will be displayed. A large, complex design may overwhelm a small wall, while a small, simple design may be lost on a large wall. Consider the surrounding furniture and decor when determining the appropriate scale.
Tip 6: Texture Variation Adds Visual Interest: Incorporating a variety of textures can create a more engaging and visually stimulating piece. Experiment with different materials and techniques to achieve a range of tactile sensations. Examples include combining smooth, polished surfaces with rough, textured elements.
Tip 7: Color Palette Harmony: Maintain a cohesive color palette to ensure visual harmony. Limit the number of colors used and choose shades that complement each other. Consider the existing color scheme of the room in which the artwork will be displayed.
Effective adherence to these guidelines will result in visually compelling and enduring examples of tactile wall decoration. Through careful planning and execution, these projects can significantly enhance the aesthetic quality of interior spaces.
With a solid grasp of these fundamental tips, the subsequent section will provide a more detailed examination of specific techniques applicable to this art form.
1. Material Selection
Material selection is a foundational element in the execution of three-dimensional wall decor projects. The choice of materials dictates the range of textures achievable, the overall aesthetic impact, and the longevity of the finished artwork. Careful consideration of material properties is, therefore, paramount to achieving the desired outcome.
- Type and Consistency of Additives:
The incorporation of additives to base mediums such as joint compound or plaster allows for manipulation of the final texture. Additives like sand, fibers, or aggregates introduce roughness, depth, and visual interest. The consistency of the base medium also influences texture; a thicker consistency yields bolder, more pronounced features, while a thinner consistency facilitates smoother, more subtle effects. The ratio of additive to base medium must be carefully calibrated to achieve the intended texture.
- Fabric and Textile Properties:
Fabrics and textiles offer a diverse range of textural possibilities. Materials vary significantly in weave, weight, and fiber content. Burlap, for example, provides a coarse, rustic texture, while silk offers a smooth, refined surface. The method of application also impacts texture; layering, pleating, or scrunching fabric creates depth and dimension. The selection of appropriate adhesives and sealants is crucial to ensure fabric adheres securely to the substrate and remains resistant to damage.
- Natural Elements and Organic Materials:
Incorporating natural elements such as dried flowers, leaves, twigs, or stones introduces organic textures and visual diversity. The inherent textures of these materials vary widely, offering opportunities for unique and visually striking compositions. Careful preservation and preparation are essential to ensure the longevity of natural elements; drying and sealing protect against decay and infestation. The arrangement and integration of natural elements should be carefully considered to maintain visual balance and cohesion.
- Recycled and Found Objects:
The utilization of recycled and found objects introduces textural variation and promotes sustainable practices. Materials such as corrugated cardboard, bottle caps, or broken tiles offer unique textural possibilities. The creative repurposing of these materials transforms discarded items into aesthetically appealing components of wall decor. Surface preparation and adhesive compatibility are essential to ensure these objects adhere securely to the substrate. The arrangement and integration of recycled objects should be carefully considered to create a visually balanced and cohesive composition.
In summary, the selection of materials is not merely a practical consideration but rather a critical determinant of the final aesthetic and tactile quality of the artwork. The choice of base mediums, additives, fabrics, natural elements, and recycled objects, along with appropriate preparation and application techniques, dictates the texture, visual appeal, and longevity of three-dimensional wall decor.
2. Texture Creation
Texture creation is an elemental process directly influencing the aesthetic and tactile characteristics of three-dimensional wall decor. The application of varying techniques to generate tangible surface variations serves as the defining attribute that distinguishes it from conventional flat wall art. Without deliberate manipulation to introduce depth, ridges, or patterns, the resultant artwork lacks the dimensionality inherent to this medium. For instance, the application of joint compound using a palette knife creates raised peaks and valleys, while the imprinting of fabric patterns onto wet plaster yields repeating motifs. These techniques, among others, fundamentally transform a flat surface into a visually engaging composition.
The selection of appropriate methods for texture creation is contingent upon the desired aesthetic and the materials employed. Employing lightweight modeling paste to sculpt intricate floral arrangements provides a delicate, refined texture, suitable for formal interior spaces. Conversely, adhering coarse natural fibers to a canvas creates a more rustic, tactile surface, appropriate for informal or naturalistic environments. The choice of tools and their application also affect the final texture; brushes, sponges, and even household implements can be used to create unique effects. Furthermore, layering different textures allows for complex and nuanced visual experiences. A combination of raised plaster elements over a textured fabric background, for example, yields both visual and tactile depth.
In conclusion, texture creation is an indispensable component of three-dimensional wall decor. The strategic application of various techniques and materials enables the transformation of a flat surface into a dynamic and visually compelling artwork. The challenges lie in selecting and executing techniques appropriate to the intended aesthetic and ensuring the long-term stability of the created textures. A thorough understanding of texture creation techniques is crucial for achieving successful and visually impactful three-dimensional wall embellishments.
3. Color Harmony
Color harmony, defined as the pleasing arrangement of hues and their related values, plays a critical role in the success of three-dimensional wall embellishments. It affects the perceived depth, balance, and overall aesthetic appeal of the artwork. The interplay between colors and textures can either enhance or detract from the desired effect. A poorly chosen color palette can diminish the visual impact of intricate textures, rendering them indistinct or visually jarring. Conversely, a well-considered color scheme can accentuate the textures, creating a more engaging and visually sophisticated artwork. For instance, a monochromatic palette, where shades of a single color are used, can highlight subtle texture variations. The absence of competing hues allows the texture to become the dominant visual element.
Practical application reveals several key considerations. The selection of color should complement the existing interior decor. A textured wall piece intended for a room with cool, neutral tones might benefit from analogous colors, such as blues and greens, to create a sense of serenity and cohesion. Conversely, contrasting colors can introduce dynamism and visual interest. The texture itself can influence the perception of color. A rough, matte surface tends to absorb light, making colors appear deeper and more saturated, while a smooth, glossy surface reflects light, causing colors to appear brighter and more intense. The specific techniques employed also influence color application. Dry brushing, for example, allows for subtle color gradations that accentuate the texture, while layering different colors can create a sense of depth and complexity. Furthermore, the scale of the artwork dictates the color strategy; larger pieces often benefit from a simpler palette to avoid visual overwhelm, while smaller pieces can accommodate more intricate color combinations.
In summation, color harmony is an indispensable element in crafting aesthetically pleasing three-dimensional wall decor. Careful consideration must be given to the interplay between color, texture, lighting, and the surrounding environment to achieve a visually cohesive and impactful artwork. Ignoring the principles of color harmony can result in a visually discordant piece, while skillful application enhances the texture and creates a more engaging and sophisticated visual experience. The successful integration of color and texture elevates the artwork from a mere decorative element to a significant design feature within the interior space.
4. Surface Preparation
Surface preparation forms the critical foundation upon which the successful creation and longevity of textured wall art depend. A meticulously prepared surface ensures optimal adhesion, prevents premature deterioration, and enhances the overall aesthetic quality of the finished piece. Without adequate attention to this initial stage, the integrity of the entire project is compromised.
- Cleaning and Degreasing
The removal of dirt, dust, oils, and other contaminants is paramount. Residue can impede the bonding of adhesive materials, leading to peeling, cracking, or uneven texture application. For instance, a wall previously treated with a silicone-based cleaner will require thorough cleaning with a degreasing agent before any texture can be applied. Neglecting this step will almost certainly result in adhesion failure.
- Repairing Imperfections
Existing imperfections, such as cracks, holes, or uneven patches, must be addressed before applying textures. Ignoring these flaws will result in their amplification within the finished piece. A proper repair involves filling imperfections with appropriate patching compounds, sanding the area smooth, and priming to create a uniform surface. Failure to rectify these underlying issues will compromise the overall aesthetic and structural integrity.
- Priming for Adhesion
Priming creates a uniform and receptive surface for subsequent texture applications. The primer establishes a strong bond between the substrate and the texture medium, enhancing adhesion and preventing absorption of moisture or solvents. The choice of primer should be appropriate to both the substrate material and the texture medium to ensure compatibility. Omitting priming will likely result in inconsistent texture application and reduced longevity.
- Texturing the surface
The underlying texture of a surface plays a crucial role in how applied textures will behave. Sanding a glossy surface can create a rougher texture which helps layers of paint and joint compound more effectively and increases its surface area. Similarly, if a surface is too porous, a rough underlying texture is need to absorb the texture and prevent it from deteriorating.
In conclusion, proper surface preparation is not merely a preliminary step but an integral component of achieving professional-quality textured wall art. The processes of cleaning, repairing, and priming provide a robust and receptive canvas for the subsequent application of textures, ensuring both aesthetic appeal and long-term durability. A failure to recognize and address these critical facets ultimately undermines the integrity and visual impact of the final piece.
5. Spatial Integration
Spatial integration, in the context of three-dimensional wall art projects, describes the harmonious assimilation of an artwork within its surrounding environment. This extends beyond mere physical placement and encompasses considerations of scale, proportion, color, and existing architectural details. The success of a tactile wall piece hinges on its ability to enhance, not disrupt, the overall aesthetic of a room. An example is a large-scale, heavily textured piece overpowering a small, minimalist space, or a delicate, subtle design being lost within a busy, ornate setting. Understanding spatial integration allows for the creation of artwork that complements and elevates the existing ambiance.
The practical application of spatial integration involves several key steps. Initially, a thorough assessment of the intended location is crucial. This includes noting the dimensions of the wall, the existing color palette, lighting conditions, and furniture arrangement. The scale of the artwork should be proportionate to the wall space, avoiding both overcrowding and a sense of emptiness. The color palette should complement or deliberately contrast with the existing decor, creating visual interest without clashing. The textures employed should harmonize with the overall style of the room, whether it be modern, rustic, or traditional. For instance, a room with exposed brick might benefit from a textured piece incorporating natural materials, reinforcing the rustic aesthetic. In rooms with abundant natural light, textured surfaces can create dynamic shadow patterns, further enhancing the artwork’s visual impact.
The deliberate consideration of spatial integration is not merely an aesthetic choice but rather a critical factor in determining the long-term appreciation of the artwork. Poor integration can lead to visual fatigue and a sense of disharmony, diminishing the artwork’s value over time. By carefully analyzing the spatial context and tailoring the design accordingly, a three-dimensional wall piece becomes a cohesive and enriching element of the overall interior design, enhancing the space and creating a more visually appealing and comfortable environment.
6. Sealing Application
The sealing application represents a crucial final stage in the creation of three-dimensional wall art. Its primary function is to protect the finished artwork from environmental factors and physical damage, thereby ensuring its long-term preservation. The absence of an appropriate sealant can lead to deterioration of materials, discoloration, and a diminished aesthetic appeal. The materials used in these art pieces, such as joint compound, natural fibers, and applied paints, are often porous and susceptible to moisture absorption, dust accumulation, and UV damage. A properly applied sealant forms a protective barrier, mitigating these risks and extending the lifespan of the artwork. For example, a piece incorporating natural elements like dried flowers would rapidly degrade without sealing, becoming brittle and attracting pests. The application of a UV-resistant sealant prevents fading and color alteration over time, maintaining the artwork’s original vibrancy. Different sealants will affect the texture differently, a flexible sealent will preserve an art piece if it is struck while a hard one would cause cracking and damage of the piece.
The selection of an appropriate sealant requires careful consideration of the materials used in the artwork and the desired finish. Acrylic sealants are suitable for general protection and offer good UV resistance. Polyurethane sealants provide enhanced durability and water resistance, making them appropriate for pieces displayed in humid environments. Matte sealants preserve the original texture and minimize glare, while gloss sealants enhance color vibrancy and create a reflective surface. The application method also affects the outcome. Multiple thin coats are generally preferable to a single thick coat, as this reduces the risk of drips and ensures even coverage. Furthermore, adequate ventilation during the application and drying process is essential to prevent the accumulation of harmful vapors. Applying an incorrect sealant can cause significant damage. For example, applying an oil-based sealant over acrylic paint can lead to cracking and discoloration, negating the benefits of protection. For instance, applying a thick layer of unthinned sealant would cause it to drip over the art piece and disrupt finer details of the art piece.
In summary, the sealing application is an indispensable step in the creation of durable and visually appealing three-dimensional wall art. Its effectiveness hinges on the selection of a compatible sealant and the implementation of proper application techniques. Neglecting this crucial stage significantly reduces the lifespan and aesthetic value of the artwork, rendering the preceding creative efforts less enduring. Adherence to best practices in sealant selection and application ensures the long-term preservation of the artwork and continued visual enjoyment. A thorough understanding of the significance of this stage is thus essential for any practitioner engaging in this art form.
Frequently Asked Questions Regarding Three-Dimensional Wall Embellishment
The following questions address common concerns and misconceptions pertaining to the creation and maintenance of three-dimensional wall decor. These responses aim to provide clarity and guidance for individuals undertaking such projects.
Question 1: What are the essential materials required for creating tactile wall artwork?
The materials depend on the desired aesthetic and technique. However, common materials include a substrate (canvas, wood panel, or prepared wall), a texture medium (joint compound, modeling paste, or fabric), adhesives, tools for application (palette knives, brushes, sponges), and a sealant for protection.
Question 2: How does one prevent cracking in joint compound or plaster-based textures?
Cracking is often caused by rapid drying or excessive thickness. Applying thin layers, allowing each layer to dry completely before adding the next, and using a crack-resistant additive can mitigate this issue. Proper surface preparation is also essential.
Question 3: What type of adhesive is most suitable for adhering fabrics to a wall panel?
The appropriate adhesive depends on the fabric type and the substrate material. Heavy-duty fabric adhesives, construction adhesives, or multi-purpose craft glues are generally suitable. Testing the adhesive on a small, inconspicuous area is recommended.
Question 4: How can one protect natural elements, such as dried flowers, from deterioration in tactile wall artwork?
Natural elements are susceptible to moisture, pests, and UV damage. Proper drying and preservation techniques, followed by sealing with a UV-resistant sealant, are essential for longevity.
Question 5: What are the best practices for cleaning textured wall art without damaging the surface?
Gentle cleaning with a soft brush or vacuum attachment is recommended. Avoid harsh chemicals or abrasive cleaners, as these can damage the texture. A slightly damp cloth can be used for spot cleaning, but ensure the surface dries completely.
Question 6: How does the existing room decor influence the design of a tactile wall art piece?
The design should complement or deliberately contrast with the existing decor. Consider the room’s color palette, style, and lighting conditions when selecting materials, textures, and colors. The scale of the artwork should also be proportionate to the wall space.
These frequently asked questions address key considerations for individuals embarking on three-dimensional wall embellishment projects. Careful planning and execution, combined with proper material selection and maintenance, contribute to the creation of visually appealing and enduring artwork.
The subsequent section will provide detailed project examples and step-by-step tutorials.
Conclusion
The preceding discussion has detailed the multifaceted nature of textured wall art diy, encompassing materials, techniques, design considerations, and long-term preservation. Effective execution relies on a thorough understanding of these elements and their interconnectedness. Failure to address any single aspect compromises the aesthetic and structural integrity of the artwork. Material selection, surface preparation, color harmony, spatial integration, and sealing application are not merely isolated steps but rather interdependent components of a holistic creative process.
The information presented herein serves as a foundational resource for individuals seeking to engage in this form of artistic expression. Continued exploration and experimentation within these guidelines will facilitate the creation of unique and enduring pieces, enhancing the aesthetic quality of interior spaces and providing a tangible embodiment of individual creativity. The pursuit of excellence in this medium necessitates a commitment to continuous learning and refinement.


