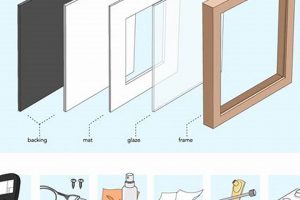
A do-it-yourself picture frame mat is a custom-cut border, typically crafted from acid-free cardstock or matboard, placed between an image and the frame’s glazing. This border serves to enhance the presentation of the artwork or photograph. For instance, a photograph of a landscape may be enhanced by a wide, neutral-colored border, drawing focus to the image itself. The project is a blend of craftsmanship and creativity.
Employing such a border yields several advantages, including protecting the artwork from direct contact with the glazing, thereby minimizing potential damage due to condensation or pollutants. The border also visually separates the image from the frame, contributing to a more aesthetically pleasing display. Historically, these borders have been employed in fine art framing to elevate the perceived value and importance of the artwork.
The following sections will detail the necessary materials, provide step-by-step instructions for accurate cutting and assembly, and offer creative considerations for those looking to personalize their framing projects.
Tips for Do-It-Yourself Frame Border Creation
The following are considerations to ensure a professional and archival-quality result when constructing borders for framed art.
Tip 1: Material Selection: Utilize acid-free matboard specifically designed for framing. Acidic materials can degrade artwork over time, causing discoloration and embrittlement. Conservation-grade matboard is recommended for valuable or irreplaceable pieces.
Tip 2: Precision Cutting: Employ a specialized mat cutter with a sharp blade to achieve clean, beveled edges. A self-healing cutting mat provides a stable surface and prolongs blade life. Inaccurate cuts result in unsightly gaps and a diminished aesthetic.
Tip 3: Measurement Accuracy: Precisely measure both the artwork and the frame’s inside dimensions. The border’s opening should be slightly smaller than the artwork to prevent slippage and ensure proper coverage. A ruler with fine graduations is essential.
Tip 4: Bevel Angle Consistency: Maintain a consistent bevel angle when cutting the interior opening. This enhances the visual appeal of the finished product and prevents light from reflecting unevenly off the border’s edge. Practice on scrap matboard before cutting the final piece.
Tip 5: Dust and Debris Control: Work in a clean, dust-free environment. Debris trapped between the border and the artwork or glazing detracts from the presentation. A soft brush or compressed air can be used to remove particles.
Tip 6: Attachment Method: Secure the artwork to the border using acid-free linen tape or corner pockets. Avoid using adhesives that can damage the artwork. Proper attachment prevents shifting and ensures long-term stability.
Tip 7: Border Width Considerations: The border’s width should be proportional to the artwork’s size and the frame’s dimensions. Overly wide borders can overwhelm small images, while narrow borders may lack visual impact. Experiment with different widths to achieve the desired effect.
Adhering to these recommendations contributes to the creation of visually appealing and archivally sound borders, preserving artwork for years to come.
The subsequent sections will address advanced techniques, including multi-layered borders and decorative enhancements.
1. Material Archival Quality
The selection of materials with archival quality is paramount in the context of do-it-yourself picture frame borders. The longevity and preservation of the enclosed artwork are directly contingent upon the chemical stability of the matboard. Acidic components, commonly found in lower-grade materials, instigate a cascade of detrimental effects, leading to discoloration, embrittlement, and eventual degradation of the artwork. This process, known as acid migration, is accelerated by environmental factors such as humidity and temperature fluctuations. The employment of acid-free or, ideally, conservation-grade matboard mitigates this risk, creating a chemically inert barrier that protects the artwork from self-destruction. Real-world examples abound, illustrating instances where valuable documents or artwork housed within acidic borders have suffered irreparable damage. Therefore, the choice of appropriate materials transcends mere aesthetic considerations; it constitutes a fundamental preservation strategy.
Furthermore, archival quality extends beyond the matboard itself to encompass all associated materials, including adhesives and backing boards. The use of acidic tapes or glues can negate the benefits of an acid-free border, introducing corrosive elements into the framed environment. Similarly, non-archival backing boards can serve as reservoirs of acidity, continuously releasing harmful compounds. In practical application, this understanding necessitates a comprehensive approach, selecting each component with meticulous attention to its chemical composition and potential impact on the artwork’s preservation. Museums and archives routinely employ rigorous testing protocols to ensure that all framing materials meet stringent archival standards, providing a benchmark for individual practitioners engaged in do-it-yourself framing projects.
In summary, the connection between material archival quality and do-it-yourself picture frame borders is inseparable. The use of appropriate materials is not merely a desirable attribute but a necessity for safeguarding valuable or sentimental artwork. While the initial cost of archival-grade materials may be higher, the long-term benefits in terms of preservation far outweigh the investment. Challenges remain in identifying and sourcing genuinely archival materials, requiring diligent research and informed purchasing decisions. The principles of archival framing are intrinsically linked to the broader concept of preventative conservation, underscoring the importance of proactive measures in preserving cultural heritage.
2. Precise Cutting Technique
Precise cutting technique is fundamental to the creation of a professional-quality do-it-yourself picture frame border. It directly influences the aesthetic appeal, functional integrity, and protective capabilities of the finished product. Inadequate cutting methods result in visible imperfections, compromising the overall presentation and potentially exposing the artwork to environmental hazards.
- Bevel Angle Consistency
Maintaining a consistent bevel angle is crucial for achieving a polished and professional appearance. Inconsistent angles create uneven light reflection and highlight imperfections. Proper technique involves utilizing a specialized mat cutter with an adjustable blade and applying consistent pressure throughout the cut. A visible demonstration of inconsistent bevels versus consistent bevels demonstrates the difference.
- Dimensional Accuracy
Accurate dimensional measurements are essential for creating a border that fits both the artwork and the frame precisely. Deviations from the intended dimensions result in gaps or overlaps, compromising the visual integrity and potentially allowing dust or moisture to infiltrate. Precise measurements require the use of a high-quality ruler or measuring tape and careful attention to detail.
- Clean Edge Finish
A clean edge finish is necessary for preventing fraying or tearing of the matboard, ensuring a durable and aesthetically pleasing result. This is achieved through the use of a sharp blade and appropriate cutting pressure. Dull blades can cause ragged edges that detract from the overall appearance. Regular blade replacements are vital for maintaining optimal cutting performance.
- Mitigation of Material Waste
Precise cutting techniques minimize material waste, optimizing resource utilization and reducing costs. Careful planning and accurate execution reduce the likelihood of errors, which can necessitate recuts and increased material consumption. Strategically planned cuts maximize matboard use.
These elements of precise cutting, when executed correctly, collectively contribute to the creation of a high-quality, visually appealing, and protective do-it-yourself picture frame border. Conversely, neglecting these techniques results in a substandard product with diminished aesthetic and functional value. The selection and mastery of appropriate cutting tools and methods are, therefore, essential for achieving optimal results in do-it-yourself framing projects.
3. Accurate Dimensional Measurement
The creation of a “diy frame mat” hinges critically upon accurate dimensional measurement. This process establishes the fundamental parameters for both the aesthetic presentation and protective function of the completed frame. Inaccurate measurements propagate errors throughout the entire fabrication process, leading to ill-fitting borders, compromised artwork presentation, and potential physical damage to the artwork itself. The relationship is causal: imprecise measurement inevitably results in a substandard final product.
Accurate dimensional measurement manifests as a composite of several factors. It requires the use of calibrated measuring instruments, meticulous attention to detail during the measurement process, and a clear understanding of the dimensional relationships between the artwork, the “diy frame mat,” and the frame itself. For instance, if the internal dimensions of the frame are miscalculated, the resulting border may be either too large to fit within the frame or too small to adequately cover the edges of the artwork. A real-world example would be measuring the artwork for a frame mat, then accidentally transposing numbers: instead of 12.5 inches the individual recorded 15.2, this would cause the mat opening to be too large and fail at displaying properly. This underscores the practical significance of mastering accurate dimensional measurement as an indispensable skill for any individual undertaking the creation of a custom picture frame border.
In summation, accurate dimensional measurement is not merely a preliminary step in the creation of a “diy frame mat,” but rather an integral component that dictates the success or failure of the entire project. Challenges may arise from the complexity of irregular artwork shapes or the limitations of available measuring tools. However, a commitment to precision and a thorough understanding of dimensional relationships are essential for achieving a professional-quality result. Ultimately, the creation of a well-crafted “diy frame mat” is inextricably linked to the mastery of accurate dimensional measurement techniques.
4. Aesthetic Border Proportions
Aesthetic border proportions are intrinsic to the success of any do-it-yourself frame mat project. These proportions dictate the visual balance and overall impact of the framed artwork. A disproportionate border, whether too wide or too narrow, can detract from the artwork’s inherent qualities, creating an unbalanced and visually unappealing presentation. The relationship is one of direct cause and effect: poorly chosen border proportions directly diminish the aesthetic value of the framed piece. The perception and appreciation of artwork are significantly influenced by the surrounding border; therefore, these proportions require careful consideration.
The selection of appropriate border widths involves several factors, including the size and complexity of the artwork, the style and dimensions of the frame, and the surrounding environment in which the framed piece will be displayed. A large, complex artwork may benefit from a wider border, providing visual breathing room and preventing the artwork from feeling cramped. Conversely, a small or simple artwork may be better suited to a narrower border, which allows the artwork to remain the focal point without being overwhelmed by the frame. For instance, a small, detailed botanical illustration might be enhanced by a narrow, neutral-colored border, while a large, abstract painting could benefit from a wider, more substantial border that complements the artwork’s scale and visual impact. The surrounding environment, such as the wall color and lighting conditions, can also influence the optimal border width. A dark wall may necessitate a wider border to create sufficient visual contrast, while a brightly lit room may allow for a narrower border.
In conclusion, aesthetic border proportions constitute a crucial component of any successful do-it-yourself frame mat project. Challenges may arise in objectively determining the “ideal” border proportions, as aesthetic preferences are inherently subjective. However, by considering the factors outlined above and experimenting with different options, it is possible to achieve a visually balanced and aesthetically pleasing presentation that enhances the artwork’s inherent qualities. The integration of informed aesthetic considerations is essential for transforming a simple frame into a showcase that elevates the perceived value and appreciation of the enclosed artwork.
5. Artwork Secure Mounting
Artwork secure mounting is an indispensable element in the context of do-it-yourself frame mat construction. It addresses the critical need to stabilize and protect the artwork within the frame, mitigating risks of slippage, damage, and environmental exposure. Proper mounting ensures the longevity and preservation of the artwork, as well as maintaining the aesthetic integrity of the framed piece. The following facets underscore the significance of this process.
- Archival Adhesives
The selection and application of archival adhesives are paramount. These adhesives, typically acid-free tapes or linen hinges, provide a secure bond between the artwork and the frame mat without compromising the artwork’s integrity. The use of non-archival adhesives, such as masking tape or glue, can lead to discoloration, staining, and irreversible damage to the artwork over time. For example, a delicate watercolor painting mounted with acidic tape may exhibit yellowing and embrittlement within a few years. The choice of appropriate adhesives directly influences the long-term preservation of the artwork.
- Support Materials
Appropriate support materials, such as acid-free backing boards and corner supports, provide structural stability and prevent warping or buckling of the artwork and the frame mat. These materials create a stable and rigid environment, minimizing the risk of physical damage during handling and display. For instance, a photograph mounted on a flimsy backing board may bend or crease, detracting from its visual appeal and potentially causing irreparable harm. The selection of suitable support materials is essential for maintaining the artwork’s structural integrity.
- Mounting Techniques
Employing proper mounting techniques, such as float mounting or window matting, enhances the visual presentation of the artwork while providing secure attachment. These techniques create a visually appealing separation between the artwork and the frame, preventing direct contact with the glazing and minimizing the risk of damage from condensation or pollutants. For example, a valuable print can be float mounted to showcase its deckle edges and create a sense of depth. The choice of appropriate mounting techniques elevates the aesthetic value of the framed piece while ensuring secure attachment.
- Reversibility Considerations
Prioritizing reversibility in mounting techniques is essential for allowing future conservation or restoration efforts without causing damage to the artwork. Mounting methods should be non-invasive and easily reversible, enabling the artwork to be safely removed from the frame without leaving residue or causing distortion. For instance, using linen hinges allows the artwork to be detached from the frame mat with minimal risk of tearing or damaging the paper. The consideration of reversibility ensures the long-term preservation and accessibility of the artwork.
These facets of secure artwork mounting are intrinsically linked to the successful creation of a do-it-yourself frame mat. Neglecting these considerations can compromise the artwork’s preservation and diminish the aesthetic value of the framed piece. By prioritizing archival materials, appropriate support structures, and reversible mounting techniques, individuals can create custom frame mats that both protect and enhance their valuable artwork.
Frequently Asked Questions Regarding Do-It-Yourself Frame Mats
The following section addresses common inquiries and misconceptions concerning the construction and utilization of custom picture frame borders.
Question 1: What specific materials are suitable for constructing a frame mat designed for archival purposes?
Acid-free matboard, specifically those labeled as conservation or museum-grade, is recommended. These materials are manufactured to prevent the leaching of acids that can degrade artwork over time. Adhesives used in conjunction should also be acid-free and specifically formulated for archival applications.
Question 2: What tools are essential for achieving precise cuts when creating a do-it-yourself frame border?
A specialized mat cutter with a sharp, replaceable blade is crucial for creating beveled edges and accurate dimensions. A self-healing cutting mat provides a stable surface and protects work areas. A metal ruler with non-slip backing ensures straight lines. A T-square aids in achieving accurate 90-degree angles.
Question 3: How does one determine the appropriate width of a frame mat for a particular artwork?
The ideal width depends on the size and complexity of the artwork, as well as the dimensions of the frame. A general guideline suggests that the mat width should be proportional to the artwork’s size, with larger artworks often benefiting from wider mats. The goal is to create a visual balance that enhances the artwork without overwhelming it.
Question 4: What methods are recommended for securely attaching artwork to a frame mat without causing damage?
Acid-free linen tape or archival mounting corners are the preferred methods. These materials provide a secure hold without introducing harmful chemicals or permanently adhering to the artwork. Avoid using standard tapes or glues, as these can cause discoloration and degradation.
Question 5: Can pre-cut frame mats be altered to fit custom artwork sizes?
While pre-cut mats can be modified, achieving precise results requires specialized tools and expertise. Attempting to alter pre-cut mats without the proper equipment often results in uneven edges and compromised aesthetics. Creating a custom mat from scratch is generally recommended for unique artwork dimensions.
Question 6: How should a frame mat be cleaned to remove dust or smudges without damaging the material?
A soft, lint-free cloth or a specialized mat cleaning sponge can be used to gently remove surface dust. Avoid using water or liquid cleaners, as these can stain or warp the matboard. For stubborn smudges, consult a professional conservator.
The careful consideration of these factors contributes to the creation of a professionally finished and archivally sound frame presentation.
The subsequent section will explore advanced techniques for custom frame mat design and construction.
DIY Frame Mat
The preceding sections have comprehensively explored the creation and application of the do-it-yourself frame mat, elucidating its importance in artwork preservation and aesthetic enhancement. Key aspects, including material selection, cutting precision, dimensional accuracy, border proportion, and secure mounting, have been addressed in detail. Furthermore, common inquiries regarding its construction and maintenance have been examined, providing a foundational understanding for practitioners.
The meticulous execution of these principles ensures not only a visually appealing presentation but also the long-term protection of valuable artwork. As such, the investment of time and effort in mastering these techniques is a prudent endeavor. The careful application of this knowledge empowers individuals to elevate their framing projects from simple enclosures to showcases of artistry and preservation, therefore encouraging continued exploration and refinement of these essential skills.


