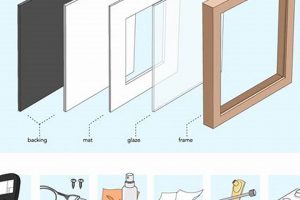
The construction of a structure to support and display a stretched artwork, typically made from wood or other suitable materials, through a process executed by the individual creator defines the focal subject. For example, an artist might construct a wooden border, attach it to a stretched painting, and thus enhance its presentation.
Such a construction process offers several advantages. It allows for customization of size, materials, and aesthetic to perfectly complement the artwork. This approach reduces expense compared to professional framing services. Historically, artists and hobbyists have engaged in this practice to exert greater control over the final appearance and affordability of their work.
Subsequent sections will elaborate on the materials, tools, and techniques required for completing such projects, providing a practical guide for interested individuals. Considerations regarding design choices and mounting methods will also be addressed.
Essential Considerations for Canvas Support Construction
The following constitutes a collection of pivotal guidelines to ensure a robust and aesthetically pleasing result when undertaking the creation of a perimeter to enhance artwork.
Tip 1: Material Selection: Prioritize kiln-dried wood to minimize warping or twisting over time. Pine or fir are commonly used due to their workability and cost-effectiveness. Ensure the wood is straight and free from knots that could compromise structural integrity.
Tip 2: Accurate Measurement and Cutting: Precise measurements of the stretched canvas are paramount. Employ a miter saw or hand saw with a miter box to achieve accurate 45-degree angles for seamless corner joints. Inaccurate cuts will result in a misaligned finished product.
Tip 3: Secure Corner Assembly: Utilize wood glue in conjunction with corner clamps or a nail gun to secure the corners. Allow the glue to dry completely before proceeding to the next step. Consider using corner braces for added reinforcement, especially for larger canvases.
Tip 4: Canvas Attachment Strategy: Choose an appropriate method for attaching the border to the canvas. Options include using staples, brad nails, or adhesive. Ensure the attachment method is strong enough to hold the canvas securely without damaging the artwork. Position the border so that the canvas edges are neatly concealed.
Tip 5: Surface Preparation and Finishing: Sand the constructed border smooth to remove any rough edges or splinters. Apply a primer to prepare the surface for paint or stain. Select a finish that complements the artwork and the surrounding environment. Several coats may be required for durability.
Tip 6: Consider Adding a Backing: For enhanced protection and stability, especially for larger pieces, consider adding a backing board. This will also help prevent dust and debris from accumulating on the back of the canvas.
By adhering to these principles, individuals can construct a professional-grade structure that enhances the presentation and longevity of their artwork.
The subsequent section will delve into advanced techniques and design considerations, catering to individuals seeking to refine their abilities further.
1. Precise Measurements
Accurate dimensional assessment is foundational to constructing a custom artwork enclosure. The internal dimensions of the structural support must precisely match the external dimensions of the stretched canvas. Deviations from accurate measurements will result in either an inability to fit the canvas within the frame, or a loose, unstable fit that compromises the artwork’s presentation and structural integrity. A real-world example illustrates this principle: a canvas measured at 24 inches by 36 inches necessitates an internal border dimension of the same size, allowing for seamless integration. Failure to adhere to this principle manifests as gaps, overlaps, or the need for forceful manipulation, potentially damaging the artwork.
The significance of precise measurements extends beyond the initial fit. Accurate corner cuts, facilitated by precise measurements, ensure a seamless mitered joint, enhancing the aesthetic appeal. Slight discrepancies in the angle or length of individual frame pieces accumulate, resulting in a visibly skewed or uneven structure. Further application extends to calculating material requirements; precise measurements minimize waste, reduce costs, and prevent the inconvenience of insufficient materials during the project. Consistent application of accurate measurement techniques yields a professional-quality result, maximizing the artwork’s visual impact and ensuring its long-term preservation. Improper measurements ripple into misalignment and instability of the whole project.
In summary, accurate dimensional assessment is not merely a preliminary step, but an integral component of the entire process. The impact of precise measurements extends from the initial construction phase to the final presentation of the artwork. Addressing this aspect diligently minimizes complications, conserves resources, and elevates the quality of the finished product. This foundational understanding is essential for achieving successful outcomes and mitigating potential challenges associated with crafting a custom artwork enclosure.
2. Wood selection
The choice of wood directly influences the structural integrity, longevity, and aesthetic appeal of a handcrafted artwork support. Different wood species exhibit varying degrees of strength, stability, and grain patterns, each affecting the final product differently. For example, softwoods like pine are easily workable and cost-effective, suitable for lighter canvases and applications where cost is a primary concern. However, pine’s inherent softness renders it susceptible to dents and warping over time, especially with larger canvases. Hardwoods such as oak or maple provide superior strength and resistance to warping, making them appropriate for larger, heavier canvases or environments demanding greater durability. The grain pattern of the wood also contributes to the overall visual impact; a prominent grain can enhance the rustic aesthetic, while a finer grain offers a more refined appearance.
Beyond the species itself, the preparation and condition of the wood are critical. Kiln-dried lumber minimizes moisture content, reducing the likelihood of warping, twisting, or cracking after construction. Straight, knot-free lumber ensures consistent strength and a smoother surface finish. The method of cutting also matters. Quarter-sawn lumber, for instance, is more dimensionally stable than plain-sawn lumber, though often more expensive. Consider the implications when framing a heavy or expensive canvas. A poorly chosen or prepared wood could lead to structural failure, damaging the artwork it’s intended to protect. The added investment in higher quality materials often mitigates these risks, safeguarding the artwork over the long term.
Ultimately, wood selection represents a crucial decision in crafting an artwork support. Balancing considerations of strength, stability, workability, cost, and aesthetic, the choice of material dictates the final result. Inadequate wood may compromise the artwork’s protection and visual appeal. Appropriate wood selection elevates the overall presentation, contributing to the artwork’s longevity and value. Therefore, thorough research and careful consideration are essential when undertaking the creation of a handcrafted support structure.
3. Corner Joinery
The intersection of woodworking techniques termed “corner joinery” constitutes a fundamental aspect of constructing a support structure for a stretched canvas. The integrity and aesthetic appeal of the enclosure hinge directly upon the selection and execution of appropriate joining methods.
- Miter Joints
Miter joints, characterized by angled cuts meeting at a precise point, create a visually seamless corner. This approach requires exacting precision in cutting and alignment. Imperfect miters result in visible gaps or unevenness, detracting from the overall appearance and potentially compromising structural stability. This technique is generally suited for experienced woodworkers with access to accurate cutting tools. A common application involves utilizing a miter saw to achieve consistent 45-degree angles, subsequently secured with wood glue and fasteners.
- Butt Joints
Butt joints, where two pieces of wood are joined end-to-side, represent a simpler alternative to miter joints. While easier to execute, butt joints inherently lack the same level of structural strength. Reinforcement is typically required, using methods such as adding corner braces or splines. This method may be preferable for beginners or smaller enclosures where aesthetics are less critical. One example involves joining the wood with glue and securing the joint with screws for additional strength.
- Lap Joints
Lap joints involve overlapping two pieces of wood, creating a strong and durable connection. This type of joint is often used for larger, heavier frames where structural integrity is paramount. Creating a lap joint requires removing material from both pieces of wood so they fit together flush. The resulting joint offers a substantial gluing surface and resistance to racking forces. An illustration might involve cutting a section from each piece of wood to create an overlapping joint, then adhering the joint with epoxy for greater durability.
- Dowel Joints
Dowel joints employ cylindrical pegs inserted into precisely drilled holes to align and reinforce the corner. This technique provides enhanced strength compared to butt joints while maintaining a clean aesthetic. Dowel joints require careful measurement and accurate drilling to ensure proper alignment and prevent weakening the wood. An example of dowel joint application is using a doweling jig to ensure accurate placement of dowel holes for precise alignment and reinforcement.
The selection of a particular corner joinery method significantly impacts the longevity and visual appeal of the support structure. Consideration must be given to the size and weight of the canvas, the skill level of the individual constructing the frame, and the desired aesthetic outcome. Proper execution of the chosen method is essential for creating a durable and visually pleasing finished product. The choice of joint represents a balance between strength, ease of construction, and visual appeal, contributing significantly to the success of the project.
4. Canvas attachment
The process of canvas attachment represents a critical stage in constructing a structure intended for artwork display. It constitutes the definitive connection between the artwork and the constructed support, directly influencing the visual presentation and long-term stability of the assembled piece. Improper execution of canvas attachment can lead to various issues, including sagging, misalignment, or even damage to the artwork itself. For example, if a canvas is secured too loosely within the support structure, environmental changes in humidity and temperature may cause the canvas to slacken over time, detracting from the overall visual impact. Conversely, overly tight attachment can create undue stress on the canvas, potentially leading to tears or distortions. Therefore, the selection of appropriate attachment methods and their precise application are essential components for successful completion.
Several methods exist for securing a canvas within its structure, each possessing distinct advantages and disadvantages. Staples are a common choice due to their ease of application and holding power. However, staples can be visually obtrusive and may not be suitable for delicate canvases. Brad nails offer a more discreet alternative, but their holding power may be less than that of staples. Adhesive methods provide a clean, seamless appearance, yet require careful selection of appropriate adhesives to prevent damage to the canvas or the structural material. The choice of attachment method should be carefully considered based on the type of canvas, the weight of the artwork, and the desired aesthetic outcome. The use of acid-free materials is also imperative to prevent long-term degradation of the canvas. This can be exemplified by the selection of stainless steel staples or pH-neutral adhesives for archival purposes.
In summary, the process of canvas attachment is not merely a perfunctory step, but a pivotal element in achieving a visually appealing and structurally sound outcome. Thorough consideration of attachment methods, coupled with precise execution, directly impacts the long-term preservation and aesthetic presentation of the artwork. Challenges may arise from the variability in canvas materials and structural designs, necessitating adaptable techniques and informed decision-making. The successful integration of canvas and support represents the culmination of the endeavor, reflecting a commitment to quality and craftsmanship.
5. Surface finishing
Surface finishing, in the context of handcrafted artwork enclosures, pertains to the processes applied to the exterior of the constructed structure to enhance both its aesthetic properties and its protective qualities. This aspect is crucial for achieving a professional-grade appearance and ensuring the longevity of the entire assembly.
- Aesthetic Enhancement
Surface finishing significantly impacts the visual appeal of the support. Techniques such as painting, staining, and varnishing can transform the appearance of the raw material, allowing it to complement the artwork it houses and blend seamlessly with the surrounding environment. For example, a dark stain applied to a wooden border can create a classic, sophisticated look, while a vibrant coat of paint can add a modern, artistic touch. The choice of finish can also accentuate the wood grain or create a smooth, uniform surface. Poor surface finishing detracts from the artwork’s presentation.
- Protective Barrier
Beyond aesthetics, surface finishing provides a protective barrier against environmental factors that can degrade the material over time. Sealants and topcoats shield the wood from moisture, UV radiation, and physical abrasions, preventing warping, fading, and scratches. For example, a marine-grade varnish applied to an enclosure constructed from wood helps protect it from the elements, extending its lifespan and preventing damage. Proper surface finishing minimizes the need for future repairs and maintenance. Improper or inadequate surface finishing expedites the degradation of the project.
- Material Compatibility
The selection of surface finishing materials must be compatible with the type of material used in construction. Different woods, metals, or composite materials require specific finishes to ensure proper adhesion, durability, and protection. For example, water-based paints adhere well to primed wood, while oil-based paints offer greater durability and resistance to moisture. Applying an incompatible finish can result in peeling, cracking, or discoloration, compromising both the appearance and the integrity of the surface. Appropriate material selection prevents damage.
- Application Techniques
The method of application plays a vital role in achieving a high-quality surface finish. Proper surface preparation, including sanding and priming, is essential for ensuring a smooth, even base. Techniques such as brushing, spraying, or wiping can be used to apply the finish, each offering different advantages in terms of coverage, texture, and efficiency. For example, spraying a finish provides a smooth, even coat, while brushing can create a more textured appearance. The skill and precision applied during the application process directly influence the final outcome, potentially requiring multiple coats and careful attention to detail. Proper tools and techniques will improve the outcome.
These facets highlight the importance of surface finishing in the realm of handcrafted enclosures. The choices made regarding materials, techniques, and application directly impact the aesthetics, protection, and longevity of the final product, and when done correctly, add significant value and extend the lifespan of both the enclosure and the artwork it protects.
Frequently Asked Questions
This section addresses frequently encountered inquiries concerning the design and construction of custom-made artwork supports. The provided information aims to clarify common points of confusion and offer practical guidance.
Question 1: What is the optimal wood type for constructing an artwork enclosure intended for long-term preservation?
Kiln-dried hardwood species, such as maple or oak, offer superior dimensional stability and resistance to warping compared to softwoods. This contributes significantly to the long-term structural integrity of the completed project.
Question 2: What considerations are paramount when selecting an adhesive for canvas attachment?
The selected adhesive should be pH-neutral and archival quality to prevent degradation of the canvas fibers over time. Acidic adhesives can cause irreversible damage.
Question 3: What tools are essential for achieving precise mitered corner joints?
A miter saw equipped with a sharp blade is highly recommended for achieving accurate 45-degree angles, which are crucial for seamless corner assembly. A miter box and hand saw represent a lower-cost alternative, though require greater manual dexterity.
Question 4: How can warping be minimized during the construction process?
Prior to construction, store lumber in a climate-controlled environment to acclimate it to the humidity levels of the intended display space. This practice helps to minimize warping and dimensional changes after assembly.
Question 5: Is it necessary to prime the structural support before applying a finish?
Priming is highly recommended to create a uniform surface for the finish to adhere to, improving its durability and aesthetic appearance. Primer also seals the wood, preventing the finish from being absorbed unevenly.
Question 6: What is the recommended method for attaching a canvas to a large-format artwork support?
For larger canvases, a combination of staples and adhesive may be necessary to ensure secure and even attachment. Distribute the staples evenly across the perimeter, and apply adhesive sparingly to avoid saturation of the canvas.
In summary, the careful selection of materials, precise execution of joinery techniques, and adherence to best practices for canvas attachment are essential for achieving a durable and visually appealing artwork support.
The concluding section will provide a comparative analysis of various construction methods, highlighting their respective strengths and weaknesses.
Conclusion
The preceding sections have explored the multifaceted nature of the DIY canvas frame, encompassing material selection, joinery techniques, canvas attachment methods, and surface finishing. Accurate dimensional assessment, combined with appropriate wood selection, ensures a structurally sound result. The choice of corner joinery impacts both the aesthetic and structural integrity, while secure canvas attachment guarantees long-term stability. Ultimately, surface finishing provides protection and visual enhancement.
The information presented serves as a resource for individuals seeking to undertake the creation of custom artwork enclosures. Informed decisions regarding materials and techniques will contribute to the construction of aesthetically pleasing and enduring display solutions, furthering the appreciation and preservation of artistic endeavors. Continued refinement of craftsmanship will lead to increasingly sophisticated and durable results.


