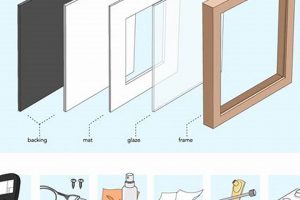
A structure designed to give the illusion that a canvas artwork is floating within its surrounding border. This framing method typically involves a narrow gap between the canvas edges and the frame, visually separating the art from its encasement and creating a distinct visual effect. As an example, consider a landscape painting seemingly suspended within a dark wooden border, highlighting its edges and depth.
This method provides a modern, minimalist aesthetic that enhances the artwork’s presentation without dominating it. The space around the canvas allows for appreciation of the artwork’s edges and texture, adding dimension and sophistication. Historically, framing emphasized ornate borders; this approach represents a shift toward simpler designs that prioritize the art itself.
The following sections will address the construction process, necessary materials, and considerations for achieving optimal results when building such a structure.
Construction Tips
The following guidelines offer valuable insights to ensure a professional and aesthetically pleasing result. These tips address crucial aspects of the building process, from material selection to final assembly.
Tip 1: Precise Measurement is Paramount: Accurate measurements of the canvas are essential. Ensure the frame dimensions accommodate the canvas without being overly tight or loose. A tolerance of approximately 1/8 inch between the canvas and frame is generally advisable.
Tip 2: Select Appropriate Wood: Choose wood that is straight, stable, and free of knots. Hardwoods such as poplar or maple offer durability and accept finishes well. Softwoods may be more susceptible to warping or damage.
Tip 3: Mitered Corners Enhance Aesthetics: Accurate 45-degree miter cuts are critical for creating seamless corners. Use a high-quality miter saw and consider a test cut on scrap wood to verify accuracy before cutting the frame pieces.
Tip 4: Adequate Canvas Support is Necessary: Employ offset clips or Z-clips to secure the canvas within the frame. Ensure these clips are strong enough to hold the canvas securely without damaging it. Position the clips evenly around the perimeter.
Tip 5: Account for the Reveal: The “reveal,” or the visible gap between the canvas edge and the frame, is a design element. A reveal of 1/4 to 3/8 inch is common, but individual preferences may vary. Maintain a consistent reveal around the entire canvas.
Tip 6: Pre-Finishing Components Simplifies Assembly: Finishing the frame pieces before assembly is often more efficient. Staining, painting, or sealing the wood before attaching the canvas reduces the risk of damaging the artwork.
Tip 7: Use Appropriate Hardware: Select screws or nails that are appropriately sized for the wood and canvas stretcher bars. Pre-drilling pilot holes prevents splitting, particularly when working with hardwoods.
Tip 8: Consider Adding Hanging Hardware: Attach D-rings or wire to the back of the frame to facilitate wall mounting. Ensure the hardware is securely fastened and capable of supporting the weight of the framed artwork.
Adhering to these guidelines will contribute to a structurally sound and visually appealing presentation that complements the artwork.
The subsequent section provides guidance on selecting suitable materials to begin construction.
1. Precise Measurements
Accurate dimensioning is paramount to the successful construction of a canvas presentation that yields the desired “floating” effect. Imprecise measurements can lead to misalignment, an unsatisfactory reveal, and structural instability, negating the intended aesthetic.
- Canvas Dimensionality Assessment
This entails meticulously measuring the canvas’s height, width, and depth. Deviations from squareness or consistent depth can introduce complexities in frame construction. An example is a canvas with a slight warp, necessitating adjustments to the frame to ensure even contact and prevent distortion. This impacts the final presentation.
- Internal Frame Allowance
The frame’s internal dimensions must precisely accommodate the canvas while allowing for a consistent reveal. Insufficient allowance creates a tight fit, potentially damaging the canvas edges. Excessive allowance results in an uneven reveal and compromises the illusion of the “floating” effect. For instance, a 1/8-inch allowance on all sides is a common practice to provide sufficient space without compromising the visual effect.
- Mitered Corner Accuracy
Accurate miter cuts are essential for seamless corners. Even a slight error in the 45-degree angle translates to a noticeable gap or misalignment at the joint. This affects the structural integrity and visual appeal. An example would be a 1-degree error on each miter, resulting in a 4-degree gap at the corner, a readily visible defect.
- Hardware Placement and Fit
Precise measurements are necessary for the correct placement of hardware used to secure the canvas within the frame. Misaligned hardware can cause uneven pressure on the canvas, leading to warping or damage. Moreover, improperly sized screws or brackets can compromise the frame’s structural integrity and the security of the mounted artwork. For example, Z-clips must be positioned to engage both the frame and stretcher bar without causing undue stress.
In conclusion, accurate measurements are not merely a preliminary step but an ongoing consideration throughout the entire fabrication process. Consistent attention to dimensioning ensures structural stability, aesthetic integrity, and ultimately, a visually compelling presentation of the canvas artwork.
2. Material Selection
The selection of appropriate materials is fundamental to the structural integrity, aesthetic quality, and longevity of a canvas presentation. The materials employed directly influence the frame’s ability to securely house the artwork while complementing its visual characteristics.
- Wood Species
The type of wood chosen impacts both the frame’s durability and its aesthetic properties. Hardwoods such as maple, oak, or walnut offer superior strength and resistance to warping, making them suitable for larger or heavier canvases. Softwoods like pine or fir are more economical but may require additional reinforcement or careful handling during construction. The grain pattern and natural color of the wood also contribute to the overall aesthetic. For instance, walnut provides a rich, dark tone that can complement certain artwork, while maple offers a lighter, more neutral option.
- Fasteners and Adhesives
The selection of appropriate fasteners and adhesives is critical for ensuring the structural integrity of the frame. Screws, nails, and wood glue must be compatible with the chosen wood species to prevent corrosion, splitting, or joint failure. High-quality wood glue, such as polyvinyl acetate (PVA), provides a strong, durable bond for mitered corners. Similarly, the use of appropriately sized and spaced screws ensures that the frame remains securely assembled over time. Using inappropriate materials can lead to structural weakness and eventual failure.
- Finishing Materials
The finishing materials applied to the frame protect the wood from moisture, UV damage, and wear, while also enhancing its aesthetic appeal. Stains, paints, varnishes, and sealers each offer different properties and visual effects. A clear varnish can protect the wood while allowing its natural grain to show through, while paint provides a uniform color and can be used to match or complement the artwork. Improperly applied or incompatible finishing materials can result in peeling, cracking, or discoloration, detracting from the overall presentation.
- Canvas Mounting Hardware
The hardware used to secure the canvas within the frame must be chosen carefully to prevent damage to the artwork and ensure a secure fit. Offset clips, Z-clips, or flexible tabs are commonly used to hold the canvas in place without applying excessive pressure. The material of the hardware, such as steel or aluminum, should be non-reactive to prevent corrosion or staining. The size and placement of the hardware must be precise to maintain a consistent reveal and prevent the canvas from shifting within the frame.
In summary, careful consideration of material selection is essential for creating a durable, aesthetically pleasing frame that effectively showcases the canvas artwork. The choice of wood, fasteners, adhesives, finishing materials, and mounting hardware all contribute to the frame’s overall quality and its ability to protect and enhance the presentation.
3. Miter Joint Accuracy
Miter joint accuracy represents a critical factor in the successful construction of a canvas presentation. Deviation from precise 45-degree angles at the corners directly impacts the structural integrity and aesthetic quality of the frame. Inaccuracies manifest as visible gaps or misalignments, disrupting the clean lines and perceived seamlessness characteristic of this style. The intended floating effect relies on consistent spacing between the canvas and the frame’s inner edges, which can be compromised by poorly executed miter joints. A practical example is evident in a scenario where one miter joint is even slightly off; the whole frame may present as non-rectangular, with the canvas failing to sit squarely, thus diminishing the artwork’s perceived value.
Practical application demands the use of precision tools, such as a high-quality miter saw equipped with a sharp blade. Implementing test cuts on scrap wood allows for verifying the saw’s accuracy and making necessary adjustments before committing to the final frame pieces. Furthermore, the use of clamping systems designed specifically for miter joints ensures consistent pressure during adhesive drying, minimizing the risk of joint slippage. Consideration should also be given to the wood’s inherent properties; hardwoods generally maintain miter angles more reliably than softer woods, thereby contributing to the frame’s long-term stability. As a related example, carefully sanding and filling slight imperfections will yield a professional-looking miter joint, despite wood’s natural inconsistencies.
In summary, miter joint accuracy serves as a linchpin in achieving the desired aesthetic and structural characteristics of a canvas presentation. Challenges in achieving precise angles can be mitigated through employing suitable tools, implementing careful techniques, and selecting appropriate materials. Attending to these details is crucial for realizing a visually appealing and structurally sound structure that effectively showcases the artwork.
4. Canvas Mounting Method
The method by which a canvas is secured within the framework is a critical determinant of the structural integrity and aesthetic outcome of a do-it-yourself presentation. The mounting approach directly impacts the stability of the artwork and the overall visual impression.
- Offset Clip Implementation
Offset clips represent a common securing mechanism, wherein metal or plastic clips are affixed to the frame’s inner perimeter, overlapping the canvas edges to maintain its position. This approach necessitates precise clip placement to ensure even pressure distribution, preventing canvas warping or distortion. A scenario involving an inadequately spaced clip array may result in visible bulging or unevenness, detracting from the artwork’s presentation.
- Z-Clip Utilization
Z-clips, characterized by their interlocking design, provide a robust means of attachment, particularly suitable for larger or heavier canvases. One portion of the clip is affixed to the frame, while the corresponding section is secured to the canvas stretcher bar. The interlocking mechanism offers enhanced stability and resistance to movement. Improper alignment of Z-clips can, however, hinder engagement or exert undue stress on the frame or canvas, necessitating meticulous installation.
- Flexible Tab Systems
Flexible tabs, typically constructed from bendable metal or plastic, offer a more forgiving approach to canvas mounting. These tabs allow for minor variations in canvas size or shape while maintaining a secure hold. The adaptability of flexible tabs can be advantageous when working with canvases that exhibit slight dimensional inconsistencies. Over-bending or stressing flexible tabs, however, may compromise their holding capacity, potentially leading to canvas slippage.
- Direct Screw Attachment (Limited Applicability)
While generally discouraged, direct screw attachment entails securing the canvas directly to the frame via screws passing through the stretcher bars. This method is most appropriate for smaller, lightweight canvases and necessitates careful screw selection to prevent splitting or damage to the wood. Overtightening screws can result in canvas distortion or frame cracking, requiring a delicate balance of force during installation. This approach should be reserved for specific situations where other methods are unsuitable.
In conclusion, the chosen canvas mounting method plays a pivotal role in the long-term stability and visual presentation of the framed artwork. Selecting an appropriate technique, coupled with meticulous execution, is essential for achieving a secure and aesthetically pleasing outcome.
5. Reveal Consistency
Reveal consistency serves as a critical element in achieving the desired aesthetic within the context of canvas presentations. This parameter, defined as the uniform gap between the canvas edge and the inner border, directly influences the perceived quality and visual appeal of the finished piece. Maintaining uniformity in this aspect underscores the intentional design, enhancing the floating effect and elevating the artwork’s presentation.
- Measurement Precision
Achieving uniformity necessitates meticulous measurement and execution throughout the building process. Inaccurate dimensioning or imprecise cuts can lead to variations in the gap, disrupting the visual harmony. Real-world examples include employing digital calipers for precise readings, verifying miter saw angles with a protractor, and utilizing spacer blocks during canvas mounting to ensure consistent edge distances. Deviations as small as 1/16 of an inch can be noticeable and detract from the intended effect.
- Material Stability
The dimensional stability of the materials employed contributes significantly to maintaining uniformity. Wood susceptible to warping or expansion can alter the reveal over time, compromising its initial consistency. Examples of mitigating strategies involve selecting kiln-dried hardwoods, applying sealant to minimize moisture absorption, and implementing robust joinery techniques to prevent frame distortion. A failure to address material stability can lead to unsightly gaps or canvas contact with the inner frame edges.
- Canvas Mounting Technique
The method by which the canvas is secured within the frame exerts a direct influence on the consistency of the reveal. Uneven pressure or misaligned mounting hardware can cause the canvas to shift or warp, disrupting the intended spacing. Techniques such as utilizing evenly spaced offset clips, employing a jig for accurate hardware placement, and ensuring uniform tension across the canvas can promote consistent spacing. Improper mounting can result in a non-uniform border, undermining the desired aesthetic.
- Environmental Control
Environmental factors, such as temperature and humidity, can affect both the canvas and framing materials, leading to variations in the reveal. Fluctuations in these conditions can cause expansion or contraction, altering the initial dimensions and disrupting the intended spacing. Examples of control measures include maintaining a stable climate within the display environment, using materials less susceptible to environmental changes, and allowing for expansion joints in the frame design. Neglecting environmental control can result in seasonal variations in the reveal, impacting the overall presentation.
In conclusion, maintaining uniformity requires a comprehensive approach that addresses measurement precision, material selection, mounting technique, and environmental control. By attending to these aspects, one can enhance the floating effect, elevating the overall aesthetic and perceived value of the presented artwork.
Frequently Asked Questions
The subsequent questions address common inquiries related to the fabrication and application of housings designed to provide a floating aesthetic for canvas artwork.
Question 1: What is the recommended gap, or reveal, between the canvas edge and the inner border?
The optimal gap generally ranges from 1/4 to 3/8 inch. This dimension provides sufficient visual separation to create the intended floating illusion without appearing excessively large or disproportionate to the artwork. Individual preferences may dictate variations within this range.
Question 2: What wood types are most suitable for constructing such housing?
Hardwoods such as maple, oak, or walnut offer superior durability and dimensional stability, making them well-suited for frames intended to house valuable artwork. Softwoods such as pine may be used, although additional care is required to prevent warping or damage.
Question 3: How does one ensure accurate miter joints for seamless corners?
Accurate miter joints necessitate the use of a high-quality miter saw equipped with a sharp blade. Test cuts on scrap wood should be performed to verify the saw’s accuracy before cutting the final frame pieces. Clamping systems designed specifically for miter joints can further ensure consistent pressure during adhesive drying.
Question 4: What is the recommended method for securing the canvas within the frame?
Offset clips or Z-clips are commonly employed to secure the canvas within the frame. These clips provide a secure hold without applying excessive pressure that could damage the artwork. Proper clip placement is essential to ensure even weight distribution and prevent canvas warping.
Question 5: How can warping or distortion of the frame be prevented over time?
Selecting dimensionally stable materials, applying sealant to minimize moisture absorption, and employing robust joinery techniques are all effective strategies for preventing warping or distortion. Maintaining a stable climate within the display environment can also mitigate these risks.
Question 6: What finishing options are suitable for enhancing the frame’s aesthetic and protecting the wood?
Stains, paints, varnishes, and sealers each offer different properties and visual effects. A clear varnish can protect the wood while allowing its natural grain to show through, while paint provides a uniform color and can be used to match or complement the artwork. The chosen finish should be compatible with the wood species and applied according to the manufacturer’s instructions.
Proper execution of these techniques ensures both structural integrity and aesthetic appeal, presenting artwork effectively. Prioritizing precision and material quality enhances durability and long-term satisfaction.
The subsequent section presents a detailed guide to the step-by-step construction process.
Conclusion
This exploration of the components and construction considerations demonstrates the multi-faceted nature of crafting a canvas presentation that offers the sought-after floating aesthetic. Adherence to precise measurements, careful material selection, and meticulous execution of joinery and mounting techniques are paramount for achieving a visually compelling and structurally sound outcome. The success of the project hinges on a comprehensive understanding of these critical elements.
Mastery of these principles equips individuals with the knowledge to effectively showcase their canvas artwork, enhancing its perceived value and artistic impact. Further investigation into advanced finishing techniques and alternative mounting methods may yield additional refinements and personalized adaptations, furthering the pursuit of superior artistic presentation.


