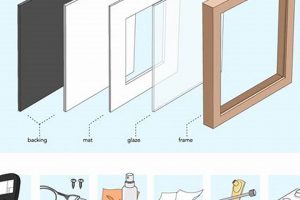
The creation of a borderless display for artwork, achieved through individual effort, involves constructing a structure that gives the illusion of the art “floating” within the frame. This effect is accomplished by spacing the artwork away from the inner edges of the frame, exposing the edges of the canvas or substrate. A common example is building a wooden frame where the artwork is attached from behind, creating a gap between the art and the frame’s inner border.
This method of framing offers several advantages, including enhancing the perceived depth of the artwork, providing a contemporary aesthetic, and offering a cost-effective alternative to professional framing services. Historically, framing served primarily to protect and elevate the status of artwork. This approach to framing builds upon that foundation but emphasizes visual appeal and creative expression for the framer.
The following sections will delve into the materials required, step-by-step instructions, and various techniques for accomplishing this specific framing project. Considerations will be given to wood selection, precise measurement, secure artwork mounting, and finishing touches that contribute to a professional final product.
Construction Recommendations
This section provides essential guidelines to ensure a structurally sound and aesthetically pleasing outcome for your framing endeavor. These recommendations address material selection, precision, and techniques crucial for achieving a professional-grade result.
Tip 1: Wood Selection Matters: Opt for hardwoods like poplar or maple for durability and a finer finish. Softwoods, such as pine, are acceptable for smaller frames or when a rustic appearance is desired, but may require more care during handling to prevent dents and scratches.
Tip 2: Accurate Measurement is Paramount: Meticulous measurements of the artwork are crucial. Allow for a consistent gap, typically 1/4 to 1/2 inch, between the artwork’s edges and the frame’s inner border to achieve the “floating” effect. This gap must be uniform on all sides.
Tip 3: Secure Artwork Mounting: Employ a robust mounting system. Z-clips, offset clips, or strategically placed wood screws driven from the back of the frame into the artwork’s support structure (e.g., stretcher bars for canvas) offer secure and concealed attachment. Avoid adhesives that may damage the artwork.
Tip 4: Miter Cuts for Professional Corners: Accurate 45-degree miter cuts are essential for creating tight, seamless corners. A miter saw or a high-quality miter box is highly recommended. Uneven corners detract from the overall quality of the finished frame.
Tip 5: Consider the Frame’s Depth: The depth of the frame should be sufficient to accommodate the thickness of the artwork plus the desired gap. A shallow frame may not adequately showcase the “floating” effect, while an excessively deep frame can appear disproportionate.
Tip 6: Finishing Enhances Durability: Apply a protective finish, such as varnish or lacquer, to the frame to protect the wood from moisture and scratches. A clear finish allows the natural wood grain to show through, while a painted finish offers a more contemporary look. Ensure the finish is fully cured before mounting the artwork.
Tip 7: Sanding for a Smooth Surface: Prior to finishing, thoroughly sand all surfaces of the frame to remove any imperfections and create a smooth surface. Progress through increasingly finer grits of sandpaper for optimal results. A smooth surface allows the finish to adhere evenly and enhances the overall appearance.
Adhering to these guidelines will enhance the structural integrity, aesthetic appeal, and longevity of the framing project. Precise execution and careful attention to detail are key to achieving a professional-looking result.
The following section will provide insights into troubleshooting common challenges encountered during the framing process, offering solutions to ensure a successful completion.
1. Wood Material Selection
The choice of wood fundamentally influences the structural integrity, aesthetic quality, and longevity of a completed framing project. In the context of a floating-style frame, material selection impacts the visibility of the frame itself, its ability to support the artwork securely, and the overall visual impression. The type of wood determines the frame’s resistance to warping, cracking, and insect damage, all of which directly affect the long-term stability and presentation of the framed artwork. For example, using a dimensionally unstable wood such as unseasoned pine can lead to frame distortion, compromising the desired “floating” effect as the artwork’s alignment shifts.
Hardwoods, like maple or walnut, offer superior strength and finer grain patterns, enabling smoother finishes and greater resistance to dents and scratches. This results in a higher-quality finished frame that enhances the perceived value of the artwork. Conversely, softwoods, while more affordable, may require additional preparation and care to achieve a comparable finish. Consider a scenario where a frame is constructed from reclaimed barn wood, the selection and treatment of the wood become paramount, emphasizing both aesthetic appeal and preventative measures against decay to maintain structural integrity and artistic value. The selection dictates the required tools, joinery techniques, and finishing applications. A hardwood necessitates precise miter cuts and robust fastening methods, whereas a softwood may benefit from reinforced corners and careful sanding to avoid splintering.
In summary, judicious wood selection is paramount to the success of creating a lasting and visually appealing presentation for artwork. Ignoring this critical aspect can lead to structural failures, aesthetic shortcomings, and a diminished appreciation of the framed piece. Therefore, thorough consideration of wood species’ characteristics, considering both its aesthetic contribution and structural performance, is indispensable for a successful floater frame construction.
2. Precise Dimensioning
Accurate measurement constitutes a foundational element in the successful execution of borderless art presentation. This framing style inherently relies on creating a visual gap between the artwork and the surrounding frame, requiring meticulous attention to dimensional accuracy. Deviations, even minor, can compromise the illusion of “floating,” resulting in an uneven or misaligned presentation. For instance, if the frame’s internal dimensions are not precisely matched to the artwork’s size, the art may either be too tightly constrained, negating the desired spacing, or too loosely fitted, leading to noticeable shifting within the frame. This accuracy directly impacts the aesthetic outcome and reflects on the craftsmanship of the framing endeavor.
The implications of dimensional inaccuracy extend beyond mere visual appeal. An improperly sized frame can exert undue pressure on the artwork, potentially causing damage over time, particularly with delicate or sensitive materials. Conversely, insufficient support can lead to warping or sagging of the artwork, especially in larger pieces. Practically, this understanding dictates the use of precise measuring tools, such as digital calipers and accurate rulers, as well as careful consideration of the artwork’s material properties and potential expansion or contraction due to environmental factors. For example, a canvas painting prepared in a high-humidity environment may shrink slightly when placed in a drier setting, necessitating a dimensionally adjusted frame construction.
In summary, meticulous dimensional accuracy is not merely a desirable attribute but an indispensable prerequisite for achieving professional results. The correlation between precise measurement and overall quality is direct and undeniable. Challenges associated with achieving this accuracy can be mitigated through careful planning, employing reliable tools, and a thorough understanding of the artwork’s characteristics and environmental sensitivities. The quality of the frame as a whole, and specifically the quality of the “float” effect, depends entirely on this level of precision.
3. Secure Artwork Mounting
In the context of creating borderless artwork presentations, the method of securing the artwork within the frame is of paramount importance. This process must ensure the artwork remains stable and undamaged while maintaining the aesthetic integrity of the presentation.
- Concealed Fastening Systems
Effective mounting techniques in a floating frame typically involve concealed fasteners, such as Z-clips or offset clips, attached to the back of the frame and the artwork’s support structure. This approach avoids visible hardware that could detract from the minimalist aesthetic. For example, using strategically placed screws through the frame’s backing into the stretcher bars of a canvas painting provides a secure hold without any visible fixings on the front or sides.
- Material Compatibility
The choice of mounting materials must be compatible with both the artwork and the frame. Acid-free materials are essential to prevent long-term degradation of the artwork. Similarly, the fasteners should not react with the frame’s finish or the artwork’s materials. An example of incompatibility would be using an adhesive that leaches into the canvas over time, causing discoloration or damage.
- Weight Distribution
Proper weight distribution is critical, particularly for larger or heavier artwork. Mounting points should be strategically placed to evenly distribute the weight across the frame, preventing warping or sagging. In cases where the artwork is significantly heavy, additional support may be needed in the form of internal bracing within the frame structure.
- Accessibility and Reversibility
While security is paramount, the mounting system should also allow for future access to the artwork if necessary. A reversable mounting method, such as using screws rather than permanent adhesives, allows for removal and reinstallation of the artwork without damage to either the art or the frame. This consideration is particularly important for valuable or fragile pieces that may require conservation or repair in the future.
These considerations underscore the critical role secure artwork mounting plays in the overall success of a borderless frame presentation. Neglecting these aspects can compromise the integrity and longevity of both the artwork and the frame. For instance, a failure in the mounting system could result in the artwork detaching from the frame, causing physical damage or detracting from the intended aesthetic effect.
4. Seamless Corner Joinery
The successful execution of a do-it-yourself borderless frame relies significantly on the quality of its corner joints. Seamless corner joinery is not merely an aesthetic preference; it is a structural necessity that directly affects the frame’s stability and visual presentation. Poorly executed corners diminish the intended effect of a professionally crafted piece, detracting from the artwork it houses. Gaps, misalignments, or visible fasteners at the corners immediately signal substandard craftsmanship, undermining the “floating” illusion central to the frame’s design. The structural integrity of the frame is compromised when the corners are weak. This can lead to warping or eventual separation, especially with larger frames or when subjected to environmental stress. Consider, for instance, a scenario where a frame constructed with inadequate corner joints begins to sag over time due to the weight of the artwork, losing its intended rectangular form and thereby distorting the displayed piece. The seamless joint construction of the floater frame is vital.
Achieving truly seamless corners typically involves precise miter cuts at a 45-degree angle, followed by secure joining methods. These methods can include the use of wood glue combined with clamping, the insertion of reinforcing elements such as splines or dowels, or specialized corner joining hardware. The selection of the joining method is influenced by the type of wood used, the size of the frame, and the desired level of durability. For example, hardwood frames frequently benefit from the added strength provided by splined miter joints, while softwood frames may suffice with glued and clamped miter joints, provided they are accurately cut and carefully assembled. The absence of appropriate support and attention to detail can impact the presentation of the artwork.
In summary, seamless corner joinery represents a critical element in the successful creation. It ensures structural integrity, contributes significantly to the frame’s aesthetic appeal, and ultimately enhances the presentation of the artwork. Overlooking this aspect compromises the final product, detracting from the intended visual effect and potentially shortening the frame’s lifespan. Therefore, mastering techniques for achieving seamless corner joints is an essential skill for anyone undertaking this type of framing project.
5. Durable Protective Finishing
The application of a durable protective finish represents a crucial stage in the creation of a DIY floater frame, directly impacting the frame’s longevity and aesthetic quality. Unfinished wood is susceptible to environmental factors such as moisture, ultraviolet radiation, and physical abrasion, leading to warping, discoloration, and surface damage. A protective finish mitigates these risks, preserving the frame’s structural integrity and visual appeal over time. For example, a frame constructed from softwood and left untreated would be prone to absorbing moisture, causing swelling and distortion that compromises the “floating” effect and potentially damages the artwork. The selection and application of the finish are therefore integral components of the overall construction process.
The choice of finish depends on several factors, including the type of wood, the desired aesthetic, and the anticipated environmental conditions. Polyurethane varnishes offer excellent resistance to moisture and abrasion, making them suitable for frames exposed to high humidity or frequent handling. Acrylic lacquers provide a clear, non-yellowing finish that enhances the natural color of the wood while offering UV protection. Oil-based finishes, such as tung oil or linseed oil, penetrate the wood, providing a subtle sheen and enhancing the wood grain, although they may require more frequent reapplication. Consider the scenario of a floater frame intended for display in a sunlit room; a finish with UV inhibitors would be essential to prevent fading or discoloration of both the frame and the artwork it contains. The practical application involves careful surface preparation, even application techniques, and appropriate drying times to ensure a uniform and durable protective layer.
In summary, durable protective finishing is not merely a cosmetic enhancement but a fundamental step in ensuring the long-term preservation of a do-it-yourself floater frame. By selecting and applying an appropriate finish, one can significantly extend the frame’s lifespan, protect it from environmental damage, and enhance its aesthetic appeal. While challenges may arise in selecting the right finish and applying it effectively, the benefits of a durable protective layer far outweigh the effort involved, making it an indispensable component of a well-crafted framing project.
Frequently Asked Questions
This section addresses common inquiries and misconceptions associated with constructing a borderless display structure for artwork independently. The following questions and answers aim to provide clarity and guidance on key aspects of this framing technique.
Question 1: What distinguishes a floater frame from a traditional frame?
The primary distinction lies in the visual presentation of the artwork. Traditional frames typically overlap the edges of the artwork, concealing a portion of the image. A floater frame, conversely, positions the artwork with a slight gap between the edge of the artwork and the frame’s inner border, creating the illusion that the art is “floating” within the frame.
Question 2: What type of artwork is most suitable for a floater frame?
Canvas paintings, stretched prints, and mounted panels are particularly well-suited for floater frames. These types of artwork possess a degree of rigidity that allows them to be securely mounted within the frame without visible supports. Works on paper or other flexible substrates may require additional mounting or backing to achieve the desired effect.
Question 3: Is specialized woodworking equipment required to construct this type of frame?
While access to specialized equipment such as a miter saw and a table saw can facilitate the construction process, it is possible to create a satisfactory floater frame using basic woodworking tools. A hand saw, miter box, drill, and clamps are essential for achieving accurate cuts and secure assembly.
Question 4: How is the artwork secured within the floater frame?
Artwork is typically secured from the rear using methods that do not obstruct the front of the piece. Z-clips, offset clips, or strategically placed screws driven through the frame into the artwork’s support structure provide concealed and secure attachment.
Question 5: What considerations should be made when selecting wood for the frame?
The choice of wood should take into account both aesthetic preferences and structural requirements. Hardwoods such as maple or walnut offer greater durability and a finer finish, while softwoods such as pine are more economical but may require additional care during handling and finishing.
Question 6: How does one ensure a consistent gap between the artwork and the frame?
Accurate measurement and careful alignment are crucial. Spacers or shims can be used during the mounting process to ensure a uniform gap around the perimeter of the artwork. This gap is typically between 1/4 and 1/2 inch, depending on the desired aesthetic.
In summary, creating a borderless artwork display structure necessitates attention to detail, precision in measurement and cutting, and careful selection of materials and mounting techniques. Addressing the considerations outlined above is crucial for achieving a professional and visually appealing final product.
The following section will provide advanced techniques and creative variations for floater frame construction, offering further insights for experienced craftspeople.
Conclusion
The preceding exploration of floater frame diy elucidates the essential aspects of crafting a visually striking and structurally sound borderless presentation for artwork. Key elements include precise material selection, meticulous dimensioning, secure artwork mounting, seamless corner joinery, and durable protective finishing. Adherence to these principles significantly influences the final result, enhancing the displayed artwork’s perceived value and longevity.
The pursuit of floater frame diy represents a commitment to craftsmanship and an appreciation for the nuanced presentation of artistic creations. Mastering these techniques empowers individuals to exercise greater control over the aesthetic outcome and to cultivate a deeper connection with their displayed artwork. The continued refinement of these skills will undoubtedly contribute to the evolution of innovative and visually compelling framing solutions.


