The practice involves constructing a border, typically rectangular, from timber to encase and display a photograph or other two-dimensional artwork. This handcrafted enclosure provides both aesthetic enhancement and physical protection for the displayed item. An example includes carefully mitering the corners of pine boards, joining them securely, and then inserting a cherished family photograph behind a protective layer of glass or acrylic.
The creation of bespoke presentation for visual media offers several advantages. It allows for personalization, enabling the crafter to select materials, dimensions, and finishes that complement the displayed artwork and the surrounding decor. Historically, creating these structures was a necessity, providing a means to showcase and preserve images. Today, it represents a blend of functionality and artistic expression, offering cost-effectiveness, creative satisfaction, and a tangible connection to the displayed piece.
The following sections will explore various techniques, design considerations, and practical tips for successful construction, addressing the entire process from material selection to finishing touches. Subsequent discussion will focus on specific methodologies employed in constructing these individual projects.
Construction Guidance
Effective construction requires meticulous planning and execution. The following guidelines offer insights into optimizing the build process for enhanced structural integrity and aesthetic appeal.
Tip 1: Material Selection: Prioritize the use of seasoned timber to minimize warping or cracking post-construction. Hardwoods, while more expensive, provide increased durability. Softwoods offer ease of workability. Proper selection ensures longevity.
Tip 2: Precise Measurement and Cutting: Accurate dimensions are crucial for seamless joinery. Utilize a high-quality miter saw or miter box to achieve precise 45-degree angles for corners. Inaccurate cuts compromise the overall structure and visual appeal.
Tip 3: Secure Joinery: Employ wood glue in conjunction with mechanical fasteners, such as brad nails or screws, to create strong and lasting bonds. Clamping the joined pieces during the glue-drying process is essential to maintain alignment and maximize adhesion.
Tip 4: Surface Preparation: Thorough sanding, beginning with coarse-grit sandpaper and progressing to finer grits, is vital for a smooth finish. Fill any imperfections with wood filler and sand flush to the surrounding surface. Surface preparation ensures a professional-looking final product.
Tip 5: Finishing Techniques: Apply multiple thin coats of finish, allowing each coat to dry completely before applying the next. Sand lightly between coats with fine-grit sandpaper for optimal smoothness. Consider the desired aesthetic and select a finish (stain, paint, varnish, lacquer) accordingly.
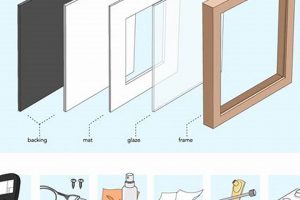
Tip 6: Securing the Artwork: Implement a reliable method for securing the artwork within the completed structure. Options include using flexible points, turn buttons, or acid-free tape to hold the artwork against a backing board. Ensure that the securing method does not damage the artwork.
Tip 7: Hardware Selection: Choose appropriate hanging hardware that complements the size and weight of the completed project. D-rings, sawtooth hangers, or wire are common options. Properly installed hardware ensures secure and stable wall mounting.
Adherence to these guidelines fosters a higher quality outcome and ensures the creation of structurally sound and visually appealing encasements for treasured visual media.
The subsequent discussion will address advanced techniques and creative embellishments, providing options for those seeking more complex designs.
1. Wood selection
The selection of timber profoundly influences the structural integrity, aesthetic appeal, and longevity of each hand-constructed border. The chosen material directly affects workability during construction, the texture and grain visible in the finished product, and its resistance to environmental factors such as humidity and temperature fluctuations. For example, opting for a softwood like pine facilitates easier cutting and shaping, making it suitable for beginners. However, pine’s inherent softness renders it susceptible to dents and scratches, potentially compromising the aesthetic over time. Conversely, hardwoods such as oak or maple, while demanding more precision during cutting and joinery, provide superior strength and resistance to wear, ensuring the finished product withstands the test of time.
Furthermore, the type of timber chosen impacts the overall visual presentation. Certain woods, like cherry or walnut, possess distinct grain patterns and rich natural colors that can enhance the displayed artwork without requiring extensive staining or painting. Others, such as poplar or basswood, exhibit a more neutral appearance, making them ideal for projects where a painted or heavily textured finish is desired. The cost considerations associated with different types of timber are also significant. Exotic hardwoods, while visually striking, often command a premium price, potentially increasing the overall cost. A practical application is considering how wood selection contributes to a personal aesthetic, such as a rustic piece using reclaimed wood, or a modern piece using maple to create a modern look.
In summary, the careful selection of lumber is a pivotal decision point in the construction process. It requires a balance between desired aesthetic characteristics, budget constraints, skill level, and intended environment. Neglecting the importance of material selection leads to compromised structural integrity, reduced longevity, and diminished visual impact. Thus, a thorough understanding of the properties of different timber types ensures a final product aligned with both functional and aesthetic expectations. The decision ultimately connects directly to the success of any individual effort.
2. Precise joinery
Precise joinery constitutes a fundamental pillar in the construction of wooden enclosures for images, directly impacting the structural integrity, aesthetic quality, and longevity. The accuracy with which individual components are joined determines the overall stability and visual appeal of the structure.
- Structural Stability and Longevity
Accurate joints, such as mitered corners or mortise and tenon joints, distribute stress evenly across the structure. This minimizes the risk of warping, cracking, or separation over time, particularly under environmental stresses like temperature and humidity fluctuations. Inaccurate joints, conversely, create weak points susceptible to failure. For example, poorly fitted mitered corners, even if initially glued and nailed, can gradually separate, compromising the rectangular form and allowing dust and moisture to penetrate, potentially damaging the displayed artwork.
- Aesthetic Appearance and Visual Harmony
Seamless transitions between individual pieces contribute significantly to the overall visual appeal. Precise cuts and alignments ensure clean lines and consistent angles, creating a sense of craftsmanship and attention to detail. Visible gaps or misalignments distract from the artwork being displayed and detract from the overall quality of the piece. An illustrative example is a frame where the corners do not meet perfectly, creating an uneven border. This not only looks unprofessional but also disrupts the visual flow, drawing attention away from the central image.
- Mitigating Material Waste and Optimizing Resource Utilization
Accurate measurements and precise cuts minimize material waste by reducing the likelihood of errors that necessitate recutting or discarding components. Efficient resource utilization not only reduces material costs but also aligns with environmentally conscious practices. For instance, if a piece is cut too short it can’t be re-used and goes to waste.
- Facilitating Accurate Assembly and Streamlining the Construction Process
Precise joinery simplifies the assembly process by ensuring that components fit together correctly without requiring excessive force or adjustments. This reduces the time and effort required for construction and minimizes the risk of damaging the materials during assembly. Well-executed joinery transforms the construction process from a struggle into a fluid and efficient operation. With good joinery, building wooden enclosures for images can be relatively painless with minimal effort.
In conclusion, precise joinery is not merely a technical requirement but a crucial element that dictates the success of a “diy wood picture frame” project. The emphasis on accuracy and attention to detail during the joinery phase translates directly into a superior finished product that showcases artwork effectively and endures the passage of time.
3. Surface preparation
Surface preparation is a critical stage in “diy wood picture frame” construction, directly influencing the quality and longevity of the final product. The process involves treating the wood to create a smooth, clean, and receptive surface for subsequent finishing, significantly affecting the aesthetic and protective qualities of the frame.
- Adhesion of Finishes
Proper preparation ensures optimal adhesion of stains, paints, varnishes, and other protective coatings. A sanded and cleaned surface provides a mechanical key for the finish, allowing it to bond effectively with the wood fibers. Failure to prepare the surface adequately results in poor adhesion, leading to peeling, cracking, or blistering of the finish over time. For example, applying a varnish to unsanded timber leads to uneven absorption and early degradation of the coating.
- Aesthetic Enhancement
Sanding removes imperfections such as scratches, dents, and raised grain, creating a smooth and uniform surface that enhances the visual appeal. The smoother the surface, the more evenly the finish is absorbed, resulting in a consistent color and sheen. Imperfections on the wood surface become amplified under a finish, detracting from the overall aesthetic. A well-prepared surface allows the natural grain of the wood to be highlighted, adding to the visual interest of the frame.
- Moisture Resistance
Surface preparation can improve the wood’s resistance to moisture absorption. Filling pores and sealing the surface with appropriate finishes creates a barrier that prevents water from penetrating the wood fibers, reducing the risk of warping, swelling, or rot. A properly sealed “diy wood picture frame” is less susceptible to damage from humidity, making it suitable for use in environments such as bathrooms or kitchens. Using wood filler to seal a knot in a wooden piece, is an example to ensure even finishing.
- Uniformity of Colour
Surface preparation ensures a more uniform uptake of colour. This is achieved when the timber piece is free of dust and sanded to an even surface. Without uniformity the applied colour may differ based on the density of the timber, and if there is dust present, the stain can react to create unwanted colour on the material.
In conclusion, surface preparation is not merely a preliminary step but an integral component of “diy wood picture frame” construction. This stage sets the foundation for a superior finish, enhances aesthetic appeal, and improves resistance to environmental factors, ultimately contributing to a longer-lasting and more visually pleasing outcome.
4. Finishing application
The finishing application represents a pivotal stage in “diy wood picture frame” construction, directly influencing both the aesthetic presentation and the protective qualities of the end product. The meticulous selection and execution of finishing techniques determine the frame’s visual appeal, its resistance to environmental degradation, and, ultimately, its longevity. An inadequate or improperly applied finish compromises the effort invested in material selection, joinery, and surface preparation, potentially leading to premature deterioration or an unappealing final appearance. For example, a frame intended for display in a high-humidity environment, such as a bathroom, requires a moisture-resistant finish to prevent warping and mildew growth. The absence of such a finish renders the frame susceptible to damage, regardless of the quality of the underlying construction.
Various finishing options exist, each offering distinct advantages and disadvantages. Staining enhances the natural grain of the wood, while painting provides a solid color coating, allowing for greater design versatility. Varnishes and lacquers offer durable, protective layers with varying levels of sheen. The selection of the appropriate finish depends on several factors, including the type of wood used, the desired aesthetic, and the intended environment. Furthermore, the application method significantly impacts the outcome. Multiple thin coats, applied evenly with proper drying time between applications, typically yield superior results compared to a single thick coat, which can lead to runs, drips, and uneven drying. Sanding between coats further enhances smoothness and adhesion, resulting in a professional-looking finish. For example, a “diy wood picture frame” crafted from reclaimed wood might benefit from a clear varnish to protect the wood while preserving its rustic character.
In conclusion, the finishing application is not merely a superficial step in “diy wood picture frame” creation. It is an integral process that contributes significantly to the frame’s overall value and durability. A carefully considered and expertly applied finish protects the wood from environmental damage, enhances its aesthetic appeal, and ensures that the frame effectively showcases the displayed artwork for years to come. The challenges related to choosing the right finish for a project and applying it using the best method, are significant factors to consider for a positive final outcome.
5. Hardware integration
Hardware integration represents a critical phase in the “diy wood picture frame” construction process, directly influencing functionality, stability, and the overall aesthetic. It encompasses the selection and secure attachment of various components that facilitate hanging, mounting, or otherwise supporting the frame and its contents. The type and quality of hardware, along with the precision of its installation, determine the load-bearing capacity, ease of use, and long-term durability. For instance, inadequate hanging hardware can result in the frame falling, potentially damaging both the frame and the artwork it contains. Conversely, thoughtfully chosen and properly installed hardware enhances the frame’s functionality and contributes to its refined appearance.
Practical considerations in hardware integration include selecting appropriate hangers (D-rings, sawtooth hangers, wire) based on the frame’s weight and size. Heavier frames necessitate stronger hardware and secure attachment points. The positioning of hangers is also crucial; incorrect placement can cause the frame to hang unevenly or put undue stress on specific points. Furthermore, the choice of hardware impacts the mounting method; frames intended for wall mounting require compatible hardware and secure wall anchors appropriate for the wall type (drywall, plaster, etc.). Securing the artwork within the frame also falls under hardware integration. Flexible points, turn buttons, or specialized retaining clips hold the artwork in place, preventing it from shifting or falling out. These components must be chosen to be compatible with the materials (glass, acrylic, backing board) and the thickness of the artwork package.
In summary, hardware integration is not merely an afterthought in “diy wood picture frame” construction. Rather, it is an integral component that requires careful planning and execution. The selection of appropriate hardware, proper installation techniques, and consideration of load-bearing capacity and mounting methods are all essential for creating a functional, stable, and aesthetically pleasing final product. A thorough understanding of hardware options and their applications ensures the longevity and safe display of cherished artwork. The successful outcome of any frame project is very reliant on good choices and careful application.
Frequently Asked Questions
This section addresses common inquiries and misconceptions regarding the construction of timber enclosures for displaying images, providing clarity on essential aspects and best practices.
Question 1: What type of wood is best suited for constructing picture frames?
The optimal choice depends on factors such as budget, desired aesthetic, and skill level. Softwoods like pine offer ease of workability and cost-effectiveness, but are susceptible to dents. Hardwoods such as oak or maple provide superior durability and a refined appearance. Consider the environmental conditions; hardwoods are better suited for rooms with higher levels of humidity.
Question 2: What tools are essential for building timber image frames?
Key tools include a miter saw or miter box for precise angle cuts, a measuring tape for accurate dimensions, wood glue and clamps for secure joinery, sandpaper for surface preparation, and a finish applicator (brush, spray gun) for applying protective coatings. Safety glasses and a dust mask are also essential for protection.
Question 3: How can corners be joined securely and aesthetically?
Mitered corners, cut at 45-degree angles, provide a seamless appearance. Strengthening the joint requires wood glue and mechanical fasteners (brad nails, screws). Clamping the corners during the glue-drying process is crucial to maintain alignment and ensure maximum adhesion. Alternatives include rabbet joints, which offer increased surface area for gluing.
Question 4: What steps are involved in surface preparation before finishing?
Surface preparation involves sanding the wood to remove imperfections and create a smooth surface. Begin with coarse-grit sandpaper and progress to finer grits. Fill any gaps or imperfections with wood filler, sand flush, and remove dust thoroughly before applying any finish. Failure to prepare the surface adequately results in uneven finish absorption and a compromised appearance.
Question 5: How is the artwork secured within the structure?
Methods include using flexible points, turn buttons, or acid-free tape to hold the artwork against a backing board (foam core, acid-free mat board). Ensure the chosen method does not damage the artwork. Sufficient depth in the frames rabbet (groove) is essential to accommodate the artwork, backing, and any glazing (glass or acrylic).
Question 6: What are common mistakes to avoid during construction?
Common errors include inaccurate measurements, resulting in ill-fitting corners; inadequate clamping during glue-drying; insufficient surface preparation, leading to a poor finish; and the use of inappropriate hanging hardware for the frame’s weight. Thorough planning, precise execution, and attention to detail are crucial to avoid these pitfalls.
This FAQ section provides essential knowledge for embarking on a “diy wood picture frame” project. Careful attention to these points fosters improved quality, reduced frustration, and a more satisfactory outcome.
The subsequent section will explore advanced techniques and design considerations for experienced crafters seeking to elevate their skills.
DIY Wood Picture Frame
This exploration has detailed the multifaceted process of creating handcrafted enclosures for visual media. From material selection and precise joinery to surface preparation, finishing application, and hardware integration, each stage demands meticulous attention to detail. The significance of each component, from the choice of timber to the method of securing the artwork, directly impacts the final product’s aesthetic quality, structural integrity, and long-term durability.
The practice extends beyond mere assembly; it embodies a commitment to craftsmanship and personalized expression. Prospective constructors should apply this knowledge judiciously, recognizing that the creation of these bespoke displays represents an investment in both the preservation of cherished images and the development of valuable skills. Continued exploration and refinement of these techniques promise to yield rewarding results for years to come.


