Creative projects involving the crafting of decorative panels from timber are increasingly popular. These projects empower individuals to personalize interior spaces with unique, handcrafted pieces. One can transform raw wood into visually appealing features for homes or offices using various techniques, finishes, and designs.
The benefits of such endeavors include cost savings compared to purchasing pre-made decor, promoting sustainable practices by utilizing reclaimed materials, and fostering personal expression through artistic creation. Historically, incorporating wood into interior design reflects a connection to nature and offers a warm, textured element to architectural spaces. This activity allows for artistic outlet and customization to specific aesthetic preferences.
The following sections will explore various methods and techniques for constructing timber-based decorations for walls, including preparation, design considerations, assembly strategies, and finishing touches. These practical instructions enable readers to realize their creative visions.
Essential Considerations for Wooden Wall Decor Projects
The creation of wooden wall ornamentation requires careful planning and execution. Attention to detail in material selection, design, and finishing ensures a professional and lasting result.
Tip 1: Prioritize Wood Selection: The choice of wood directly impacts the final aesthetic. Consider grain pattern, color, and texture. Softwoods like pine are easily workable but may require additional sealing. Hardwoods such as oak or maple offer durability and refined appearance but demand more specialized tools.
Tip 2: Accurate Measurement is Crucial: Precise measurements prevent material waste and ensure proper fit. Measure the wall space multiple times and account for any architectural irregularities. A laser level can assist in establishing a straight and accurate baseline.
Tip 3: Employ Proper Cutting Techniques: Clean, accurate cuts are essential for professional results. Utilize a miter saw for angled cuts and a table saw for ripping larger pieces. Always wear appropriate safety gear, including eye protection and hearing protection.
Tip 4: Secure and Concealed Fastening: Choose appropriate fasteners for the wood type and project design. Consider using pocket screws for concealed joinery or construction adhesive for seamless attachment. Ensure fasteners are countersunk and filled for a smooth, finished surface.
Tip 5: Sanding for a Flawless Finish: Thorough sanding is critical for achieving a smooth and uniform surface. Start with a coarser grit sandpaper (e.g., 80-grit) and gradually progress to finer grits (e.g., 220-grit) for a professional finish. Sand with the grain to avoid scratching.
Tip 6: Consider Finishing Options: The choice of finish protects the wood and enhances its natural beauty. Stain can add color and depth, while a clear coat of polyurethane or varnish provides durability and resistance to moisture. Apply multiple thin coats for optimal results.
Tip 7: Plan the Installation Method: Determine the best method for hanging the finished piece. Consider the weight of the item and the wall type. French cleats offer a secure and level hanging solution, while heavy-duty picture hangers are suitable for lighter pieces. Pre-drill pilot holes to prevent splitting the wood during installation.
These guidelines provide a foundation for successfully creating visually appealing and durable wooden wall adornments. Diligence in planning and execution translates directly to a high-quality final product.
The following sections will further elaborate on specific design possibilities and creative applications of wooden wall decor.
1. Material Selection
Material selection exerts a defining influence on the aesthetic quality, structural integrity, and longevity of timber-based wall decorations. The choice of wood species, its inherent characteristics (grain, color, density), and its condition (new, reclaimed) establish the foundation for the artistic expression and physical robustness of the final piece. For instance, using reclaimed barn wood, characterized by weathering and a rustic appearance, inherently introduces a vintage aesthetic to the project, impacting the overall design direction. Conversely, selecting a clear, knot-free hardwood such as maple allows for precise detailing and a more refined, contemporary look.
The structural properties of the chosen wood directly affect the artwork’s durability and suitability for specific applications. Softer woods, such as pine or cedar, are easier to work with and suitable for intricate carvings or lightweight wall hangings. However, they are more susceptible to dents and scratches. Hardwoods like oak, walnut, or cherry offer greater resistance to wear and tear, making them ideal for larger, more substantial pieces intended for high-traffic areas. The consideration of moisture content is also paramount. Wood that is not properly seasoned can warp or crack over time, compromising the structural integrity of the artwork. For example, using green wood in a frame may lead to joint separation and deformation as it dries.
Ultimately, a comprehensive understanding of wood characteristics and their impact on the final product is essential for successfully crafting timber-based wall ornamentation. A thoughtful material selection process not only elevates the artistic potential of the artwork but also ensures its long-term stability and visual appeal. Neglecting this critical stage can result in a piece that is structurally unsound, aesthetically displeasing, or prone to premature deterioration. The selection of appropriate finishes is equally important to preserve the chosen material and enhance its natural beauty.
2. Design Complexity
Design complexity significantly influences the execution and ultimate aesthetic outcome of timber-based wall adornments. The level of intricacy inherent in a design dictates the skills, tools, time investment, and material considerations required for successful completion. A project’s complexity must align with the craftsman’s abilities and available resources to achieve the desired result.
- Skill Level Requirements
Intricate designs, such as complex geometric patterns or detailed wood carvings, necessitate advanced woodworking skills. Precise cutting, joinery, and finishing techniques are paramount. Novice woodworkers may find simpler designs, like basic geometric shapes or abstract arrangements of wood pieces, more manageable and satisfying. The design should challenge but not overwhelm the individual’s capabilities.
- Tool and Equipment Needs
More complex designs often require specialized tools and equipment. For example, intricate carvings may necessitate the use of rotary tools with various bits, while elaborate joinery techniques may demand a router, tenon jig, or specialized hand tools. Simpler designs can often be executed with basic tools such as a saw, drill, and sandpaper. Access to the appropriate tools directly impacts the feasibility and efficiency of the project.
- Time Investment
The time required to complete a wooden wall art project is directly proportional to its design complexity. Intricate designs with numerous components, intricate details, and demanding finishing processes will naturally require a greater time commitment. Simpler designs can often be completed in a fraction of the time. Careful consideration of the time available is crucial for realistic project planning and prevents frustration due to unmet expectations.
- Material Waste and Cost
More complex designs, particularly those involving intricate cuts or unconventional shapes, often result in a higher degree of material waste. Precise cuts and intricate joinery can leave behind significant scrap material. The increased material consumption translates to higher project costs. Simpler designs with straightforward cuts and efficient material utilization minimize waste and reduce overall expenses. Balancing design ambition with budgetary constraints is essential.
In conclusion, the design’s complexity stands as a pivotal determinant in the feasibility, cost, and ultimately, the success of wooden wall adornment endeavors. A realistic assessment of skills, resources, and time availability, aligned with a carefully chosen design, paves the way for a satisfying and visually compelling outcome.
3. Construction Method
The selection of a construction method is pivotal in the creation of timber-based wall decorations. This choice directly influences the structural integrity, aesthetic characteristics, and longevity of the finished piece. The method employed determines how individual wood components are joined and secured, thereby impacting the overall stability and visual appearance. For instance, a simple butt joint, while straightforward to execute, provides minimal strength and is unsuitable for large or heavy pieces. Conversely, mortise-and-tenon joinery, a more complex technique, offers superior strength and durability, making it appropriate for weight-bearing structures within the artwork. The application of pocket-hole joinery facilitates concealed connections and is effective for assembling frames or panels where visible fasteners are undesirable. Therefore, the selected technique fundamentally shapes the outcome of the project.
Consider a scenario where an individual aims to construct a large-scale geometric panel consisting of numerous small wooden triangles. Employing a simple adhesive bonding method might appear efficient initially. However, without supplementary mechanical fasteners or a robust clamping process, the adhesive bond could fail over time, particularly in environments with fluctuating temperature or humidity. This would lead to panel delamination and eventual structural collapse. A more suitable approach would involve combining adhesive bonding with brad nails or small screws to provide additional mechanical reinforcement. Alternatively, creating a supporting framework to which the triangles are attached would distribute the load and enhance the panel’s stability. The choice between these approaches depends on the project’s scale, desired aesthetic, and the available resources.
The proper application of a construction method represents a critical factor influencing the success of timber-based wall decoration endeavors. Challenges often arise from inadequate joint preparation, improper fastener selection, or insufficient clamping pressure. Addressing these challenges requires a thorough understanding of woodworking principles and a meticulous approach to execution. By carefully considering the structural requirements, aesthetic preferences, and available tools, individuals can select and implement a construction method that ensures a durable, visually appealing, and long-lasting piece of wooden wall art. Neglecting this aspect can result in structural failure and diminished aesthetic value, ultimately undermining the project’s intended purpose.
4. Surface Treatment
Surface treatment represents a critical phase in the creation of timber-based wall decorations, directly impacting the artwork’s aesthetic qualities, durability, and overall longevity. The selection and application of a suitable surface treatment determine how the wood interacts with its environment, influencing resistance to moisture, UV radiation, scratches, and other forms of wear and tear. The choice of treatment depends on the type of wood used, the intended aesthetic, and the expected environmental conditions. For example, a piece crafted from reclaimed wood destined for an outdoor setting requires a robust sealant to prevent moisture absorption and decay. Conversely, an interior artwork made from hardwood may benefit from a more subtle oil finish to enhance the natural grain and color. Failure to apply an appropriate treatment can lead to premature degradation, discoloration, and structural instability, diminishing the artwork’s value and lifespan.
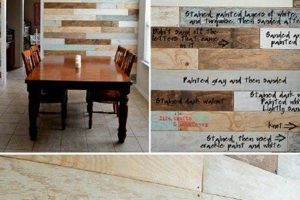
The impact of surface treatment extends beyond mere protection. It offers the opportunity to enhance the visual appeal of the wood, adding depth, richness, and character. Staining, for instance, allows for the introduction of color and highlights the wood grain, creating a distinct visual effect. Clear coats, such as varnish or lacquer, provide a protective layer while preserving the natural appearance of the wood. Techniques like distressing or antiquing can add a rustic or vintage aesthetic, further transforming the wood’s appearance. Consider a simple geometric pattern constructed from pine. Without a surface treatment, the pine may appear bland and unremarkable. However, the application of a dark stain followed by a light sanding can accentuate the grain and create a weathered look, adding visual interest and transforming the piece into a compelling work of art. The practical significance of this lies in the ability to tailor the artwork’s aesthetic to specific design preferences and complement the surrounding environment.
In summary, surface treatment is inextricably linked to the success of timber-based wall decoration projects. Challenges may arise from selecting an incompatible treatment, improper application techniques, or neglecting to adequately prepare the wood surface. However, with careful consideration and proper execution, surface treatment not only safeguards the artwork from environmental damage but also serves as a powerful tool for enhancing its aesthetic qualities and realizing the artist’s vision. The insights gained from understanding the interplay between surface treatment and material properties are crucial for achieving a lasting and visually appealing final product, contributing significantly to the overall value and appreciation of the artwork.
5. Installation Security
The enduring stability and safety of timber-based wall art projects hinge directly on robust installation security measures. Inadequate installation poses a significant risk of detachment, leading to potential damage to the artwork itself, the surrounding environment, and, more critically, possible injury to individuals. The weight and dimensions of the wooden piece, the structural integrity of the wall, and the chosen hanging method are all interdependent variables demanding careful assessment. For instance, a large, heavy wooden panel affixed to drywall solely with small nails represents a clear and present danger; the drywall’s limited load-bearing capacity will inevitably fail, resulting in the panel’s collapse. Selecting appropriate hanging hardware, such as heavy-duty picture hangers, French cleats, or Z-hangers designed to distribute weight effectively, is therefore paramount. Furthermore, ensuring that fasteners are securely anchored into wall studs or utilizing appropriate wall anchors is critical for providing a stable and reliable mounting. Thorough preparation and the application of sound engineering principles are not merely best practices but rather essential prerequisites for guaranteeing long-term installation integrity.
Practical application of secure installation techniques necessitates a comprehensive understanding of wall construction types. Drywall, plaster, and concrete each require distinct anchoring solutions. While drywall anchors can suffice for lightweight pieces, heavier artwork demands direct attachment to wall studs or the use of specialized concrete anchors. A real-world example underscores this point: consider a homeowner who installs a decorative wooden headboard using only drywall anchors, failing to locate the underlying studs. Over time, the repetitive stress of leaning against the headboard weakens the drywall, causing the anchors to pull out and the headboard to detach, potentially causing injury. This scenario highlights the practical importance of properly assessing the wall’s composition and selecting anchoring hardware accordingly. Furthermore, regular inspection of the installation hardware is recommended to identify any signs of loosening or deterioration, allowing for timely intervention and preventing potential accidents.
In conclusion, secure installation is not a mere afterthought but an integral component of successful timber-based wall art endeavors. Challenges such as accurately locating wall studs, selecting appropriate anchors for diverse wall types, and accounting for the artwork’s weight and dimensions can be effectively addressed through careful planning, diligent execution, and adherence to established safety standards. By prioritizing installation security, individuals can ensure the long-term stability, safety, and aesthetic enjoyment of their handcrafted wooden wall decorations, mitigating potential risks and maximizing the value of their creative efforts. This emphasis on safety complements the artistic expression, transforming the completed project into a source of enduring pride rather than a potential hazard.
Frequently Asked Questions
The following addresses common inquiries regarding the creation and implementation of timber-based decorative wall features. These answers are intended to provide clarity and promote successful project execution.
Question 1: What type of wood is most suitable for creating wall art?
The optimal wood choice depends on the desired aesthetic, structural requirements, and budget. Softwoods like pine are cost-effective and easy to work with but may require sealing. Hardwoods such as oak or maple offer superior durability and a refined appearance. Reclaimed wood provides a rustic aesthetic but may require extensive preparation.
Question 2: How does one prevent wood from warping after creating wall art?
Properly seasoned wood is essential. Ensure the wood has been dried to an appropriate moisture content for the intended environment. Applying a sealant or finish can also help to minimize moisture absorption and prevent warping. Consider using engineered wood products, such as plywood, which are less prone to warping than solid wood.
Question 3: What are the safest methods for cutting wood at home?
Always wear appropriate safety gear, including eye protection and hearing protection. Use sharp, well-maintained cutting tools. Secure the workpiece firmly before cutting. Employ a push stick when using a table saw. If using power tools, ensure they are properly grounded and that all safety guards are in place.
Question 4: How can one achieve a professional-looking finish on DIY wooden wall art?
Thorough sanding is crucial, starting with coarser grits and progressing to finer grits. Apply multiple thin coats of finish, allowing each coat to dry completely before applying the next. Consider using a high-quality brush or sprayer for even application. In between coats, lightly sand with a fine-grit sandpaper or steel wool.
Question 5: What are the most secure methods for hanging wooden wall art?
The hanging method depends on the weight and size of the artwork and the type of wall. French cleats offer a secure and level hanging solution for heavier pieces. Heavy-duty picture hangers are suitable for lighter items. Ensure fasteners are anchored into wall studs whenever possible. Use appropriate wall anchors for drywall or plaster.
Question 6: How does one clean and maintain wooden wall art?
Regular dusting with a soft cloth is generally sufficient. Avoid using harsh chemicals or abrasive cleaners, as these can damage the finish. For more stubborn dirt, use a damp cloth with a mild soap solution. Ensure the wood is thoroughly dried after cleaning. Consider applying a furniture polish or wax periodically to protect the finish.
Careful consideration of these questions promotes the successful creation and long-term preservation of appealing timber-based wall decorations. Prioritizing both safety and aesthetic considerations contributes to a satisfactory outcome.
The subsequent sections will explore diverse artistic styles and creative concepts within the domain of wooden wall decorations.
DIY Wooden Wall Art
The preceding discussion has explored various facets of diy wooden wall art, emphasizing material selection, design complexity, construction methods, surface treatments, and installation security. These elements are interdependent, and their careful consideration directly impacts the aesthetic appeal, structural integrity, and longevity of the finished product. Furthermore, adherence to safe practices is crucial throughout the entire process.
The creation of decorative timber panels represents a tangible avenue for personal expression and environmental consciousness. By embracing these techniques and principles, individuals can transform raw materials into enduring works of art, enriching interior spaces and fostering a deeper connection with the natural world. Continued exploration and refinement of these skills will undoubtedly yield innovative and impactful contributions to the realm of interior design.


