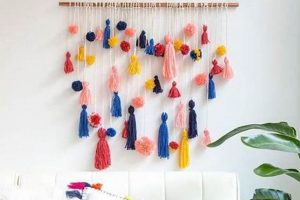
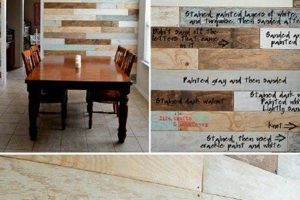
Creating dimensional surfaces on interior walls through individual artistic efforts introduces tactile and visual interest to living spaces. This form of decorative art involves the application of various materials and techniques to produce raised patterns, layered effects, or sculpted designs on a wall surface. Examples include using joint compound to create swirling patterns, applying fabric scraps for a layered effect, or sculpting plaster to form three-dimensional shapes.
The appeal of dimensional wall dcor stems from its ability to personalize environments, offering a unique alternative to conventional painting or wallpaper. It allows individuals to express creativity and tailor dcor to specific aesthetic preferences. Historically, textured wall treatments have been utilized across diverse cultures and periods, ranging from ancient plaster reliefs to modern applications of mixed media. The practice enhances visual appeal, adds depth, and can contribute to acoustic dampening within a room.
The following sections will delve into the array of materials suitable for this creative endeavor, explore various techniques for achieving desired effects, and provide guidance on the necessary preparations and execution steps to ensure a successful outcome. This will equip the reader with the knowledge to transform ordinary walls into personalized works of art.
Essential Considerations for Dimensional Wall Creation
Successfully integrating dimensional elements into interior wall design requires careful planning and execution. The following tips provide guidance on key aspects to consider before embarking on such a project.
Tip 1: Surface Preparation is Paramount: Ensure the wall surface is clean, dry, and free of loose paint or debris. Priming is generally recommended to provide a stable and receptive base for the applied textures.
Tip 2: Material Selection Aligns with Desired Aesthetic: Consider the desired texture and overall aesthetic when selecting materials. Joint compound, plaster, fabric, and textured paint each offer distinct visual and tactile properties.
Tip 3: Experimentation is Key: Before applying textures to the entire wall, conduct tests on a small, inconspicuous area or a separate board. This allows for refinement of techniques and assessment of the final appearance.
Tip 4: Layering Techniques Add Depth: Incorporate layering techniques to create more complex and visually intriguing textures. This can involve applying multiple layers of different materials or using varying application methods.
Tip 5: Tools Influence Texture: Utilize a range of tools, such as trowels, sponges, brushes, and stencils, to achieve diverse textural effects. Experiment with different tools to discover their impact on the final outcome.
Tip 6: Lighting Enhances Dimensionality: Consider the impact of lighting on the textured surface. Strategic lighting can accentuate the textures and create shadows that enhance the overall visual impact.
Tip 7: Sealing Protects and Preserves: After completing the texture application, consider applying a sealant to protect the surface and enhance its durability. This is particularly important in high-traffic areas or rooms with high humidity.
Adhering to these principles enhances the likelihood of achieving a visually appealing and durable dimensional wall treatment. Careful planning and skillful execution are essential for transforming a plain wall into a distinctive art feature.
The concluding section of this article will summarize the key steps involved in creating dimensional wall decor, offering a consolidated guide for successful implementation.
1. Material Selection
The selection of materials is a foundational element in the creation of dimensional wall art, directly influencing the texture, aesthetic, and longevity of the final artwork. Choices extend beyond mere aesthetic preference, necessitating consideration of application, adhesion, and environmental compatibility.
- Joint Compound and Plaster Varieties
Joint compound and plaster are versatile mediums, offering diverse textures from smooth to heavily textured. Lightweight joint compound is well-suited for subtle, low-relief designs. In contrast, heavier patching plasters allow for deeper sculpting and more pronounced three-dimensional effects. The selection hinges on the desired depth, intricacy, and structural requirements of the artwork.
- Textured Paints and Additives
Textured paints incorporate aggregates such as sand, silica, or polymers, providing an immediate textural base. Additives can be mixed into standard paints to create custom textures. These options are advantageous for their ease of application and ability to cover large areas efficiently. They are suitable for replicating uniform textures or subtle gradients across a wall surface.
- Fabric and Natural Fiber Integration
The incorporation of fabrics, paper, or natural fibers like burlap or sisal introduces tactile variation and visual interest. These materials can be adhered directly to the wall surface or incorporated into plaster or joint compound mixtures. The choice of fiber influences the overall aesthetic, ranging from rustic to refined. Considerations include the fabric’s weight, texture, and resistance to environmental factors.
- Recycled and Found Objects
The utilization of recycled materials such as cardboard, plastics, or found objects contributes to sustainable practices and unique aesthetic possibilities. These materials can be layered, assembled, and integrated into a textural composition. Their inherent textures and forms add character and dimension. Proper adhesion techniques and sealing are critical for ensuring longevity and preventing degradation of these unconventional materials.
The implications of material selection resonate throughout the entire creative process. Each material possesses distinct characteristics that demand specific handling techniques and influence the final artistic expression. The careful selection of appropriate materials, coupled with skillful application, is paramount for achieving impactful and enduring dimensional wall art.
2. Surface Preparation
Surface preparation constitutes a critical preliminary stage in the creation of dimensional wall art. It establishes the foundation upon which all subsequent textural applications depend, influencing adhesion, longevity, and the overall aesthetic quality of the finished piece. Inadequate preparation can lead to premature failure, compromised aesthetics, and wasted materials.
- Cleaning and Degreasing
The removal of surface contaminants, such as dust, grease, and grime, is essential for optimal adhesion. These contaminants can inhibit the bonding of textural materials to the wall, resulting in peeling, cracking, or uneven texture. For example, kitchen walls often require thorough degreasing prior to any application. Failure to clean the surface adequately can lead to visible imperfections and reduced durability.
- Repairing Imperfections
Addressing existing imperfections, including cracks, holes, and unevenness, ensures a uniform base for texturing. These flaws can distort the intended texture or create stress points that lead to cracking. Patching compounds are typically employed to fill holes and cracks, while sanding evens out irregularities. Neglecting these repairs can result in an unprofessional appearance and compromised structural integrity of the texture.
- Priming for Adhesion and Uniformity
The application of a primer serves multiple purposes: it enhances adhesion, seals porous surfaces, and creates a uniform color base. Primers formulated for specific materials, such as plaster or textured paint, are often recommended. Without priming, absorbent surfaces may unevenly draw moisture from the texturing material, leading to inconsistencies in color and texture. Proper priming establishes a stable and receptive surface, promoting optimal adhesion and visual uniformity.
- Sanding for Texture Enhancement
Light sanding may be necessary to create a mechanical key for better adhesion of textured materials, especially on glossy or previously painted surfaces. Sanding also helps to smooth out any minor imperfections that may have been missed during the initial repair phase. The grit of the sandpaper should be selected based on the surface and the texture of the material being applied. A smooth, slightly abraded surface provides an ideal canvas for creating dimensional wall art.
The interconnectedness of these preparation facets underscores their collective importance in the creation of successful dimensional wall art. Neglecting any single aspect can compromise the entire project. The meticulous attention to detail during surface preparation directly correlates with the final aesthetic quality, durability, and long-term performance of the textured wall surface.
3. Technique Proficiency
The successful execution of dimensional wall art is inextricably linked to the artisan’s proficiency in various application techniques. A mastery of these methods ensures that the intended design is realized with accuracy and visual appeal. Without adequate technique, even the most innovative concept can result in a lackluster or structurally unsound outcome.
- Troweling and Spatula Application
Troweling and spatula techniques are fundamental to applying plaster, joint compound, and other thick mediums. These methods involve spreading the material across the surface, creating textures through controlled pressure and movement. For instance, a skilled artisan can use a notched trowel to create uniform ridges, or a flexible spatula to sculpt smooth, undulating patterns. Imperfect troweling can lead to uneven texture and detract from the overall aesthetic.
- Stenciling and Patterning
Stenciling and patterning techniques allow for the precise replication of designs onto the wall surface. Stencils, either commercially produced or custom-made, guide the application of paint, plaster, or other materials to create repeating motifs or intricate images. Accurate stencil alignment and consistent application pressure are crucial for achieving clean, well-defined patterns. Sloppy stenciling results in blurred lines and diminished visual impact.
- Layering and Textural Build-Up
Layering techniques involve the sequential application of different materials or textures to create depth and visual complexity. This can include applying a base layer of textured paint, followed by sculpted plaster elements and finishing with metallic glazes. Each layer contributes to the overall effect, requiring careful consideration of color, texture, and adhesion. Poorly executed layering can lead to a muddy or disjointed appearance.
- Dry Brushing and Color Washing
Dry brushing and color washing are glazing techniques used to accentuate texture and add subtle color variations. Dry brushing involves applying a small amount of paint to a brush and lightly dragging it across the raised surfaces of the texture, highlighting the peaks and ridges. Color washing involves applying a diluted glaze over the entire surface, allowing it to settle into the crevices and create a soft, antiqued effect. Skilled application enhances the dimensionality of the wall art, while improper technique can obscure the texture or create an artificial appearance.
These techniques, when mastered, empower the artisan to translate their artistic vision into tangible form. The correlation between technical skill and the aesthetic quality of dimensional wall art is undeniable. Investing time in developing these proficiencies significantly enhances the potential for creating impactful and enduring works of art.
4. Color Palette
Color palette selection is a critical determinant in the success of dimensional wall art. The chosen colors influence the perception of depth, highlight textural nuances, and harmonize the artwork with the surrounding environment. A poorly conceived color scheme can diminish the impact of even the most skillfully executed texture, while a well-considered palette amplifies the visual interest and integrates the artwork seamlessly into the space. For example, a monochromatic palette applied to a deeply textured surface emphasizes the play of light and shadow, creating a sophisticated and understated effect. Conversely, contrasting colors applied sparingly can draw attention to specific textural elements, making them focal points within the composition.
The application of color to dimensional surfaces necessitates an understanding of how different hues interact with light and shadow. Lighter colors tend to accentuate raised areas and reflect more light, making textures appear more pronounced. Darker colors recede and absorb light, creating a sense of depth and highlighting recessed areas. The choice between matte and gloss finishes further influences the perception of texture; matte finishes minimize glare and allow the texture to be the primary focus, while gloss finishes reflect light and add a subtle sheen. An example is the application of a metallic glaze over a textured plaster wall, which enhances the dimensionality by reflecting light in a dynamic and visually engaging manner. Furthermore, the adjacent wall colors play a vital role; a neutral color allows the textured wall to stand out, and similar colors blend the textured wall into the broader setting.
In summary, the color palette is not merely an aesthetic consideration but an integral component that determines how texture is perceived and integrated into the environment. Careful consideration of color relationships, light interaction, and finish effects is essential for achieving a cohesive and impactful result. The selection of the right color palette is the key for dimensional wall art, and transforms it from being an afterthought into a centerpiece. Challenges arise when attempting to balance contrasting colors or to create subtle gradients, requiring a nuanced understanding of color theory and practical application techniques.
5. Design Complexity
The level of intricacy within a dimensional wall art project significantly influences the execution process and the ultimate visual impact. Increased complexity in design directly correlates with a greater demand for technical skill, material expertise, and time investment. For instance, a simple, uniformly textured wall using a single application of joint compound requires minimal planning and effort. Conversely, a complex design incorporating multiple layers, intricate patterns, and diverse materials necessitates careful pre-planning, precise execution, and a comprehensive understanding of the interplay between different textures and colors. Design complexity affects the project’s accessibility to individuals with varying levels of experience. Novice creators may find that undertaking ambitious, intricate designs leads to frustration and unsatisfactory results, whereas experienced artisans can leverage complexity to create truly unique and compelling wall art.
The determination of appropriate design complexity should consider the existing architectural features of the space. An overly complex design in a small or cluttered room may appear overwhelming, while a simpler texture can enhance the sense of spaciousness and harmony. Conversely, a large, minimalist space may benefit from a more intricate and visually engaging wall treatment to add character and visual interest. The practical application of this understanding involves a careful assessment of the space, the desired aesthetic, and the capabilities of the individual undertaking the project. For example, replicating a complex fractal pattern on a large wall necessitates advanced stenciling techniques, precise measurements, and a significant time commitment. Alternatively, creating a layered texture using a combination of natural materials, such as wood shavings and burlap, requires an understanding of material properties and adhesion techniques.
In conclusion, design complexity is a pivotal factor in dimensional wall art. The selection of appropriate design intricacy balances desired aesthetic outcomes with the available skillset, time investment, and spatial context. While complex designs offer opportunities for unique and impactful creations, they demand a higher degree of expertise and planning. The practical significance of understanding this relationship lies in the ability to make informed decisions, ensuring a rewarding and aesthetically pleasing outcome. The overall theme shows that a balanced consideration of design complexity is essential for successful dimensional wall art.
6. Application Consistency
The uniformity of material application is a paramount factor in the creation of successful dimensional wall art. Discrepancies in application can detract from the intended aesthetic, compromise structural integrity, and undermine the overall impact of the artwork.
- Uniform Material Distribution
Maintaining an even distribution of the chosen material is essential for achieving a visually balanced texture. Uneven distribution, whether it stems from variations in pressure, tool angle, or material viscosity, can result in a patchy or unbalanced appearance. For example, when applying joint compound with a trowel, consistent pressure and overlapping strokes are necessary to create a smooth, uniform surface. Inconsistency can lead to visible ridges or depressions, detracting from the overall aesthetic.
- Consistent Pattern Replication
For designs involving repeating patterns or stencils, maintaining consistency in replication is crucial. Accurate alignment, uniform application pressure, and precise tool control are necessary to ensure that each repetition mirrors the others. Deviations in pattern spacing, size, or texture can create visual dissonance and disrupt the intended flow of the design. An example is the use of a patterned roller to create a repeating texture. Overlapping the roller imprecisely or varying the pressure applied can result in a disjointed, uneven pattern.
- Controlled Layer Thickness
In multi-layered designs, maintaining consistent layer thicknesses is essential for achieving the desired depth and texture. Variations in layer thickness can create uneven shadows, disrupt the overall composition, and compromise the structural integrity of the artwork. For example, when applying multiple coats of textured paint, allowing each layer to dry completely and applying each coat with uniform thickness ensures a consistent and visually appealing result. Inconsistent application can lead to cracking or peeling of the paint.
- Standardized Tool Handling
The consistency of tool handling directly impacts the final texture and appearance of the wall art. Using the same tool at a consistent angle, with consistent pressure, and at a consistent speed ensures a uniform application. Varying these factors can result in inconsistencies in texture depth, pattern definition, and overall surface quality. As an example, using a brush to create a specific texture can be improved with a consistent angle and a steady hand.
Achieving application consistency in dimensional wall art requires practice, attention to detail, and a thorough understanding of the materials and techniques involved. The ability to maintain uniformity throughout the application process is a hallmark of skilled craftsmanship and contributes significantly to the creation of visually appealing and structurally sound wall art. The importance of the application is directly correlated with the overall outcome of the project and overall aesthetic appearance.
7. Sealing Durability
The application of a sealant to dimensional wall art is a critical step directly influencing its longevity and resistance to environmental factors. The absence of a protective sealant renders the textured surface vulnerable to damage from moisture, dust, and physical abrasion. This vulnerability results in accelerated degradation of the artwork, necessitating frequent repairs or premature replacement. For example, a textured wall in a high-humidity environment, such as a bathroom, is highly susceptible to mold growth and moisture damage if unsealed. The presence of a suitable sealant establishes a barrier against these elements, significantly extending the lifespan of the dimensional artwork.
Sealants designed for interior applications offer varying degrees of protection and aesthetic properties. Acrylic sealants provide a cost-effective solution for general protection against dust and light moisture. Polyurethane sealants offer enhanced durability and resistance to abrasion, making them suitable for high-traffic areas. Epoxy sealants provide superior chemical resistance and are ideal for applications requiring frequent cleaning. For instance, applying an epoxy sealant to a textured kitchen backsplash protects the surface from grease splatters and facilitates easy cleaning. The selection of an appropriate sealant should align with the specific environmental conditions and functional demands of the location where the dimensional wall art is installed. Ignoring sealant selection may lead to ineffective or premature degradation and thus, it is the most important task to consider before starting the project.
The selection and application of a suitable sealant is integral to the long-term preservation of dimensional wall art. It ensures the integrity of the textured surface and sustains its aesthetic appeal. The specific challenges associated with sealing textured surfaces stem from the uneven topography, which requires meticulous application to ensure complete coverage. In essence, sealing durability is an indispensable component of dimensional wall art, transforming it from a temporary embellishment into a lasting element of interior design. It helps to balance maintenance cost with aesthetic life of the project.
DIY Texture Wall Art
The following addresses common inquiries concerning the creation and maintenance of dimensional wall decor.
Question 1: What is the expected lifespan of DIY texture wall art?
The longevity of dimensional wall decor depends on several factors, including the materials used, the quality of application, and the environmental conditions. Properly sealed and maintained textures can last for many years, while those exposed to high humidity or physical abrasion may require more frequent repair or replacement. Surfaces created with high-quality materials, and properly sealed can last for more than 10 years.
Question 2: Is specialized expertise required to execute such a project?
While prior experience in art or construction can be beneficial, specialized expertise is not strictly necessary. Many dimensional wall art techniques are accessible to individuals with basic DIY skills. Careful planning, attention to detail, and a willingness to experiment are more critical than formal training.
Question 3: Can existing wall textures be modified or built upon?
Existing wall textures can indeed be modified or built upon, provided the existing surface is structurally sound and properly prepared. It is crucial to assess the adhesion and integrity of the existing texture before applying new materials. Priming the existing surface can improve adhesion and create a uniform base for the new design.
Question 4: What are the primary challenges encountered during the creation process?
Common challenges include achieving consistent texture, preventing cracking or peeling, and ensuring proper adhesion of materials. Thorough surface preparation, careful material selection, and adherence to recommended application techniques can minimize these issues. Time management, and proper planning are also the key to avoid additional expenses or project failure.
Question 5: How is dimensional wall art properly cleaned and maintained?
Cleaning methods depend on the type of texture and sealant used. Generally, gentle dusting or vacuuming with a soft brush attachment is sufficient for routine maintenance. For more thorough cleaning, a damp cloth and mild detergent can be used, provided the sealant is water-resistant. Abrasive cleaners should be avoided.
Question 6: What is the approximate cost associated with DIY texture wall art?
The cost varies widely depending on the materials used, the size of the wall, and the complexity of the design. Simple textures using inexpensive materials can be created for a relatively low cost, while more elaborate designs involving specialized materials and tools can be significantly more expensive. Planning and cost-benefit analysis are key to budget management.
In summary, dimensional wall decor offers a unique opportunity for personalization and artistic expression. A successful project hinges on careful planning, skillful execution, and ongoing maintenance.
The subsequent section will provide a comprehensive list of materials and tools required for a variety of dimensional wall art techniques.
Conclusion
This exploration has illuminated the multifaceted nature of diy texture wall art, encompassing material selection, surface preparation, technique proficiency, color palette, design complexity, application consistency, and sealing durability. These elements are interconnected and collectively determine the visual impact and longevity of the final artwork. A thorough understanding of each factor empowers individuals to transform ordinary walls into personalized expressions of artistic vision.
As interior design trends evolve, the enduring appeal of dimensional surfaces remains evident. The potential to create unique, tactile experiences within living spaces ensures the continued relevance of diy texture wall art. Continued experimentation with new materials and techniques will undoubtedly expand the possibilities of this creative endeavor, offering endless opportunities for innovation and self-expression.


