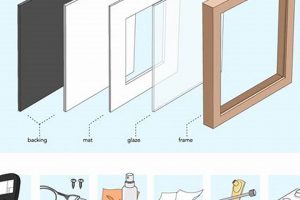
A custom border, crafted for photo enclosures, provides both aesthetic enhancement and protective spacing between the image and the frame. This border, often made from acid-free paper or board, helps prevent deterioration of the photograph over time. An example involves cutting a precisely sized opening in a piece of decorative cardstock, then layering it over a photograph before placing both within a picture frame.
The significance of such a border lies in its ability to draw the viewer’s attention to the artwork or photograph while also safeguarding it from potential damage caused by direct contact with the glass or acrylic of the frame. Historically, these borders have been utilized in art preservation, offering a visual separation that elevates the perceived value and professional presentation of the enclosed image. These are often a cost-effective and personalized solution for showcasing memories and artwork.
The following sections will delve into the tools and techniques required for constructing personalized borders, explore the various materials suitable for this craft, and outline a step-by-step process for achieving professional-looking results.
Essential Construction Guidelines
Achieving a professional and lasting result requires careful planning and execution. The subsequent advice offers insights for creating aesthetically pleasing and archival-quality borders for framed images.
Tip 1: Material Selection: Opt for acid-free and lignin-free boards to prevent discoloration and degradation of the enclosed image over time. Conservation-grade options are available for preserving valuable artwork.
Tip 2: Precise Measurement: Accurate dimensions are crucial. Measure the photograph and the inside of the frame precisely, accounting for overlap. Ensure the opening is slightly smaller than the photograph to prevent it from slipping.
Tip 3: Cutting Tools: A dedicated mat cutter with a 45-degree bevel blade ensures clean, professional edges. A self-healing cutting mat provides a stable and protective surface.
Tip 4: Bevel Angle: The standard bevel cut adds depth and visual appeal. Maintain a consistent angle throughout the cut for a uniform appearance.
Tip 5: Corner Alignment: Perfect right-angle corners contribute significantly to the overall quality. Use a T-square or set square to ensure accurate alignment during cutting.
Tip 6: Surface Protection: Handle materials with clean hands or wear gloves to prevent fingerprints and smudges, which can detract from the final presentation.
Tip 7: Backing Board Integration: Consider incorporating a backing board behind the image for added support and stability within the frame. Choose a backing board that is also acid-free.
Tip 8: Securing the Image: Use acid-free hinging tape to attach the photograph to the backing board. This reversible method secures the image without causing damage.
Adhering to these recommendations will improve the quality and longevity of displayed artwork and photographic prints, offering a refined presentation for any framed piece.
The following section provides a detailed, step-by-step process for creating a visually appealing and professionally finished product.
1. Materials
The selection of materials critically influences both the aesthetic appeal and the archival quality of a crafted border for picture frames. The materials used directly determine the longevity of the artwork being framed and the overall visual presentation. For instance, using acidic cardboard can cause discoloration and deterioration of a photograph over time, negating the purpose of framing as a means of preservation. Conversely, employing acid-free alpha-cellulose board, a common material for conservation framing, mitigates this risk and ensures the photograph remains pristine for extended periods. The choice of material extends beyond the core board to include adhesives, tapes, and any decorative elements applied; each component must be considered for its archival properties.
Beyond preservation, the chosen materials contribute significantly to the visual character of the framed piece. A textured fabric border can add tactile depth and complement certain artwork styles, while a smooth, white border can provide a clean, minimalist look. Color considerations are also paramount; a border color that clashes with the artwork can detract from its impact, whereas a carefully selected hue can enhance the piece and draw the viewer’s eye. Practical applications range from utilizing reclaimed wood for a rustic aesthetic to employing specialized decorative papers to match interior design themes. These examples highlight the breadth of creative options available when considering material selection.
In summary, the appropriate selection of materials is not merely a superficial consideration but a fundamental determinant of both the aesthetic and archival success of a custom picture frame border. Overlooking the material’s composition and its potential effects on the artwork can lead to long-term damage and a compromised presentation. By understanding the specific properties of various materials and their compatibility with the framed piece, individuals can achieve professional results that both protect and enhance their treasured images.
2. Measurement
Precise measurement is foundational to the successful creation of a custom border for a picture frame. Inaccurate dimensions can lead to a border that either overwhelms the artwork due to excessive size or fails to adequately frame it, diminishing its visual impact. Measurement errors frequently result in gaps between the border and the frame or the border and the artwork, compromising the overall aesthetic. A practical example is miscalculating the size of the opening, which can cause the artwork to either be partially obscured or to slip behind the border, rendering the entire piece unusable. The cascading effect of inaccurate measurement underscores its crucial role in ensuring a professional-quality finish.
Effective measurement requires understanding the specific dimensions of the artwork and the interior of the picture frame. These measurements must account for the desired overlap of the border onto the artwork, typically a quarter to half inch, to secure the image. Furthermore, variations in frame dimensions necessitate careful consideration; seemingly identical frames can exhibit slight differences, requiring individual measurement. A common challenge arises when dealing with irregularly shaped artwork, demanding meticulous attention to detail to ensure a balanced and visually appealing final product. Real-world scenarios, such as framing antique photographs or unique art pieces, highlight the importance of precise measurements and adaptations to accommodate non-standard sizes.
In summary, accurate measurement is not merely a preliminary step but an integral component of crafting custom borders for picture frames. Its influence extends from the structural integrity to the aesthetic appeal of the finished product. Challenges associated with inaccurate measurement can be mitigated through careful planning, precise execution, and a thorough understanding of the interplay between the artwork, the border, and the frame. Consequently, mastery of measurement techniques is essential for anyone seeking to produce professional-quality and visually compelling framed artwork.
3. Cutting
The process of cutting is fundamental to the creation of a custom border for picture frames. Precise cuts directly influence the aesthetic appeal and functional integrity of the finished product. Inadequate cutting techniques can result in uneven edges, mismatched corners, and an overall unprofessional appearance, diminishing the visual impact of the artwork. For example, a border with ragged edges or uneven bevels can distract the viewer and detract from the artwork’s inherent qualities. Therefore, the quality of the cut directly correlates to the quality of the finished border.
The tools used for cutting are integral to achieving professional results. A dedicated mat cutter, equipped with a sharp blade and a guide rail, facilitates accurate and consistent cuts. The use of a self-healing cutting mat provides a stable surface and prevents damage to the underlying work area. Furthermore, understanding the appropriate cutting techniques for different materials, such as paper, cardstock, or fabric, is essential. For instance, applying excessive pressure when cutting thin paper can cause tearing, while insufficient pressure when cutting thicker board can result in incomplete cuts. Specialized techniques, like creating a beveled edge, enhance the border’s visual depth and require specific tools and expertise.
In summary, cutting represents a critical phase in the creation of custom borders. The skill and precision employed during this phase directly influence the final product’s appearance and functionality. Challenges related to cutting can be addressed through the use of appropriate tools, the application of correct techniques, and a thorough understanding of the material properties. Mastery of cutting techniques is, therefore, indispensable for achieving professional-quality and visually appealing framed artwork, providing the proper visual effect.
4. Assembly
The assembly stage represents the culmination of planning, measurement, and cutting in the creation of a custom border for picture frames. It is during this phase that individual components are integrated to form a cohesive and functional unit, directly impacting the overall presentation and preservation of the enclosed artwork.
- Layering and Alignment
The correct layering sequence is critical. The artwork, custom border, and backing board must be assembled in the correct order to protect the image and ensure proper presentation. Accurate alignment prevents visual distortion and maintains a professional appearance. Misalignment can result in uneven borders or portions of the artwork being obscured.
- Securing the Artwork
Acid-free hinging tape is typically employed to secure the artwork to the backing board. This method ensures that the artwork remains in place without causing damage over time. Incorrect tape placement or the use of non-archival tape can lead to deterioration or discoloration of the artwork. Ensuring the image is fixed, but can be removed without damage, is the goal.
- Frame Integration
The assembled unit, comprising the artwork, border, and backing board, must be seamlessly integrated into the picture frame. The dimensions of the border must precisely match the frame’s interior dimensions to prevent movement or gaps. Improper fit can compromise the structural integrity of the assembled piece and detract from its aesthetic appeal.
- Dust and Debris Control
Maintaining a clean work environment is essential during assembly to prevent dust and debris from becoming trapped between the artwork, border, and glass or acrylic. Contamination can diminish the clarity of the image and introduce unsightly imperfections. Proper cleaning and handling techniques minimize the risk of contamination.
These facets of assembly, when executed meticulously, ensure that a border is not only visually appealing but also provides lasting protection for the enclosed artwork. Careful attention to detail during this stage elevates the final product from a simple collection of materials to a professionally crafted and enduring display piece.
5. Aesthetics
Aesthetics, in the context of custom-made borders for picture frames, encompasses the principles governing the visual appeal and artistic merit of the finished product. The aesthetic considerations influence the viewer’s perception of the artwork and the overall harmony of the display.
- Color Harmony
The selection of border colors plays a crucial role in aesthetic harmony. Complementary or analogous color schemes can enhance the artwork’s existing palette, while contrasting colors can create a focal point. An example includes using a neutral-toned border for a vibrant painting to avoid overwhelming the visual impact. Conversely, a brightly colored border may invigorate a monochromatic print. The color choice should support the image without competing with it.
- Proportional Balance
The width of the border affects the perceived balance of the framed piece. A border that is too wide can dwarf the artwork, while one that is too narrow may appear insignificant. The appropriate width depends on the size and complexity of the artwork, as well as the dimensions of the frame. A larger image typically requires a wider border to maintain visual equilibrium.
- Texture and Materiality
The texture and material of the border contribute to its overall aesthetic character. Smooth, matte surfaces offer a clean and understated look, while textured or patterned materials can add depth and visual interest. Fabric-covered borders can introduce a tactile element, while metallic finishes can create a sense of luxury or formality. Material selection must align with the artwork’s style and the intended presentation.
- Bevel and Depth
The presence and angle of a beveled edge on the border contribute to the visual depth and dimension of the framed piece. A beveled edge creates a subtle shadow line, which can enhance the artwork’s perceived depth and draw the viewer’s eye inward. The angle of the bevel influences the intensity of the shadow line and the overall aesthetic effect.
These aesthetic elements, when thoughtfully considered, contribute significantly to the overall success of any custom border project. They demonstrate that the creation of a border is not merely a functional exercise but an artistic endeavor that requires a nuanced understanding of visual principles.
6. Preservation
The construction of custom borders for picture frames offers a direct pathway to artwork preservation. Materials selected, such as acid-free boards and archival-quality adhesives, directly influence the longevity of the encased image. Acidic components within traditional borders can leach into photographs or artwork over time, causing discoloration, embrittlement, and eventual degradation. The use of appropriate materials mitigates this risk, providing a stable environment that protects the image from chemical damage. For instance, employing lignin-free conservation board avoids the yellowing often observed with standard cardboard, thereby extending the lifespan of the artwork.
Effective preservation also extends to physical protection. A properly constructed border creates a buffer between the artwork and the glazing, preventing direct contact that can lead to sticking, moisture damage, or surface abrasions. Furthermore, the backing board, when properly secured, provides rigid support, minimizing warping or bending of the artwork over time. An example is utilizing a vapor-permeable backing to allow for minor humidity fluctuations without trapping moisture against the artwork, reducing the risk of mold growth. Sealing the back of the frame further protects the artwork from environmental pollutants and insects. These actions offer a tangible barrier against environmental factors that could compromise the artwork.
In summary, the creation of custom borders for picture frames offers both aesthetic enhancement and active preservation of artwork. The selection of archival-quality materials and the implementation of proper assembly techniques directly contribute to the long-term stability and protection of the encased image. A border constructed with an emphasis on preservation safeguards the artwork from chemical degradation, physical damage, and environmental pollutants, ensuring its continued enjoyment and value for generations to come.
Frequently Asked Questions
This section addresses common inquiries regarding the creation and utilization of custom borders for picture frames, providing clarification on various aspects of the process.
Question 1: What specific materials are recommended for ensuring archival quality in a custom border?
Acid-free and lignin-free boards, specifically those labeled as conservation-grade, are recommended. Adhesives and hinging tapes should also be acid-free to prevent deterioration of the artwork over time.
Question 2: What tools are essential for achieving clean and precise cuts when creating a border?
A dedicated mat cutter with a sharp, replaceable blade and a guide rail is essential. A self-healing cutting mat provides a stable surface and protects the underlying work area. A metal ruler or T-square assists in maintaining straight lines.
Question 3: How can the potential for moisture damage to artwork within a framed piece be minimized?
Employing a vapor-permeable backing board allows for minor humidity fluctuations without trapping moisture against the artwork. Sealing the back of the frame can further protect against environmental moisture.
Question 4: What is the recommended method for securing artwork within a frame without causing damage?
Acid-free hinging tape should be used to attach the artwork to the backing board. This method is reversible and minimizes the risk of damage compared to permanent adhesives.
Question 5: How is the appropriate width of a border determined for a given piece of artwork?
The border width should be proportional to the size and complexity of the artwork. Larger or more complex pieces typically benefit from wider borders. The goal is to achieve visual balance without overwhelming the artwork.
Question 6: What steps can be taken to prevent dust and debris from accumulating within the framed piece?
Work in a clean environment and use compressed air to remove any dust particles from the artwork and border prior to assembly. Handle materials with clean hands or wear gloves to avoid transferring oils or debris.
These answers offer insights into achieving professional-quality results and ensuring the longevity of framed artwork. Attention to detail and the use of appropriate materials and techniques are paramount.
The subsequent section provides a summary of the critical steps involved in crafting custom borders, reinforcing the key principles outlined throughout this article.
diy picture frame mat
This exploration has elucidated the multifaceted nature of creating a “diy picture frame mat”. From the critical selection of archival-quality materials to the precision required in measurement and cutting, each stage contributes to both the aesthetic presentation and the long-term protection of enclosed artwork. Meticulous assembly and a keen understanding of visual balance are paramount to achieving professional results.
The diligent application of these principles ensures not only an enhanced visual experience but also the safeguarding of treasured images for future generations. Consideration of these factors transcends mere craftsmanship, representing a commitment to the enduring value of art and memory.


