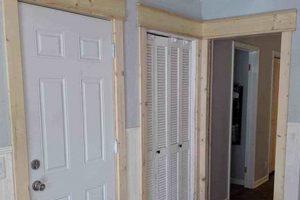
The practice of installing decorative molding around doorways is a common home improvement project. This endeavor involves selecting, cutting, and affixing various trim pieces to enhance the aesthetic appeal of an entryway. For instance, a homeowner might choose to add a casing, baseboard, and head molding to frame a door, thereby creating a more polished and refined look.
Properly executed doorway molding provides numerous advantages. Beyond visual enhancement, it can conceal gaps between the door frame and the wall, offering a more finished appearance. Historically, such applications have been valued for their ability to add character and architectural detail to otherwise plain spaces, reflecting evolving design trends and personal preferences.
The subsequent sections will delve into the specific tools, materials, and techniques required for successful execution of this task, including accurate measurement, precise cutting angles, and secure installation methods.
Doorway Molding Installation Guidance
Effective doorway molding installation requires meticulous planning and execution. The following guidelines aim to facilitate a successful outcome.
Tip 1: Precise Measurement is Paramount. Accuracy in measurement is critical for achieving seamless joints and a professional finish. Double-check all dimensions before commencing any cuts to minimize material waste and ensure proper fit.
Tip 2: Select Appropriate Materials. Choose trim materials that complement the existing aesthetic of the space. Consider factors such as moisture resistance, paintability, and durability when making material selections.
Tip 3: Employ Proper Cutting Techniques. Utilize a miter saw to create accurate angled cuts. Ensure the saw blade is sharp and the cutting angle is precise to avoid gaps or misalignments at the joints.
Tip 4: Secure Attachment is Essential. Use construction adhesive in conjunction with finishing nails to firmly affix the trim to the door frame and wall. This combination provides both immediate hold and long-term stability.
Tip 5: Fill Nail Holes and Seams. Apply wood filler to conceal nail holes and seams. Sand the filler smooth after it dries to create a uniform surface ready for painting or staining.
Tip 6: Apply Caulk for a Seamless Finish. Apply a bead of paintable caulk along all edges where the trim meets the wall and door frame. This fills any remaining gaps and provides a clean, professional look.
These guidelines, when adhered to, can improve the quality and longevity of door trim installations, enhancing both the aesthetic appeal and value of the dwelling.
The final segment of this document will cover common pitfalls and troubleshooting advice for addressing frequent problems that may occur during installation.
1. Material Selection
The selection of materials is a foundational element in the process of installing door trim. This choice has a direct effect on the project’s overall aesthetic, durability, and cost-effectiveness. For example, medium-density fiberboard (MDF) is a common selection due to its affordability, consistent surface, and ease of paint application. However, its susceptibility to moisture damage limits its suitability in high-humidity environments such as bathrooms. Conversely, solid wood, like pine or oak, offers increased resistance to moisture and greater structural integrity, but it commands a higher price point and may require more specialized tools for cutting and shaping.
Consideration must be given to the existing architectural style of the structure. In older homes, using historically accurate wood profiles may be desirable to maintain authenticity. Alternatively, in modern constructions, simpler, cleaner lines achieved with materials like primed finger-jointed pine may be preferred. The weight of the chosen material also influences the selection of fasteners; heavier materials require stronger nails and adhesive to ensure secure attachment. Furthermore, the material’s compatibility with paint or stain dictates the finishing process. Proper surface preparation is crucial to ensure optimal adhesion and a lasting finish.
In summary, material selection is not merely a preliminary step, but rather an integrated component that influences every aspect of a doorway molding installation. Challenges may arise from balancing budgetary constraints with aesthetic preferences and functional requirements. By carefully evaluating the properties of various materials and their compatibility with the intended application, successful outcomes and durable results are more readily achievable. Understanding this interrelationship contributes significantly to a successful and long-lasting trim installation.
2. Precise Measurements
Accurate dimensions are paramount when undertaking doorway molding projects. Without meticulous attention to detail in the measurement phase, the subsequent stages of cutting and installation are compromised, often leading to unsatisfactory results.
- Mitigation of Material Waste
Precise measurements directly curtail material waste. Inaccurate measurements frequently necessitate recutting, resulting in the disposal of unusable trim pieces. By obtaining accurate dimensions initially, one minimizes the potential for costly errors and promotes efficient resource utilization.
- Ensuring Flush Joints
Properly measured trim pieces ensure flush and seamless joints. Ill-fitting joints detract from the overall aesthetic and can compromise the structural integrity of the trim assembly. Accuracy in measurement enables the creation of tight, professional-looking joints that enhance the appearance of the doorway.
- Facilitating Efficient Installation
Accurate measurements expedite the installation process. Trim pieces that are correctly sized based on precise dimensions require minimal adjustments during installation. This translates to reduced labor time and effort, as well as a lower risk of damage to the surrounding surfaces.
- Adherence to Design Specifications
Exact measurements are indispensable to comply with design specifications. Should the intention be to replicate an existing trim detail, precise replication of those dimensions and angles is crucial. Failure to accurately capture these dimensions leads to deviations from the original design, compromising the authenticity of the trim work.
The consequences of neglecting dimensional accuracy in doorway molding installations extend beyond mere aesthetic considerations. Material waste, compromised structural integrity, and inefficient labor utilization are all potential outcomes of imprecise measurements. Consequently, investment in the initial measurement phase is a fundamental prerequisite for any successful doorway molding endeavor.
3. Miter Saw Accuracy
The precision attainable with a miter saw directly influences the quality and professional appearance of doorway molding installations. Accurate cuts are indispensable for creating tight-fitting joints and visually appealing trim work.
- Joint Integrity and Aesthetics
Precise miter saw cuts result in seamless joints, eliminating gaps and irregularities. These gaps not only detract from the aesthetic appeal of the molding but can also compromise its structural integrity and provide entry points for moisture. Accuracy in cutting angles ensures that the trim pieces align perfectly, creating a clean and polished look.
- Efficient Material Utilization
Miter saw accuracy minimizes material waste. When cuts are imprecise, additional material is required to correct errors, leading to increased costs and inefficient use of resources. A saw that provides accurate angles reduces the need for recuts and ensures that each piece of molding is utilized effectively.
- Consistent Angle Replication
Miter saws with precise angle settings facilitate the consistent replication of angles, which is particularly important when installing multiple trim pieces or when matching existing trim work. Consistent angles ensure that the trim maintains a uniform appearance throughout the doorway.
- Impact on Installation Time
A miter saw that consistently delivers accurate cuts reduces installation time. Less time is spent correcting errors and making adjustments, allowing for a faster and more efficient installation process. The resulting time savings are particularly valuable in large projects involving multiple doorways.
The correlation between miter saw accuracy and the overall success of doorway molding installation is significant. Investment in a quality miter saw and meticulous attention to angle settings directly translate to improved aesthetics, reduced material waste, and enhanced efficiency throughout the project. This relationship underscores the importance of selecting and utilizing a miter saw that provides the necessary level of precision for achieving professional-grade results.
4. Secure Attachment
The stability and longevity of doorway molding are directly contingent upon the effectiveness of its attachment to the underlying structure. Secure attachment is not merely a procedural step, but a critical element that ensures the trim remains aesthetically pleasing and functionally sound over time.
- Fastener Selection and Application
The appropriate selection and application of fasteners, such as nails and screws, are paramount for secure attachment. The type of fastener should correspond to the material of both the molding and the substrate, ensuring adequate grip and preventing premature failure. For instance, using finish nails alone on heavier trim may result in loosening over time, whereas the addition of construction adhesive or longer screws driven into studs can significantly enhance stability.
- Adhesive Compatibility and Coverage
Construction adhesive plays a vital role in supplementing mechanical fasteners. Selecting an adhesive compatible with the trim material and substrate is essential for achieving a strong, durable bond. Even coverage of the adhesive on the trim’s back surface maximizes contact area and ensures uniform distribution of stress, mitigating the risk of localized detachment.
- Substrate Preparation for Adhesion
Proper preparation of the substrate is critical for achieving optimal adhesion. Removing dust, debris, and loose paint or wallpaper creates a clean surface that promotes a strong bond between the adhesive and the substrate. Sanding glossy surfaces can also improve adhesion by increasing surface roughness.
- Addressing Environmental Factors
Environmental factors, such as humidity and temperature fluctuations, can influence the long-term performance of doorway molding attachments. In environments with high humidity, using moisture-resistant adhesives and corrosion-resistant fasteners can prevent premature degradation and ensure the trim remains securely attached.
The integration of these considerations into the doorway molding installation process contributes significantly to the creation of a robust and enduring finished product. By prioritizing secure attachment techniques, potential issues such as loosening, warping, and detachment can be minimized, resulting in a aesthetically pleasing outcome that withstands the test of time.
5. Finishing Details
Finishing details represent the culmination of a doorway molding installation, contributing significantly to the overall aesthetic and perceived quality of the project. These final steps, often involving concealing imperfections and creating seamless transitions, transform a functional installation into a polished and professional-looking feature. For example, neglecting to fill nail holes or caulk gaps can result in a visually unappealing result, detracting from the effort invested in the preceding stages. The careful execution of these details is thus a critical factor in the success of the undertaking.
Specific tasks categorized as finishing details include filling nail holes with wood filler, sanding surfaces to create a smooth and uniform texture, applying caulk along seams to bridge gaps between the trim and adjacent surfaces, and applying paint or stain to enhance the trim’s appearance and protect it from environmental factors. Each of these tasks contributes to the overall impression of the installation. A real-world example is evident in comparing two identical installations, one with meticulous attention to finishing details and one without; the former exhibits a refined and complete appearance, while the latter appears incomplete and amateurish. The practical significance lies in the fact that even high-quality materials and expert cutting can be undermined by neglecting these final steps.
Ultimately, the investment in time and resources dedicated to finishing details represents a critical component of a successful doorway molding project. While challenges may arise in achieving flawless results, particularly for inexperienced individuals, the resulting improvement in aesthetics and perceived value justifies the effort. Recognition of the importance of these details, and dedicated execution of each step, serves to transform a simple installation into a sophisticated and enduring architectural element.
DIY Door Trim
This section addresses common inquiries regarding the installation of doorway molding. The intent is to provide clear and concise answers based on established best practices.
Question 1: Is specialized expertise required for undertaking such an installation?
While specialized expertise is not strictly mandatory, a fundamental understanding of carpentry principles and the ability to operate power tools, such as a miter saw, are beneficial. Novices are advised to initiate installation on less conspicuous doorways.
Question 2: What is the optimal method for determining the quantity of trim required?
Accurate measurement of the doorway opening is crucial. Add the lengths of the three sides to be trimmed, accounting for the mitered corners. Purchase additional material (approximately 10%) to accommodate potential errors during cutting.
Question 3: Which type of adhesive is most suitable for securing trim to the door frame?
Construction adhesive specifically designed for bonding wood or MDF to various surfaces is recommended. Ensure the adhesive is compatible with the trim material and the substrate to which it will be attached.
Question 4: How is a seamless transition between trim pieces achieved?
Miter cuts at a 45-degree angle are employed to join trim pieces at corners. Precision is paramount. A tight joint can be further enhanced by applying wood glue before fastening the pieces.
Question 5: What is the appropriate method for concealing nail holes in the trim?
Wood filler formulated to match the color of the trim is utilized. Overfill the hole slightly, allow it to dry completely, and then sand it smooth with fine-grit sandpaper.
Question 6: How is the trim protected from moisture damage, especially in bathrooms?
Priming and painting or sealing the trim with a moisture-resistant coating is essential. Employing trim materials inherently resistant to moisture, such as PVC, may also be considered.
In summary, while doorway molding installation can be accomplished by individuals with basic carpentry skills, meticulous attention to detail and adherence to established techniques are vital for achieving a professional-quality result.
The subsequent section will present advanced techniques and design considerations for customized doorway molding.
Conclusion
This document has provided a comprehensive overview of the “diy door trim” endeavor, encompassing material selection, measurement accuracy, cutting techniques, secure attachment methods, and finishing details. The successful execution of these elements is critical for achieving a professional and aesthetically pleasing outcome.
Competent and accurate execution contributes significantly to the enhancement of interior spaces and the preservation of property value. Continued adherence to best practices and ongoing refinement of skills will ensure lasting results and sustained satisfaction.


