The concept involves creating a protective and aesthetically pleasing barrier around a bathtub using materials and skills possessed by the homeowner. This typically encompasses projects ranging from installing tile or prefabricated panels to more creative solutions utilizing reclaimed wood or waterproofed beadboard. The primary goal is to prevent water damage to surrounding walls and floors while enhancing the bathroom’s overall appearance.
Such endeavors offer several advantages. Cost savings are a significant motivator, as professional installation can be expensive. Personalization is another key benefit; individuals can customize the material, color, and design to match their specific tastes and bathroom dcor. Historically, homeowners have sought cost-effective and personalized solutions for home improvement, leading to the widespread adoption of this type of project. The longevity of the materials selected directly correlates to the overall durability and performance.
Various options are available for accomplishing this type of project. Subsequent sections will discuss material selection, installation techniques, waterproofing methods, and design considerations to aid in achieving a successful and long-lasting result.
Essential Guidance for Constructing a Tub Surround
The following provides essential guidance for those undertaking a project involving the construction of a barrier around a bathtub.
Tip 1: Precise Measurement is Critical: Accurately measure the dimensions of the bathtub and surrounding walls. This ensures proper material acquisition and minimizes the risk of waste or the need for extensive alterations.
Tip 2: Prioritize Waterproofing: Apply a robust waterproofing membrane to the walls before installing any surface material. Neglecting this step can result in water damage, mold growth, and costly repairs in the future. Consider using a liquid membrane or waterproof drywall.
Tip 3: Select Moisture-Resistant Materials: Opt for materials specifically designed for wet environments. Tile, acrylic, and certain types of PVC panels are suitable choices. Avoid using porous materials like untreated wood or standard drywall.
Tip 4: Proper Ventilation is Imperative: Ensure adequate ventilation within the bathroom. A properly functioning exhaust fan will reduce moisture buildup and prolong the lifespan of the installation. Use the exhaust fan during and after showering.
Tip 5: Account for Expansion and Contraction: Incorporate expansion joints, particularly when using tile. Temperature fluctuations can cause materials to expand and contract, leading to cracks and structural issues if expansion is not accommodated.
Tip 6: Ensure Level and Plumb Installation: Use a level to ensure all surfaces are plumb and level. A level substrate is essential for proper tile adhesion and a professional-looking finished product. Correct any imperfections in the underlying walls before proceeding.
Tip 7: Use Appropriate Adhesives and Sealants: Select adhesives and sealants specifically formulated for wet environments. Use a high-quality mildew-resistant caulk along seams and edges to prevent water penetration.
These critical considerations will greatly contribute to the longevity, functionality, and aesthetic appeal of the installed barrier.
The subsequent segment will address common pitfalls and provide solutions for troubleshooting potential challenges.
1. Waterproof Material Selection
Waterproof material selection is a foundational element within the scope of creating a barrier for bathtubs oneself. It directly impacts the longevity, structural integrity, and healthiness of the bathroom environment. Failure to select appropriate materials can result in water damage to underlying structures, fostering mold growth and compromising the air quality. For example, utilizing standard drywall instead of cement board as a substrate for tiling exposes the wall to moisture ingress, eventually leading to deterioration and necessitating costly repairs.
The correlation between the chosen material and its ability to resist water penetration dictates the overall success. Acrylic panels, porcelain tile, and fiberglass are common choices known for their non-porous nature. When utilizing tile, the selection extends to the grout, which must also possess waterproof qualities or be treated with a sealant to prevent water absorption. An improper selection may manifest as discoloration of the grout or tiles, peeling paint, or structural weakening of the walls behind the surround. In areas with high water usage, the use of multiple layers of waterproofing compounds is essential to ensure longevity.
In conclusion, the correct choice of waterproof materials is paramount for any construction involving bathtub surroundings. Overlooking this critical component significantly increases the risk of water damage, mold growth, and structural deterioration. A careful evaluation of material properties and suitability for wet environments is crucial for a durable and healthy bathroom.
2. Precise Measurement
Accurate dimensional assessment constitutes a foundational necessity for the successful undertaking of a project to independently construct a barrier around a bathtub. Discrepancies between planned dimensions and the actual physical space lead to a cascade of potential complications, including material waste, structural instability, and aesthetic incongruity. For example, if the initial height measurement for a tiled surround is underestimated by even a quarter of an inch, the final row of tiles may require cutting, resulting in an uneven and unprofessional appearance.
Furthermore, deviations from accurate measurements can impact the overall structural integrity. Inadequate dimensions may result in gaps between the surround and the bathtub, creating pathways for water ingress. This water infiltration can promote the growth of mold and mildew, compromising the health of the bathroom environment and potentially damaging the underlying structural components. Precise measurement allows for proper fitting of materials, ensuring a watertight seal and minimizing the risk of water damage. In cases where prefabricated panels are utilized, inaccurate measurements could render the panels unusable, leading to significant financial loss.
In summary, precise measurement is not merely a preliminary step, but a critical component directly influencing the functional and aesthetic outcome. Errors in measurement propagate through every stage of the project, culminating in potentially costly and time-consuming rectifications. Therefore, thorough and accurate measurement practices are indispensable for achieving a durable, waterproof, and visually pleasing result.
3. Proper Substrate Preparation
The establishment of a suitable foundation is crucial for realizing durable, aesthetically pleasing, and waterproof barriers around bathtubs. Deficiencies in substrate preparation directly compromise the long-term performance. The substrate, representing the surface beneath the visible layer (tile, acrylic, etc.), bears the load and provides adhesion. Untreated drywall, for instance, rapidly deteriorates upon water exposure, leading to structural failure of the entire surround. The relationship is causal: inadequate preparation precipitates predictable negative outcomes. The preparation stage involves ensuring the underlying surface is level, plumb, and appropriately waterproofed. A common misstep is applying tile directly to existing painted surfaces without adequate bonding agents, resulting in eventual tile detachment.
Consider the practical application of cement board installation. Cement board, inherently water-resistant, serves as an optimal substrate for tile. However, improper installationfailing to tape and mud the seams, neglecting to use corrosion-resistant screws, or neglecting a waterproofing membranenegates its benefits. This can result in moisture migration through the seams, leading to mold growth within the wall cavity. Therefore, selecting the right material is only part of the equation; correct installation is equally vital. Ensuring the substrate is level is equally important, as imperfections can lead to uneven tile lines and pooling water.
In essence, substrate preparation is not merely a preliminary step but an integral component directly influencing the longevity and functionality. Overlooking its importance invariably leads to compromised structural integrity, water damage, and premature failure. A comprehensive understanding of substrate requirements and meticulous adherence to best practices are indispensable for achieving a successful and enduring outcome. The effort invested in thorough preparation is ultimately reflected in the durability and aesthetic quality of the finished product, making it a vital investment in the overall success of the installation.
4. Adequate Ventilation
Proper air circulation plays a critical role in the longevity and structural integrity of any project aiming to create a bathtub barrier. The absence of sufficient ventilation leads to moisture accumulation, fostering conditions conducive to microbial growth and material degradation.
- Mold and Mildew Prevention
The primary benefit of adequate ventilation lies in its capacity to inhibit the proliferation of mold and mildew. Moist environments create a breeding ground for these organisms, which can compromise indoor air quality and cause structural damage to the surround materials and surrounding walls. An exhaust fan or open window facilitates the removal of moisture-laden air, preventing condensation and reducing the risk of microbial growth.
- Material Preservation
Sustained exposure to moisture can accelerate the deterioration of construction materials, including grout, caulk, and even certain types of tile. Adequate ventilation promotes quicker drying times after showering or bathing, minimizing the duration of moisture exposure and extending the lifespan of these materials. Failure to provide adequate ventilation can result in premature cracking, peeling, or discoloration, necessitating repairs or replacements.
- Structural Integrity
Moisture penetration can compromise the structural integrity of the surrounding walls. Water seeping behind the barrier can cause wood framing to rot and drywall to disintegrate. Adequate ventilation reduces the risk of water accumulation, preserving the structural soundness of the bathroom and preventing costly repairs. This is particularly crucial in older homes where ventilation may be inadequate.
- Odor Control
Beyond the direct effects of moisture, inadequate ventilation contributes to unpleasant odors. Trapped humidity fosters the growth of bacteria and other microorganisms that produce musty or stale smells. Proper air circulation helps dissipate these odors, maintaining a fresher and more hygienic bathroom environment. Regular use of an exhaust fan or opening a window after bathing can significantly improve air quality.
The incorporation of adequate ventilation is therefore an essential consideration. Neglecting this aspect increases the likelihood of moisture-related problems, leading to compromised aesthetics, structural damage, and potential health hazards. A well-ventilated bathroom is not only more pleasant to use but also ensures the longevity and integrity of the barrier and the surrounding structure.
5. Secure Sealing
The establishment of a watertight barrier between the bathtub and the surrounding wall structure forms a critical component within the domain of do-it-yourself construction. Secure sealing directly mitigates water intrusion, preventing damage to underlying structural elements such as framing and subflooring. The absence of proper sealing precipitates a cascade of negative consequences, including mold and mildew growth, material degradation, and potential structural compromise. A real-world example involves the application of caulk along the junction where the bathtub meets the newly installed surround. Insufficient or improperly applied caulk allows water to seep behind the surround, leading to hidden mold colonies and eventual rot, necessitating costly remediation efforts.
Practical significance lies in the meticulous selection and application of appropriate sealant materials. Silicone-based caulks, recognized for their flexibility and water resistance, are commonly employed. However, proper surface preparation, including cleaning and drying the surfaces to be sealed, is paramount for achieving optimal adhesion. The sealant must be applied in a continuous bead, filling all gaps and voids to create an impenetrable barrier. Furthermore, regular inspection and maintenance of the sealant are necessary to address any cracks or deterioration that may occur over time. Failure to maintain the seal may lead to gradual water damage, undermining the entire construction effort.
In summary, secure sealing represents a non-negotiable element. It directly contributes to the longevity, structural integrity, and hygiene of the bathroom environment. Thorough surface preparation, the selection of appropriate sealant materials, and meticulous application techniques are essential for preventing water intrusion and ensuring the success of a do-it-yourself tub surround project. Continuous monitoring and maintenance are crucial for sustaining the watertight seal, protecting the investment, and preventing future damage.
6. Aesthetic Integration
In the context of designing and constructing a bathtub surround, aesthetic integration plays a critical role in harmonizing the new structure with the existing bathroom environment. It goes beyond mere functionality, aiming to create a visually cohesive and appealing space. Succe
ssful aesthetic integration elevates the overall design, enhancing the perceived value and comfort of the bathroom.
- Color Palette Harmony
The selection of colors for the surround should complement the existing color scheme of the bathroom. Using analogous colors or a carefully chosen contrasting accent color creates visual harmony. For instance, if the bathroom features a primarily blue color scheme, utilizing shades of blue or complementary colors such as soft grays or whites for the surround can result in a unified aesthetic. Conversely, a poorly chosen color, like a jarring shade of orange against a blue backdrop, can disrupt the visual balance and diminish the overall appeal.
- Material Consistency
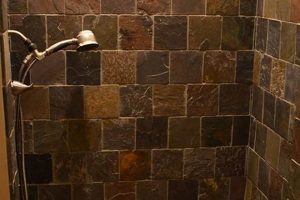
The materials chosen for the surround should align with the existing materials in the bathroom. If the bathroom features natural stone elements, incorporating similar stone accents or textures into the surround can create a sense of continuity. Conversely, introducing a vastly different material, such as highly polished metal in a rustic bathroom, can appear discordant. The goal is to select materials that enhance, rather than detract from, the established design theme.
- Architectural Style Compatibility
The architectural style of the surround should correspond to the overall architectural style of the bathroom and the home. A modern bathroom with clean lines and minimalist features would benefit from a simple, streamlined surround design. Conversely, a traditional bathroom with ornate details would require a more elaborate and decorative surround. Incongruent styles can create a jarring visual experience, detracting from the intended aesthetic.
- Fixture Coordination
The design and finish of the fixtures (faucets, showerheads, etc.) should coordinate with the design and finish of the surround. Chrome fixtures, for instance, would pair well with a modern, minimalist surround featuring chrome accents. Conversely, oil-rubbed bronze fixtures would complement a more traditional surround with earth-toned tiles. Paying attention to these details creates a cohesive and polished final product.
Achieving effective aesthetic integration requires careful planning and consideration of existing design elements. By harmonizing color palettes, ensuring material consistency, respecting architectural style, and coordinating fixtures, a cohesive and visually pleasing outcome can be attained. Success in this realm transforms a simple tub surround into a key design feature that significantly enhances the overall bathroom environment. The synthesis of these elements not only complements the primary function but also amplifies the immersive ambiance, culminating in an elevated and holistic design experience.
Frequently Asked Questions
The following addresses common inquiries regarding the independent construction of barriers around bathtubs, providing objective answers based on established practices.
Question 1: Is a building permit required for a bathtub surround project?
The necessity of a building permit varies by jurisdiction. Contacting the local building department is recommended to ascertain specific requirements regarding alteration or replacement of bathroom fixtures. Non-compliance can result in fines or mandatory modifications.
Question 2: What is the most cost-effective material for a DIY bathtub surround?
Cost-effectiveness depends on material availability and installation skills. Acrylic panels often represent a balance between affordability and ease of installation. However, tile may offer long-term value due to its durability, though it demands greater installation expertise.
Question 3: How can one ensure a completely waterproof seal?
Achieving a watertight seal requires multiple steps. Utilizing a waterproof membrane beneath the surface material is essential. Sealing all seams and edges with mildew-resistant caulk, and addressing any gaps or cracks promptly, further enhances waterproofing. Regular inspection for signs of water intrusion is recommended.
Question 4: What tools are essential for completing this kind of project?
Essential tools typically include a level, measuring tape, tile saw (if using tile), caulk gun, utility knife, and safety glasses. Depending on the chosen material, additional tools such as a circular saw or drill may be required.
Question 5: How long does a typical bathtub surround project take?
Project duration varies significantly depending on skill level, project complexity, and material selection. A simple acrylic panel installation may be completed in a weekend, while a complex tile project can span several days or longer.
Question 6: What are the common mistakes to avoid?
Common pitfalls include inadequate surface preparation, neglecting waterproofing, using inappropriate adhesives or sealants, and failing to ensure proper ventilation. Attention to detail throughout the process is critical for preventing future problems.
Thorough planning and adherence to best practices contribute significantly to the successful completion of a bathtub surround project.
The subsequent section presents a summary of critical considerations.
Conclusion
The exploration of undertaking bathtub surround construction oneself reveals that it necessitates a comprehensive understanding of material properties, waterproofing techniques, and meticulous execution. This endeavor requires careful planning, precise measurement, proper substrate preparation, adequate ventilation strategies, secure sealing methods, and aesthetic integration to ensure a successful outcome. The potential challenges involving water damage and structural degradation are significant if adequate preventative measures are not implemented.
Therefore, careful consideration of the information presented herein, alongside adherence to established construction practices, is paramount. Undertaking this project demands diligent research, precise execution, and a commitment to long-term maintenance. A successful construction effort not only enhances the aesthetic appeal of the bathroom but also provides a protective barrier against water damage, ensuring the longevity and structural integrity of the surrounding areas.


