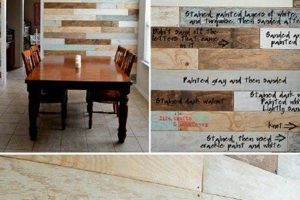
A popular interior design project involves affixing strips of wood, typically thin and evenly spaced, to a wall surface. This undertaking, often completed by the homeowner, allows for a textured and visually appealing aesthetic to be achieved without professional assistance. Examples of this include creating an accent wall in a living room, headboard design in a bedroom, or cladding for a home office space.
The appeal of this project stems from its relatively simple execution and its capacity to add warmth, dimension, and a modern touch to interior spaces. It offers sound dampening benefits and can conceal imperfections on existing wall surfaces. Historically, the incorporation of linear wood elements in interiors dates back centuries, finding expression in wainscoting and paneling, but this contemporary adaptation emphasizes minimalist and customizable design.
The following sections will explore materials selection, installation techniques, design considerations, and potential challenges associated with undertaking this decorative wall treatment, offering a comprehensive guide for successful implementation.
Essential Considerations for Wood Slat Wall Installation
Successful implementation of a wooden slat wall requires careful planning and execution. The following guidelines aim to mitigate common pitfalls and ensure a professional-looking result.
Tip 1: Material Selection: Opt for hardwoods like oak or walnut for high-traffic areas requiring durability. Softwoods, such as pine, offer a cost-effective alternative for less demanding applications. Ensure lumber is kiln-dried to prevent warping or cracking after installation.
Tip 2: Accurate Measurement: Precise measurements are crucial to avoid material waste and uneven spacing. Measure the wall’s height and width multiple times, accounting for any irregularities. Calculate the necessary number of slats and spacing based on desired aesthetic.
Tip 3: Proper Spacing: Consistent spacing is key to a visually appealing result. Utilize spacers cut from wood or plastic to maintain uniform gaps between each slat. Consider the visual impact of varying spacing widths for design emphasis.
Tip 4: Secure Attachment: Choose appropriate fasteners for the wall material and slat thickness. Construction adhesive combined with brad nails or screws provides a secure and lasting bond. Pre-drilling pilot holes prevents splitting the wood, especially when working with hardwoods.
Tip 5: Leveling and Alignment: Use a level and plumb bob to ensure slats are installed straight and true. A laser level can be particularly helpful for longer walls or complex installations. Slight adjustments during installation can correct minor imperfections.
Tip 6: Surface Preparation: Clean the wall surface thoroughly before installation. Remove dust, debris, and any loose paint or wallpaper. Applying a primer can improve adhesion and prevent moisture absorption.
Tip 7: Consider Acoustic Properties: Incorporate sound-absorbing materials behind the slats to enhance the acoustic performance of the wall. This is particularly beneficial in home theaters, offices, or noisy living spaces.
Adhering to these guidelines will contribute to a well-executed and aesthetically pleasing wood slat wall, enhancing the visual appeal and functionality of the space.
The concluding section will explore the maintenance requirements and potential long-term challenges associated with wood slat walls.
1. Material selection
The selection of appropriate materials constitutes a foundational element in the successful execution of a wood slat wall project. Material properties directly influence the aesthetic appeal, durability, and long-term maintenance requirements of the finished installation. Inappropriate material choices can lead to structural instability, warping, cracking, or premature deterioration of the wall. For instance, utilizing untreated softwood in a high-humidity environment may result in rot and fungal growth, necessitating costly repairs or replacement. Conversely, selecting a dense hardwood such as teak offers superior resistance to moisture and wear, thereby extending the lifespan of the wall, but at a higher initial cost.
Consideration of grain pattern, color, and texture is equally important for achieving the desired visual effect. Vertical grain patterns offer a clean, modern look, while pronounced wood grain patterns contribute to a rustic aesthetic. Color variations can either be uniform for a cohesive appearance or intentionally varied for a more natural, organic feel. Furthermore, the choice of finish whether a clear sealant, stain, or paint further enhances the material’s appearance and provides protection against environmental factors.
Ultimately, the careful evaluation of material characteristics in relation to the intended application and environmental conditions is essential for ensuring the longevity, visual appeal, and overall success of the wood slat wall project. A strategic material selection decision mitigates potential problems and results in a sustainable and aesthetically pleasing design element.
2. Spacing precision
Maintaining consistent and accurate spacing between individual wood slats constitutes a critical aspect of design and execution. Its significance transcends mere aesthetics, directly impacting visual harmony, material usage, and overall structural integrity.
- Aesthetic Uniformity
Consistent spacing creates a sense of visual rhythm and order, contributing to a polished and professional appearance. Deviation from uniform spacing, even subtly, can disrupt the visual balance, resulting in an amateurish or haphazard look. For example, consistently varying the spacing by a small margin throughout the wall can lead to an eye-catching gradient effect or subtle texture.
- Material Optimization
Accurate spacing calculations enable precise material estimation, minimizing waste and reducing project costs. Incorrect spacing parameters can lead to either an insufficient quantity of slats or surplus material, both of which represent inefficiencies in project management. Prior accurate calculation can allow for minimal material waste.
- Structural Integrity and Ventilation
Spacing can be optimized to allow air ventilation behind the wall. This reduces the risk of moisture accumulation and subsequent decay of the materials. A design with too little or too much ventilation could have detrimental impacts in certain environments.
In summary, meticulous attention to spacing precision is paramount. By addressing these factors, one can achieve a visually pleasing, structurally sound, and cost-effective slat wall that elevates the overall aesthetic of the space.
3. Secure attachment
The connection between secure attachment and wood slat wall construction is a fundamental determinant of structural integrity and long-term performance. Inadequate fastening methods undermine the entire installation, leading to potential hazards and aesthetic degradation. The absence of secure attachment mechanisms results in slats detaching from the wall surface, compromising the visual appeal and potentially posing a safety risk. An example includes a wall using only adhesive, which over time, fails because of environmental and mechanical stressors.
Considerations for attachment methods must account for wall substrate material, slat weight and dimensions, and anticipated environmental conditions. Drywall, concrete, and wood substrates require different fastening solutions. Heavier, denser slats necessitate more robust attachment mechanisms to prevent sagging or detachment. High-humidity environments demand corrosion-resistant fasteners to maintain long-term stability. Choosing an appropriate fastener type, such as screws over nails in high-stress areas or the application of a continuous bead of construction adhesive, prevents structural weaknesses that could compromise the installation.
In conclusion, secure attachment represents a non-negotiable aspect of wood slat wall projects. It is the foundation upon which durability, safety, and aesthetic longevity are built. Thorough evaluation of substrate material, slat characteristics, and environmental factors, coupled with the selection of appropriate attachment methods, is essential for realizing a successful and lasting wood slat wall installation. Ignoring this crucial element leads to inevitable failure and necessitates costly remedial actions.
4. Surface preparation
Surface preparation constitutes a critical prerequisite for the successful execution of a wood slat wall project. The condition of the underlying wall surface directly impacts the adhesion, stability, and longevity of the installed slats. Failure to properly prepare the surface can lead to a range of adverse outcomes, including poor adhesion, uneven slat alignment, and premature failure of the installation. Contaminants, such as dust, grease, or loose paint, act as barriers, preventing proper bonding between the adhesive or fasteners and the wall. This weakened bond results in slats becoming loose or detaching over time. An example would be applying adhesive to a wall with old, flaking paint; the slats are only as secure as the paint layer itself.
The preparation process typically involves cleaning, patching, and priming the wall surface. Cleaning removes dust, dirt, and grease, ensuring a clean substrate for adhesion. Patching addresses any imperfections, such as holes or cracks, creating a smooth and even surface for the slats. Priming seals the surface, improving adhesion and preventing moisture absorption. For instance, on a porous drywall surface, primer ensures the adhesive doesn’t get absorbed into the wall, reducing the effectiveness of the bond. Additionally, priming helps to create a uniform surface, minimizing variations in texture or color that could be visible through the gaps between the slats.
In conclusion, surface preparation is not merely a preliminary step but an integral component of a wood slat wall project. Its thorough execution ensures optimal adhesion, structural stability, and aesthetic quality. Neglecting this crucial phase inevitably results in compromised outcomes, leading to diminished durability and a less visually appealing final product. The time and effort invested in proper surface preparation yield significant returns in terms of the long-term performance and appearance of the wood slat wall.
5. Level Alignment
Level alignment constitutes a critical factor in the successful implementation of wood slat wall installations. Deviation from horizontal or vertical planes compromises the aesthetic appeal and introduces visual distortion, undermining the intended design.
- Visual Perception
The human eye is highly sensitive to deviations from level and plumb. Even slight misalignments in slat placement can be readily detected, creating a sense of unease and detracting from the overall visual quality of the installation. This effect is magnified in larger wall surfaces, where cumulative errors become more apparent. Consider, for example, a series of horizontally aligned slats progressively drifting upward or downward; this deviation, while potentially subtle at each individual slat, becomes increasingly noticeable across the entire wall.
- Structural Integrity
Maintaining level alignment directly impacts the structural stability of the wall. Misaligned slats can induce uneven stress distribution, potentially leading to warping, cracking, or detachment over time. Accurate leveling ensures that the load is distributed evenly across the supporting structure, minimizing stress concentrations and enhancing the wall’s long-term durability. For instance, poorly aligned vertical slats may exert undue pressure on the lower attachments, causing them to fail prematurely.
- Installation Efficiency
Precise level alignment facilitates a more efficient installation process. Accurate initial leveling establishes a reliable reference point for subsequent slat placement, minimizing the need for adjustments and corrections. Employing tools such as laser levels or spirit levels ensures consistent alignment, reducing installation time and material waste. An experienced installer understands that taking the time to meticulously level the initial slat significantly streamlines the remainder of the project.
- Interaction with Architectural Elements
Walls don’t exist in isolation. They’re usually framed by door ways, ceilings and floors and not properly aligning the slats can make these other aspects of the surrounding area appear visually inconsistent. When creating the accent wall, these edges and corners should be in the forefront of consideration in order to maintain aesthetic consistency.
In conclusion, level alignment is not merely a cosmetic consideration but a fundamental principle that underpins the aesthetic appeal, structural integrity, and installation efficiency of wood slat walls. Strict adherence to level and plumb lines is essential for achieving a professional-quality result that stands the test of time. The absence of precise alignment invariably compromises the wall’s visual impact and structural soundness, ultimately diminishing its value and longevity.
6. Finishing options
Finishing options represent a critical stage in a wood slat wall project, directly influencing its appearance, durability, and resistance to environmental factors. The selected finish acts as a protective barrier, safeguarding the wood against moisture, UV radiation, scratches, and stains. Failure to apply an appropriate finish, or choosing an unsuitable one, can lead to premature deterioration, discoloration, and a compromised aesthetic. For example, an unfinished pine slat wall exposed to high humidity is prone to warping and fungal growth, necessitating costly repairs or replacement. Conversely, a properly finished hardwood slat wall can maintain its appearance and structural integrity for many years.
Finishing choices encompass a diverse range of products, each offering distinct properties and aesthetic characteristics. Clear sealants provide a transparent, protective layer that enhances the natural wood grain. Stains alter the wood’s color, allowing for customization and matching to existing dcor. Paints offer a wide array of color options and provide a durable, opaque finish. Each selection, sealant, stain or paint, impacts labor, long term cost and even replacement parts cost due to availability. Furthermore, specialized finishes, such as UV-resistant coatings or fire-retardant treatments, offer enhanced protection against specific environmental hazards. For instance, a UV-resistant finish is crucial for slat walls exposed to direct sunlight, preventing fading and discoloration.
In summary, the selection and application of a suitable finish are essential for maximizing the longevity, aesthetic appeal, and overall performance of a wood slat wall. A well-chosen finish protects the wood from environmental damage, enhances its beauty, and contributes to a lasting, high-quality installation. Prior to installation, it’s crucial to explore these options and consider the surrounding environment. Ignoring the finishing stage significantly increases the risk of premature deterioration and diminishes the value of the entire project.
Frequently Asked Questions
The following questions address common concerns and misconceptions associated with wooden slat wall installations. These are answered in order to promote understanding and effective execution.
Question 1: What is the optimal wood species for a wood slat wall intended for high-humidity environments?
For installations exposed to elevated moisture levels, species such as cedar, teak, or redwood are recommended due to their inherent resistance to decay and water absorption. Kiln-dried options are advised to minimize warping.
Question 2: How should spacing between slats be determined to achieve optimal acoustic performance?
Spacing affects sound absorption characteristics. Narrower gaps generally provide better sound diffusion. Consulting acoustic calculators or professional advice is advised for critical applications. Backing the wall with acoustic felt can help achieve even greater sound performance
Question 3: What are the recommended methods for attaching slats to different wall substrates, such as drywall, concrete, or wood?
Drywall requires anchors or adhesive combined with brad nails. Concrete necessitates drilling and anchoring with screws. Wood allows for direct screwing or nailing. Select fasteners based on slat weight and substrate density. Pre-drilling is required for hardwoods.
Question 4: How can one ensure level alignment when installing horizontal wood slats, especially over long wall spans?
Utilize a laser level or a long spirit level to establish a horizontal reference line. Regularly check and adjust slat placement to maintain consistent alignment. Minor shimming may be required to compensate for wall imperfections.
Question 5: What are the potential challenges associated with installing wood slat walls in areas with uneven wall surfaces, and how can they be addressed?
Uneven surfaces require careful shimming or furring strips to create a level plane. Identify and address irregularities before installation to prevent warping or misalignment of the slats.
Question 6: What are the long-term maintenance requirements for wood slat walls, and how can one prevent issues such as warping, cracking, or discoloration?
Regular cleaning with a damp cloth is recommended. Apply a sealant or finish to protect against moisture and UV damage. Inspect periodically for signs of warping or cracking, and address promptly. Maintain consistent humidity levels to prevent material stress.
Adherence to these considerations will contribute to a successful wood slat wall installation, maximizing aesthetic appeal and long-term performance.
The concluding section will address advanced design techniques and specialized applications of wood slat walls.
Conclusion
The preceding discussion has illuminated the critical factors involved in executing a successful “wood slats wall diy” project. From material selection and spacing precision to secure attachment, surface preparation, level alignment, and finishing options, each element plays a crucial role in determining the final aesthetic and structural integrity. Diligence in these areas minimizes the risk of common pitfalls, ensuring a visually appealing and durable outcome.
While the installation process may appear straightforward, careful planning and execution are essential to fully realize the potential of this design element. The insights presented serve as a foundation for informed decision-making, empowering individuals to approach this endeavor with confidence. Continued exploration of advanced techniques and specialized applications will further refine the craft and expand the possibilities for incorporating wood slat walls into diverse interior spaces.


