Crafting personalized enclosures for images using wood offers a tangible means of showcasing memories. This activity involves the selection, preparation, and assembly of wooden components to create a border that both protects and enhances a photograph or piece of artwork. For example, a person might choose reclaimed barn wood to construct a rustic-looking display for a family portrait.
The practice allows for a high degree of customization and control over the final aesthetic. It provides an opportunity to express individual creativity and tailor displays to complement specific dcor or personal style. Historically, hand-made versions of these displays have been valued for their unique character and the personal investment involved in their creation, providing an alternative to mass-produced alternatives.
This exploration now delves into specific techniques, material considerations, and design ideas to facilitate the construction of visually appealing and structurally sound wooden enclosures for cherished visuals.
Construction Strategies for Bespoke Image Displays
The following guidance provides essential considerations for crafting durable and aesthetically pleasing wooden enclosures for photographs and artwork. These tips emphasize structural integrity and visual appeal.
Tip 1: Material Selection: Opt for hardwoods like oak or maple for increased durability. Softwoods, such as pine, are more easily worked but require careful handling to prevent damage. Ensure that the wood is properly seasoned and free from defects like knots or warping.
Tip 2: Precise Measurements: Accurate measurements are crucial for achieving a snug fit. Measure the image to be displayed and account for any desired overlap. Employ precision tools, such as a digital caliper, to ensure dimensional accuracy.
Tip 3: Joint Construction: Employ robust jointing techniques, such as mortise and tenon or dovetail joints, for enhanced structural stability. Mitered corners, while visually appealing, often require reinforcement with splines or corner keys for long-term durability.
Tip 4: Surface Preparation: Thoroughly sand all surfaces to achieve a smooth and uniform finish. Begin with coarse-grit sandpaper (e.g., 80-grit) and progressively move to finer grits (e.g., 220-grit) to eliminate imperfections and prepare the wood for finishing.
Tip 5: Finishing Application: Apply a suitable finish to protect the wood from moisture and enhance its aesthetic appeal. Consider using a clear coat of polyurethane or varnish to accentuate the natural grain, or opt for paint or stain to achieve a desired color and texture.
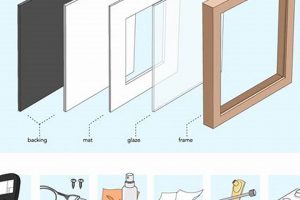
Tip 6: Hardware Integration: Select appropriate hardware for hanging and securing the image within the structure. D-rings and picture wire provide a secure and discreet hanging mechanism. Consider using glazing points or flexible tabs to hold the image in place, allowing for easy replacement.
Tip 7: Design Considerations: Experiment with different wood species, profiles, and finishing techniques to create unique and personalized designs. Consider incorporating decorative elements, such as carvings, inlays, or applied moldings, to enhance the visual interest.
Effective execution of these strategies results in custom-made displays that enhance the presentation of valued images while providing enduring protection. Skilled craftsmanship, attention to detail, and quality materials culminate in a finished product of lasting value.
The article now turns its attention to exploring design inspirations and advanced techniques in wooden display construction.
1. Wood selection
The selection of wood constitutes a foundational decision in the realm of creating personalized wooden enclosures for images. The chosen wood directly impacts the structural integrity, aesthetic qualities, and overall longevity of the finished display. The inherent properties of different wood types influence their suitability for this particular craft. For example, hardwoods, such as oak and maple, provide superior strength and resistance to wear, making them appropriate for frequently handled or weight-bearing structures. Conversely, softwoods, like pine and fir, offer ease of workability, enabling more intricate detailing but potentially compromising long-term durability.
The choice of wood influences the finishing process. Hardwoods generally exhibit a finer grain and accept stains and finishes more uniformly than softwoods. Knots, grain patterns, and natural coloration can either enhance or detract from the desired aesthetic. Reclaimed wood, with its unique history and character markings, represents a distinct material selection that imparts a rustic or vintage appeal. However, such material often requires extensive preparation to ensure structural soundness and prevent further degradation. An example illustrates the significance of proper wood selection; using a warped piece of lumber, regardless of species, will likely result in a display that is structurally unsound and visually displeasing.
The selection of a wood species therefore involves careful consideration of functional requirements and aesthetic preferences. The physical properties of the wood must align with the intended purpose of the display, while its visual characteristics should complement the image or artwork it houses. Ultimately, thoughtful wood selection represents a crucial step in creating a hand-crafted display that is both beautiful and enduring, ensuring that personalized wooden image enclosures serve as lasting showcases for cherished memories and artistic expressions.
2. Precise cutting
Precise cutting constitutes a fundamental element in the creation of wooden enclosures for images. Inaccurate cuts directly compromise the structural integrity and visual appeal of the final product. Gaps in joints, uneven borders, and skewed angles undermine the intended aesthetic and potentially weaken the structure, causing eventual failure. For example, if the mitered corners are not cut at exactly 45 degrees, the resulting display will exhibit noticeable gaps and lack the crisp, clean lines characteristic of a well-crafted enclosure. Furthermore, inconsistencies in size between the individual pieces can lead to challenges during assembly, necessitating additional adjustments or even rendering some components unusable.
The direct correlation between cutting accuracy and the quality of the finished display necessitates the use of appropriate tools and techniques. A miter saw, for instance, allows for highly accurate angle cuts, essential for creating tight and seamless joints. A table saw, when properly set up, facilitates precise straight cuts, ensuring uniformity in the dimensions of the individual pieces. Beyond tooling, the operator’s skill and attention to detail play a critical role. Careful measurement, proper blade selection, and controlled cutting speed contribute significantly to accuracy. The benefits of this are demonstrated when attempting to create perfectly square corners for an image, relying on hand-sawing will likely yield significantly imperfect results, diminishing the presentation and professionalism of the piece.
In summary, precise cutting is not merely a procedural step but a cornerstone of successful wooden enclosure construction. It ensures structural soundness, enhances visual appeal, and facilitates a smooth assembly process. The time and effort invested in achieving accuracy during the cutting stage translate directly into the overall quality and longevity of the resulting artisanal display. Therefore, mastering precise cutting techniques is essential for anyone undertaking the creation of bespoke wooden enclosures for images, thereby guaranteeing a final product that showcases the image to its fullest potential.
3. Joint stability
Joint stability constitutes a critical factor in the structural integrity and longevity of wooden enclosures for images. Robust joints ensure that the display remains intact and resists the stresses of handling, hanging, and environmental changes. Deficient joint construction can lead to warping, separation, and eventual failure of the display.
- Joint Selection and Load Bearing
The choice of joint type significantly impacts the load-bearing capacity and overall stability. Mortise and tenon joints, for example, provide exceptional strength and resistance to racking forces, making them well-suited for larger or heavier displays. Mitered joints, while aesthetically pleasing, offer less inherent strength and require reinforcement, such as splines or keys, to prevent separation. The size and weight of the image being displayed should inform the selection of an appropriate joint type. Failure to match the joint to the load can result in catastrophic failure of the structure.
- Adhesive Selection and Application
The type of adhesive used to bond the joint significantly affects its overall strength and durability. Wood glues formulated for specific wood types and applications provide optimal bonding. Proper application techniques, including adequate clamping pressure and appropriate drying time, are essential for achieving a strong and lasting bond. Insufficient adhesive or inadequate clamping can result in weak or compromised joints that are prone to failure under stress. For instance, using polyvinyl acetate (PVA) glue on oily woods such as teak will significantly reduce joint strength.
- Joinery Precision and Fit
The precision with which the joints are cut and fitted plays a crucial role in their stability. Gaps or inconsistencies in the joint weaken the overall structure and provide opportunities for moisture to penetrate, leading to wood rot or delamination. Close-fitting joints maximize the surface area for adhesive bonding and ensure even distribution of stress. The use of precision tools and techniques, such as hand planing or jointing, allows for achieving the necessary level of accuracy. Even minor imperfections in joint fit can significantly reduce the load-bearing capacity and long-term stability of the display.
- Environmental Considerations
Environmental factors, such as humidity and temperature fluctuations, can significantly impact the stability of wooden joints. Wood expands and contracts with changes in moisture content, placing stress on the joints. Joints that are not properly constructed or sealed are particularly vulnerable to damage from moisture intrusion. The use of water-resistant adhesives and finishes can help to mitigate the effects of environmental changes and prolong the life of the display. Careful attention to environmental factors is essential for ensuring the long-term stability and integrity of wooden enclosures for images.
In conclusion, joint stability is a non-negotiable aspect of creating wooden enclosures for images. The proper selection and construction of joints, coupled with appropriate adhesives and attention to environmental factors, are crucial for ensuring that the display remains structurally sound and visually appealing for years to come. Compromising on joint stability risks the integrity of the entire piece and ultimately diminishes its value as a lasting showcase for treasured images.
4. Sanding technique
The process of sanding, when applied to DIY wooden enclosures for images, serves as a crucial determinant of the final aesthetic and tactile quality. It involves abrading the wood surface with progressively finer grits of sandpaper to remove imperfections, smooth the texture, and prepare it for subsequent finishing. Deficiencies in sanding technique can result in visible scratches, uneven color absorption during staining, and a generally unprofessional appearance, which detract from the image being displayed. For instance, inadequate sanding of a pine display may leave pronounced grain lines, causing a stained finish to appear blotchy and uneven.
Sanding influences not only the visual presentation but also the longevity of the wooden enclosure. A properly sanded surface provides a better bond for finishes such as varnish or paint, enhancing their protective qualities against moisture and wear. Conversely, a poorly sanded surface may cause finishes to peel or crack prematurely, exposing the wood to environmental damage. Consider the practical example of a wooden display left outdoors; proper sanding followed by a protective finish can significantly extend its lifespan, preventing rot and weathering.
Mastering effective sanding techniques represents a necessary skill for those engaged in crafting custom wooden displays. This involves understanding the appropriate grit sequence, applying consistent pressure, and recognizing when the surface is sufficiently prepared for finishing. Furthermore, awareness of grain direction and wood species characteristics is crucial to avoid creating unwanted sanding marks or altering the wood’s natural appearance. The skill applied to this process will directly impact the quality of the final product, affecting its visual impact and durability, and transforming raw materials into a polished, professional showcase.
5. Finish application
The application of a finish represents a critical stage in the construction of wooden enclosures for images, directly influencing both the aesthetic characteristics and protective qualities of the final product. The finish serves as a barrier against environmental elements, such as moisture and ultraviolet radiation, which can degrade the wood over time. Furthermore, the finish enhances the visual appeal of the wood, accentuating its natural grain or imparting a desired color and texture. A poorly executed finish compromises both the protective function and aesthetic impact, detracting from the overall quality of the image display. A real-life example demonstrates this, when a home built image enclosure that is left unfinished or poorly treated is placed into a bathroom; this is where the humidity and potential for water damage is highest, leading to accelerated deterioration of the wood, warping, and potential discoloration.
Different types of finishes offer varying levels of protection and aesthetic effects. Polyurethane provides a durable and water-resistant surface, suitable for high-traffic areas or displays exposed to moisture. Varnish offers a similar level of protection but may impart a warmer tone to the wood. Oil finishes penetrate the wood, enhancing its natural grain and providing a soft, matte appearance. Paint offers the widest range of color options but may obscure the natural wood grain. The choice of finish depends on the desired aesthetic, the intended use of the display, and the type of wood being used. Application techniques, such as brushing, spraying, or wiping, also influence the final result. Each method necessitates specific skills and equipment to achieve a uniform and professional finish. For instance, spraying requires a well-ventilated space and proper respiratory protection but allows for a smooth and even application, particularly on intricately detailed surfaces. Applying several thin coats of a finish is essential to achieving a high-quality result. This provides enhanced protection and a smooth and even surface.
In summary, the application of a finish is an integral component of crafting durable and visually appealing wooden enclosures for images. It requires careful selection of the appropriate finish, skillful application techniques, and attention to environmental factors. A well-executed finish not only enhances the aesthetic value of the display but also provides long-lasting protection against environmental damage, ensuring that the enclosure serves as a lasting showcase for treasured images. Ignoring or underestimating the importance of the finish application process can compromise the entire project, negating the effort invested in previous stages of construction.
6. Image securing
Image securing, within the context of constructing artisanal wooden enclosures for photographs, represents a critical step in preserving and showcasing the visual content. The method employed must effectively hold the image within the display while minimizing potential damage and allowing for future replacement or adjustments. Failure to adequately secure the image can result in misalignment, slippage, or even physical harm to the photograph.
- Glazing Points and Spring Clips
Glazing points and spring clips provide a traditional method for securing images. These small, metal fasteners are inserted into the wood around the perimeter of the image, applying pressure to hold it in place. Glazing points are typically used with rigid backings, such as cardboard or foam board, while spring clips can accommodate slight variations in thickness. A practical application involves the use of glazing points to secure a photograph within a frame constructed from reclaimed barn wood, providing a rustic aesthetic. However, the points can be challenging to remove without damaging the surrounding wood or the image itself.
- Flexible Tabs and Turn Buttons
Flexible tabs and turn buttons offer a more adjustable and user-friendly approach to image securing. Flexible tabs, often made of metal or plastic, are attached to the back of the wood and bent over the edge of the image to hold it in place. Turn buttons, small rotating fasteners, provide a similar function but offer greater adjustability and ease of use. Consider a situation where a wooden image display is created for a rotating collection of photographs; turn buttons allow for quick and easy image changes without requiring specialized tools. However, this technique may not be suitable for very thin or fragile images, as the pressure from the tabs or buttons could cause bending or damage.
- Adhesive Mounting
Adhesive mounting involves using adhesives, such as double-sided tape or mounting sprays, to directly adhere the image to the backing board. This method provides a clean and seamless appearance but can be problematic if the image needs to be removed or repositioned. The adhesive can damage the photograph or leave residue on the backing board. This approach finds favor in instances where permanence is desired, as when creating a collage on wood for decorative purposes. However, the irreversibility of this method necessitates careful alignment during application.
- Recessed Channels and Overlays
Recessed channels and overlays offer a more sophisticated and visually appealing approach to image securing. Recessed channels involve creating a groove in the wood into which the image is inserted, providing a secure and protected environment. Overlays, typically made of glass or acrylic, are placed over the image and secured to the wood, providing additional protection from dust and damage. This technique is particularly well-suited for high-value or delicate images, as it minimizes the risk of physical harm. For example, securing a vintage print inside an oak frame with an acrylic overlay, protecting it from UV damage and physical wear and tear. However, the complexity of this method requires advanced woodworking skills.
In conclusion, effective image securing mechanisms are paramount to successfully crafting DIY wooden enclosures for photographs. Each securing method presents distinct advantages and disadvantages relative to cost, complexity, image preservation, and the ability to change photographs in the future. Careful consideration of these factors is crucial to achieving a durable, aesthetically pleasing, and functional display.
7. Hanging mechanism
The implementation of a secure and aesthetically appropriate hanging mechanism represents a final, critical step in the construction of handcrafted wooden enclosures for images. The selected method directly influences the stability, presentation, and ease of installation of the finished piece, and must be carefully considered in relation to the display’s size, weight, and intended mounting location.
- D-rings and Picture Wire
D-rings, small metal loops shaped like the letter “D,” are commonly affixed to the back of wooden displays and used in conjunction with picture wire. The wire is strung between the D-rings, creating a loop that can be hung on a nail or hook. This method offers a balance of strength and adjustability, allowing for minor corrections to the display’s alignment. A practical illustration involves the creation of a simple wooden frame for a family photograph, utilizing small D-rings and thin picture wire for discreet and easy hanging. However, the wire may be visible from certain angles, potentially detracting from the display’s aesthetic.
- Sawtooth Hangers
Sawtooth hangers, characterized by their serrated edge, provide a simple and inexpensive hanging solution. These hangers are typically hammered or screwed into the back of the wooden display, allowing it to be hung directly on a nail. Sawtooth hangers are best suited for smaller, lighter displays, as their holding capacity is limited. An example is the use of a sawtooth hanger on a small, lightweight wooden enclosure for a postcard-sized print. However, they offer minimal adjustability and may not be suitable for uneven walls.
- Keyhole Hangers
Keyhole hangers offer a more secure and professional-looking hanging solution. These hangers consist of a keyhole-shaped slot that is routed or drilled into the back of the wooden display. The display is then hung on a screw or nail that is inserted into the wall, with the head of the screw fitting snugly into the keyhole slot. Keyhole hangers provide a flush and stable mounting, preventing the display from tilting or wobbling. An illustration is securing a larger, heavier display housing artwork from the sun. However, installation requires precise measurements and careful drilling to ensure proper alignment.
- French Cleats
French cleats provide a robust and versatile hanging system for larger or heavier wooden displays. This system consists of two interlocking pieces of wood, one attached to the back of the display and the other mounted on the wall. The interlocking design distributes the weight of the display evenly, providing exceptional stability. A practical application is utilizing a French cleat to hang a large, multi-panel wooden display. However, requires careful construction and precise alignment to ensure a secure fit.
The selection of a hanging mechanism for handmade wooden image enclosures is contingent on the dimensions, mass, desired aesthetic qualities, and mounting situation. The appropriate selection increases stability, simplifies the hanging, and guarantees the visual appeal of the enclosure.
Frequently Asked Questions
The following addresses commonly encountered inquiries regarding the construction, maintenance, and longevity of wooden structures designed to showcase images.
Question 1: What types of wood are most suitable for constructing image enclosures?
Hardwoods, such as oak, maple, and walnut, offer superior durability and resistance to wear, making them appropriate for enclosures intended for long-term use. Softwoods, like pine and fir, are more easily worked but require greater care to prevent damage and may necessitate more frequent maintenance.
Question 2: How can warping be prevented in wooden structures?
Warping is best prevented through the use of properly seasoned wood that has been dried to an appropriate moisture content. Storing wood in a stable environment and applying a protective finish can also minimize the risk of warping. The proper selection of wood grain direction during assembly can reduce the effects of wood movement.
Question 3: What jointing techniques provide the greatest structural stability?
Mortise and tenon joints, dovetail joints, and rabbet joints offer superior structural stability compared to simple butt joints or mitered joints. Reinforcing mitered joints with splines or keys is also recommended to enhance their strength.
Question 4: How should wood surfaces be prepared before applying a finish?
Wood surfaces should be thoroughly sanded with progressively finer grits of sandpaper to remove imperfections and create a smooth, uniform surface. Dust should be removed completely before applying any finish. Applying a wood conditioner prior to staining can help ensure even color absorption.
Question 5: What factors should be considered when selecting a hanging mechanism?
The size and weight of the enclosure, the type of wall it will be mounted on, and the desired aesthetic should all be considered when selecting a hanging mechanism. D-rings and picture wire are suitable for smaller enclosures, while keyhole hangers and French cleats offer greater stability for larger or heavier pieces.
Question 6: How can image fading due to UV exposure be minimized?
Direct sunlight exposure should be avoided. UV-protective glass or acrylic should be considered as a front cover for any image that is to be exhibited for long periods. Certain finishes can also provide a degree of UV protection to the wood itself.
Ultimately, the successful creation and maintenance of wooden image enclosures hinges upon informed material selection, meticulous craftsmanship, and appropriate finishing techniques. Adherence to these principles ensures both the longevity and aesthetic appeal of the completed project.
The subsequent section delves into advanced design considerations and innovative construction techniques to further enhance the artistry and functionality of custom wooden displays.
Conclusion
The preceding exploration of DIY wooden photo frames has underscored the multifaceted nature of their creation. From meticulous material selection and precise cutting techniques to the critical importance of joint stability, surface preparation, and finish application, each stage profoundly influences the final product’s structural integrity and aesthetic appeal. The securing of the image and the choice of an appropriate hanging mechanism represent further critical considerations.
The creation of DIY wooden photo frames presents an opportunity to craft personalized, enduring showcases for cherished images. Careful attention to the principles outlined will yield aesthetically pleasing and structurally sound displays that enhance and preserve visual memories for years to come. The commitment to quality materials and skilled craftsmanship ultimately distinguishes these handcrafted pieces from mass-produced alternatives, establishing them as valued heirlooms. The skills and understanding discussed will equip crafters to enhance their woodworking projects.


