The concept involves detailed outlines and instructions for constructing a media storage and display unit using self-directed methods. These outlines typically include material lists, cutting diagrams, and step-by-step assembly guides, enabling individuals to create customized furniture pieces for housing electronic devices and related accessories. For example, such an outline might detail the construction of a wall-mounted unit with shelving for a television, sound system, and gaming consoles.
Creating a customized media center offers several advantages, including cost savings compared to purchasing pre-fabricated furniture and the opportunity to tailor the design to specific space constraints and aesthetic preferences. Historically, such projects reflect a broader trend toward personalization and resourcefulness in home improvement, allowing homeowners to exert greater control over their living environments and promote sustainable practices through the reuse of materials and reduction of consumption.
The following sections will explore various aspects of this construction, including design considerations, material selection, essential tools, construction techniques, and safety precautions.
Essential Considerations for Media Center Construction
The following guidelines address crucial aspects of crafting a functional and aesthetically pleasing media center, emphasizing precision and long-term durability.
Tip 1: Space Assessment: Thoroughly measure the available area to ensure the planned structure fits without obstructing walkways or interfering with existing architectural features. Account for both horizontal and vertical dimensions, as well as the proximity of electrical outlets and ventilation systems.
Tip 2: Material Selection: Choose construction materials based on their structural integrity, visual appeal, and compatibility with the room’s decor. Solid hardwoods, plywood, and engineered wood products offer varying degrees of strength and cost-effectiveness. Consider factors such as moisture resistance and susceptibility to warping.
Tip 3: Structural Integrity: Prioritize robust joinery techniques, such as mortise-and-tenon joints, dowel joints, or pocket-hole screws, to ensure the media center can withstand the weight of electronic components and accessories. Reinforce critical areas with additional bracing or support structures.
Tip 4: Cable Management: Incorporate design elements that facilitate efficient cable routing and concealment. Drill strategically placed holes or install cable channels to prevent tangled wires and maintain a clean, organized appearance. Proper cable management also enhances safety by reducing the risk of tripping hazards.
Tip 5: Ventilation: Provide adequate ventilation for electronic devices to prevent overheating and potential damage. Open shelving, ventilation holes, or built-in fans can dissipate heat generated by amplifiers, gaming consoles, and other components. Ensure sufficient clearance around heat-generating equipment.
Tip 6: Ergonomic Considerations: Design the media center with optimal viewing angles and accessibility in mind. Position the television screen at a comfortable eye level and ensure shelves are easily accessible for accessing media or adjusting equipment settings. Prioritize user comfort and convenience.
Tip 7: Surface Finishing: Apply a durable and aesthetically pleasing finish to protect the wood and enhance its visual appeal. Consider factors such as stain resistance, scratch resistance, and ease of cleaning. Choose finishes that complement the room’s decor and provide a cohesive look.
Proper planning, precise execution, and careful attention to detail are essential for creating a high-quality media center that meets individual needs and preferences while enhancing the overall functionality and aesthetics of the living space.
The subsequent sections will delve deeper into specific design styles and advanced construction techniques for creating truly unique media center designs.
1. Accurate Measurements
Accurate measurements constitute a foundational element in the successful execution of projects within this domain. The absence of precise dimensions directly precipitates a cascade of negative consequences, ultimately compromising the structural integrity and aesthetic coherence of the final product. Erroneous measurements lead to misaligned components, unstable joints, and a diminished capacity to accommodate intended electronic equipment. For instance, a miscalculation in shelf width might render it incapable of supporting the weight of an amplifier, necessitating costly and time-consuming remedial action.
Moreover, inaccurate dimensions can lead to a significant increase in material waste. Improperly cut components often become unusable, requiring additional material purchases and increasing the overall project expenditure. Consider a scenario where the overall width of the unit is miscalculated; this error could affect the dimensions of multiple components, compounding the material loss. The relationship between measurement precision and material efficiency is therefore a critical determinant of project cost-effectiveness. The initial investment in accurate measuring tools and techniques is demonstrably offset by the reduction in material waste and rework.
In summary, the practice of obtaining precise measurements serves as a cornerstone of successful media center construction. Measurement accuracy is not merely a procedural detail; it is a fundamental prerequisite for achieving structural soundness, aesthetic harmony, and budgetary control. Overlooking this principle increases the likelihood of project failure and significantly diminishes the overall value of the undertaking.
2. Detailed Material List
A comprehensive enumeration of materials is indispensable for successfully completing any construction undertaking, and is especially true for self-directed media storage units. This list acts as a blueprint for procurement, ensuring that all necessary components are available prior to commencing the physical construction phase.
- Lumber Specification
The list must detail the types and quantities of wood required, specifying dimensions (thickness, width, length) for each board. For example, it would differentiate between “4×4 posts (8 ft)” and “1×6 pine boards (10 ft),” and indicate the total number of each. This clarity avoids under- or over-purchasing, which can stall progress or increase project costs. Failing to specify lumber dimensions adequately often results in mismatched structural supports or shelves, necessitating rework and additional expense.
- Fasteners and Hardware
This section includes all screws, nails, bolts, hinges, drawer slides, and other connecting elements. The list should specify the type (e.g., “wood screws,” “lag bolts”), size (e.g., “1 1/4 inch”), and quantity needed. Omission of even a single type of fastener can lead to structural weakness or an inability to properly assemble components. An incomplete hardware list can cause significant delays as the necessary items are sourced mid-project.
- Finishing Supplies
The materials required for surface treatment, such as sandpaper (various grits), wood stain, sealant, varnish, or paint, should be clearly identified. Specifying the exact type and volume of finishing materials ensures color consistency and protection against moisture and wear. Neglecting this aspect can lead to a compromised aesthetic appearance and reduced durability of the finished unit.
- Adhesives and Joinery Components
This category encompasses wood glue, construction adhesive, wood filler, dowels, and other elements utilized for joining wood pieces. Detailing the appropriate types of adhesives (e.g., “exterior wood glue” for moisture-prone areas) is crucial for achieving strong, durable bonds. Inadequate specification of these elements can result in weak joints that compromise the structural integrity of the assembled unit.
The aforementioned facets, when accurately compiled into a complete inventory, ensure a smooth and predictable workflow. Conversely, a deficient enumeration of materials often leads to project setbacks, compromised structural integrity, and increased expenditure. This list is not merely an inventory; it is a planning tool that ensures the feasibility and ultimate success of the media storage project.
3. Precise Cutting Diagrams
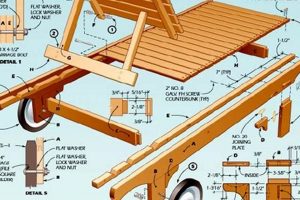
The creation of do-it-yourself media centers necessitates accurate cutting diagrams to optimize material utilization and minimize potential errors. These diagrams serve as visual guides, translating design specifications into actionable cutting instructions for each component of the structure.
- Material Optimization
Cutting diagrams facilitate the efficient arrangement of individual parts on raw material sheets, such as plywood or hardwood. By strategically nesting components, the diagrams minimize waste and reduce the overall material costs of the project. Failure to employ precise diagrams often results in inefficient material usage and increased expenditure on additional supplies. Examples include using specialized software to calculate the best layout for the components.
- Dimensional Accuracy
These diagrams specify exact dimensions for each piece, ensuring that the assembled structure conforms to the intended design. Precision in cutting is critical for achieving structural integrity and a professional aesthetic. Deviations from the specified dimensions can lead to misaligned joints, uneven surfaces, and an overall compromised outcome. The accuracy can depend of the tool that is used for example a table saw.
- Assembly Sequencing
Cutting diagrams can also incorporate information regarding the order in which components should be assembled. This sequencing helps to streamline the construction process and prevent errors that might arise from improper assembly order. A carefully planned sequence ensures that each piece fits correctly and that the overall structure is stable and aligned.
- Error Reduction
By providing a clear and visual representation of each component, cutting diagrams minimize the likelihood of errors during the cutting phase. The diagrams serve as a reference point, allowing the builder to double-check measurements and ensure that each piece is cut to the correct size and shape. This reduces the risk of having to recut components, saving time and materials.
The implementation of detailed and accurate cutting diagrams is therefore indispensable for achieving a successful outcome. These diagrams not only optimize material usage and reduce waste, but also contribute to dimensional accuracy, streamlined assembly, and a reduction in potential errors. Consequently, integrating comprehensive cutting diagrams into the planning phase is crucial for any individual undertaking the construction of a customized media center.
4. Secure Assembly Methods
The structural integrity of self-constructed media centers hinges directly upon the application of secure assembly methods. These techniques dictate the stability, longevity, and safety of the unit, thereby influencing its capacity to adequately house electronic equipment and withstand normal usage.
- Joinery Techniques and Load Bearing
Effective joinery is fundamental to distributing weight evenly and preventing structural failure. Mortise-and-tenon joints, dovetail joints, and robust screw connections provide superior resistance to shear and tensile forces compared to weaker alternatives like simple butt joints. The selection of appropriate joinery directly impacts the unit’s ability to bear the combined weight of televisions, audio equipment, and decorative items without deformation or collapse. For instance, shelving constructed with pocket-hole screws and insufficient bracing may sag or detach under heavy load.
- Fastener Selection and Material Compatibility
The choice of fasteners, including screws, nails, and bolts, must align with the materials being joined. Using inappropriately sized or improperly hardened fasteners can lead to compromised connections. For example, driving drywall screws into hardwood can result in snapped screw heads and inadequate holding power. Furthermore, galvanic corrosion can occur when dissimilar metals are combined, weakening connections over time. Selecting fasteners that are compatible with the wood species and environmental conditions is crucial for long-term structural integrity.
- Adhesive Application and Bond Strength
Wood glue serves as a critical supplement to mechanical fasteners in many assembly processes. It enhances joint strength and prevents movement, particularly in areas subject to stress. Proper surface preparation and adhesive application are essential for achieving a durable bond. Contaminated surfaces or insufficient glue coverage can significantly reduce bond strength, leading to joint separation. Clamping pressure is necessary to ensure close contact between surfaces during the curing process, maximizing adhesive effectiveness.
- Reinforcement and Bracing Strategies
Strategic reinforcement and bracing techniques enhance the overall stability of the media center, particularly in areas prone to stress or deflection. Adding corner braces, installing back panels, or incorporating internal supports can significantly increase the unit’s resistance to racking forces and prevent warping. The design should account for potential weak points and incorporate appropriate reinforcement measures. For example, a tall, narrow unit may require anchoring to the wall to prevent tipping. Reinforcement can be achieved in different ways using metal parts or wood. Each way has its own specific advantages.
In conclusion, the application of secure assembly methods is paramount for ensuring the structural integrity and long-term performance of self-made media centers. Failure to prioritize robust joinery, appropriate fastener selection, adhesive application, and reinforcement strategies can compromise the unit’s ability to safely and effectively house electronic equipment, potentially resulting in damage, injury, or premature failure.
5. Wiring Considerations
Proper wiring management constitutes an integral component of successful self-directed media center construction. Inadequate attention to cable routing, power distribution, and equipment connectivity can result in a visually cluttered environment, increased risk of electrical hazards, and impaired system functionality. The integration of wiring considerations early in the planning phase is crucial for mitigating these potential problems. For example, a media center designed without pre-planned cable pathways will necessitate ad-hoc solutions, often involving unsightly dangling wires or improvised cable management techniques. The absence of dedicated power outlets within the unit may require reliance on extension cords and power strips, increasing the risk of electrical overload and fire. The correlation between foresight in wiring planning and the overall success of the finished media center is therefore significant.
The practical application of wiring considerations involves several key steps. First, assessing the power requirements of all electronic components is essential for determining the necessary number and placement of electrical outlets within the media center. Second, designing cable pathways that conceal wires while providing easy access for future modifications or repairs is crucial for maintaining a clean and organized appearance. This often involves incorporating cable channels, grommets, or strategically placed openings within the structure. Third, ensuring proper ventilation around electronic devices to prevent overheating is vital for prolonging their lifespan. Finally, adherence to local electrical codes and safety regulations is paramount for preventing electrical hazards and ensuring compliance. Failing to adhere to these factors presents a number of risks.
In summary, integrating wiring considerations into the design process is essential for creating a functional, safe, and aesthetically pleasing self-made media center. Proper planning minimizes clutter, reduces the risk of electrical hazards, and enhances the overall user experience. Overlooking this aspect can lead to a compromised final product, necessitating costly and time-consuming modifications. Therefore, a comprehensive approach to wiring is a fundamental component of this entire project.
Frequently Asked Questions
This section addresses common inquiries regarding the planning and execution of self-directed media center constructions, providing clarity on critical aspects of the process.
Question 1: What is the minimal skill level required for this type of project?
Successful completion generally necessitates basic carpentry skills, including accurate measuring, cutting, and assembling techniques. Familiarity with power tools, such as circular saws and drills, is also recommended.
Question 2: What is the estimated cost associated with constructing a media center?
Material expenses vary depending on the chosen materials (e.g., solid wood vs. plywood), the complexity of the design, and the size of the unit. Cost estimation requires a detailed material list and price comparison from various suppliers.
Question 3: What are the essential tools for undertaking this project?
Core tools include a measuring tape, level, circular saw (or table saw), drill/driver, sandpaper, and clamps. Additional tools, such as a pocket-hole jig or router, may be required depending on the design’s complexity.
Question 4: How can structural integrity be ensured in a self-constructed media center?
Employing robust joinery techniques (e.g., mortise-and-tenon, dovetail), using appropriate fasteners (e.g., wood screws of adequate length), and incorporating bracing or reinforcement structures are crucial for ensuring stability.
Question 5: What are the primary safety precautions to observe during construction?
Wearing appropriate safety gear (e.g., safety glasses, hearing protection), using power tools according to manufacturer instructions, ensuring adequate ventilation during finishing processes, and adhering to electrical safety guidelines are essential.
Question 6: How can cable management be effectively incorporated into the design?
Integrating cable channels, grommets, or strategically placed openings within the structure facilitates efficient cable routing and concealment, minimizing clutter and preventing potential tripping hazards.
Careful planning and execution are crucial to the endeavor. Addressing these questions will ensure a successful and worthwhile endeavor.
The subsequent sections will delve into various resources and inspirations for design ideas.
Conclusion
The preceding discussion comprehensively explores the multifaceted considerations involved in the successful execution of “diy entertainment center plans”. Accurate measurements, detailed material lists, precise cutting diagrams, secure assembly methods, and integrated wiring considerations stand as pivotal elements influencing the structural integrity, aesthetic quality, and long-term functionality of these projects.
Mastery of these principles empowers individuals to create customized storage and display solutions tailored to specific spatial constraints and design preferences. The enduring relevance of resourcefulness in home improvement further underscores the significance of these skills, fostering personalized living environments that are both functional and aesthetically pleasing. Continuous learning in these areas proves invaluable.


