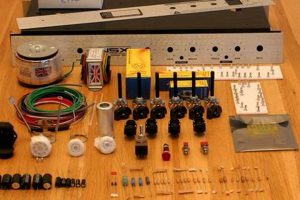
A build-it-yourself electric guitar package centers on the iconic Telecaster design. The offering generally includes a pre-shaped body (often unfinished), a neck (typically maple or rosewood), pickups, hardware (bridge, tuning pegs, control knobs), electronics (pots, capacitors, wiring), and a pickguard. The purchaser assembles these components to create a functional musical instrument.
These packages provide an economical entry point into guitar ownership, allowing individuals to customize their instrument’s look and feel. The building process furnishes valuable insights into the workings of an electric guitar, empowering owners to perform repairs and modifications. Historically, the availability of component guitar parts fostered a community of builders and experimenters, influencing guitar design and construction.
Subsequent discussion will delve into selecting an appropriate package, essential tools for assembly, finishing techniques for the body and neck, wiring the electronics, setting up the guitar for optimal playability, and troubleshooting common issues that may arise during the build process.
Assembly and Customization Guidance
This section provides essential advice for a successful instrument-building experience. Careful planning and execution are crucial for achieving a playable and aesthetically pleasing result.
Tip 1: Component Assessment. Before commencing assembly, inventory and inspect all provided parts. Verify the dimensions and compatibility of the neck pocket and neck heel. Address any defects or missing items with the supplier prior to modification.
Tip 2: Neck Fit Precision. A tight and secure neck joint is paramount for sustain and intonation. Ensure the neck fits snugly into the body pocket. Shimming may be required to achieve the correct neck angle for optimal action.
Tip 3: Finish Preparation. Proper surface preparation is critical for a durable and attractive finish. Sand the body and neck thoroughly with progressively finer grits of sandpaper. Consider grain filling for open-pore woods such as ash or mahogany.
Tip 4: Wiring Schematic Adherence. Follow the provided wiring diagram meticulously. Double-check all connections for accuracy and integrity. Shielding the control cavity can reduce unwanted noise.
Tip 5: Hardware Alignment. Accurate bridge placement and tuner installation are essential for intonation. Use precise measurements and pilot holes to ensure proper alignment of these components.
Tip 6: String Tree Optimization. Proper string tree placement minimizes string buzz and ensures consistent string tension. Experiment with different positions to find the optimal setup for playability.
Tip 7: Fret Leveling and Crowning. Addressing fret imperfections is crucial for low action and accurate intonation. Level, crown, and polish the frets using appropriate tools and techniques.
These guidelines aim to maximize the potential of the instrument-building endeavor. Paying close attention to detail and adhering to best practices will contribute significantly to the overall quality and playability of the finished product.
The following sections will explore strategies for troubleshooting common issues encountered during assembly and offer further guidance on advanced customization techniques.
1. Wood Selection
Wood selection constitutes a foundational element within the realm of customizable electric guitar packages, directly influencing tonal characteristics, weight, and aesthetic appeal. The choice of body and neck woods impacts the instrument’s resonant properties and overall sound. For instance, ash and alder bodies are frequently favored for their balanced frequency response, rendering them suitable for a range of musical genres. In contrast, mahogany bodies tend to exhibit a warmer, more sustained tone, appealing to players seeking a richer sound. The neck wood, typically maple or rosewood, contributes to the instrument’s brightness and sustain. The quality of the materials influences longevity. The physical properties of these materials will significantly contribute to the overall instrument performance.
Practical examples abound. A package featuring a swamp ash body and maple neck will produce a bright, articulate sound suitable for country or funk styles. Conversely, a package employing a mahogany body and rosewood neck will deliver a warmer, rounder tone favored by blues or rock musicians. The density of the wood also affects the instrument’s weight, impacting player comfort during extended performance. Furthermore, the grain pattern and figure of the wood influence the guitar’s visual appeal, often requiring careful finishing techniques to highlight its natural beauty. The type and quality of wood can significantly contribute to the cost of the kit.
In summary, careful consideration of wood selection is paramount when assembling an instrument using a package. Understanding the tonal properties, weight characteristics, and aesthetic qualities of different woods enables the builder to create an instrument tailored to specific musical preferences and playing styles. Overlooking this aspect can lead to an instrument that fails to meet the player’s sonic expectations, resulting in dissatisfaction and a diminished playing experience. A well-informed selection will lead to higher quality final product.
2. Hardware Quality
The quality of hardware components included in a customizable electric guitar package directly influences the instrument’s playability, tuning stability, and longevity. Substandard hardware can compromise performance and necessitate costly replacements, while high-quality components enhance the playing experience and contribute to the instrument’s overall value.
- Tuning Machines
Tuning machines, or tuners, are critical for maintaining accurate pitch. Low-quality tuners are prone to slippage, making it difficult to achieve and maintain proper tuning. High-ratio tuners, typically found in higher-quality packages, provide finer adjustments and greater stability. Examples of desirable features include sealed mechanisms and precise gear ratios, which minimize backlash and enhance tuning accuracy. Inadequate tuners can lead to frustration and negatively impact the instrument’s usability.
- Bridge Assembly
The bridge assembly dictates intonation, string spacing, and sustain. A poorly designed or constructed bridge can cause intonation problems, rendering the instrument unplayable in certain positions. High-quality bridges often feature adjustable saddles, allowing for precise intonation adjustments. The material used in the bridge construction also affects sustain and tonal characteristics. For example, a solid brass bridge can enhance sustain and contribute to a brighter tone, whereas a cheaper alloy may dampen vibrations and diminish sound quality.
- Pickups and Electronics Mounting Hardware
The hardware used to mount pickups and electronic components, such as potentiometers and switches, contributes to the overall structural integrity of the instrument. Loose or poorly fitted hardware can lead to unwanted vibrations and noise. Quality potentiometers provide a smooth and consistent response when adjusting volume and tone, while robust switches ensure reliable signal routing. Substandard components are susceptible to failure and may require replacement.
- Control Knobs and Switch Tips
While seemingly minor, control knobs and switch tips contribute to the overall ergonomics and aesthetic appeal of the instrument. Well-made knobs provide a comfortable grip and allow for precise adjustments, while durable switch tips withstand frequent use. Low-quality knobs and tips can be prone to breakage or slippage, detracting from the playing experience and potentially damaging the underlying potentiometers or switches.
In conclusion, the selection of high-quality hardware is paramount when assembling an instrument utilizing a customizable electric guitar package. Investing in reliable components enhances playability, tuning stability, and overall instrument longevity. The initial cost may be higher, but the long-term benefits of improved performance and reduced maintenance outweigh the savings associated with using inferior parts.
3. Electronic Components
The electronic components included in a customizable electric guitar package constitute the core of its sonic capabilities. These components, encompassing pickups, potentiometers, capacitors, switches, and wiring, directly determine the instrument’s tone, output level, and overall signal integrity. Their proper selection, installation, and interaction are crucial for achieving a desired sound profile and ensuring reliable performance. The quality of these parts and their correct wiring is what allows for a “diy telecaster guitar kit” to function and to sound the way it does.
Pickups, the transducers that convert string vibrations into electrical signals, are arguably the most critical electronic element. Different pickup types, such as single-coil and humbucker, produce distinct tonal characteristics. Single-coil pickups, commonly associated with the Telecaster, offer a bright, articulate sound with pronounced clarity. Potentiometers control volume and tone, shaping the signal’s frequency response. Capacitors affect the tone control’s range, influencing the instrument’s overall warmth or brightness. Switches enable selection between different pickup configurations, providing tonal versatility. Wiring connects all components, and its quality impacts signal flow and noise levels. As an example, improper shielding within the control cavity can introduce unwanted hum and interference, degrading the instrument’s signal quality.
The efficacy of a customizable electric guitar package hinges on the interplay between these electronic components. Careful consideration of each element’s characteristics and their combined effect is essential for achieving a musically satisfying outcome. Challenges may arise from sourcing compatible components, interpreting wiring diagrams, and troubleshooting signal-related issues. However, a thorough understanding of electronic principles and diligent attention to detail will ensure a well-functioning and sonically pleasing instrument. The electronics and their proper use are what can make or break the sound from a “diy telecaster guitar kit”.
4. Neck Profile
The neck profile, a crucial factor in the playability of any guitar, assumes particular significance in the context of a customizable electric guitar package. Its shape dictates the feel of the neck in the player’s hand, directly influencing comfort, speed, and overall playing experience. For a “diy telecaster guitar kit” the selection of appropriate neck profile can dramatically affect the end product.
- Profile Shapes
Neck profiles are commonly described using terms like “C,” “D,” “V,” and “U.” A “C” shape, arguably the most popular, offers a comfortable, rounded feel suitable for various playing styles. A “D” shape is flatter and thinner, often preferred by players with smaller hands or those seeking faster action. A “V” shape features a more pronounced apex, favored by some for its vintage feel and secure grip. A “U” shape is generally thicker and fuller, providing substantial support for the hand. Selecting the appropriate profile is influenced by individual hand size, playing style, and personal preferences. This greatly affect the playability from a “diy telecaster guitar kit”.
- Neck Thickness
Neck thickness, measured from the fretboard surface to the back of the neck, also contributes to playability. Thicker necks generally provide more sustain and a fuller tone, while thinner necks facilitate faster playing. The interaction between profile shape and thickness is crucial. A thin “D” shape, for example, will feel significantly different from a thick “U” shape, even if both share the same overall dimensions. The preference for thicker or thinner necks is highly subjective. Thicker neck profiles can have a dramatic effect, positive or negative, from a “diy telecaster guitar kit”.
- Fretboard Radius
The fretboard radius refers to the curvature of the fretboard surface. A smaller radius (e.g., 7.25″) creates a more pronounced curve, often preferred for playing chords. A larger radius (e.g., 9.5″, 12″) offers a flatter surface, facilitating bending notes and playing lead lines. The selection of fretboard radius influences string action and overall playability. Vintage-style kits often feature smaller radii, while modern kits typically offer flatter surfaces. The fretboard radius has an impact on playability from a “diy telecaster guitar kit”.
- Material and Finish
The material used for the neck, typically maple or rosewood, affects its tonal characteristics and feel. Maple necks are generally brighter and snappier, while rosewood necks offer a warmer, more mellow tone. The finish applied to the neck also plays a role. Gloss finishes can feel sticky, while satin finishes offer a smoother, faster feel. Some kits offer unfinished necks, allowing the builder to apply a custom finish tailored to their preferences. A proper material selection will bring better sound from a “diy telecaster guitar kit”.
In summary, careful consideration of neck profile, thickness, fretboard radius, material, and finish is paramount when assembling a customizable electric guitar package. The neck is the primary interface between the player and the instrument; therefore, selecting a neck that aligns with individual preferences and playing style is essential for maximizing comfort, playability, and overall enjoyment. Overlooking these factors can lead to an instrument that feels awkward or uncomfortable, hindering musical expression. If the player is not comfortable with the neck, they will not enjoy the sound from their “diy telecaster guitar kit”.
5. Finishing Process
The finishing process represents a critical stage in the assembly of a customizabl
e electric guitar package, significantly impacting the instrument’s aesthetic appeal, durability, and, to a lesser extent, its tonal characteristics. Proper execution of the finishing process protects the wood from moisture and physical damage while enhancing its visual beauty. For any “diy telecaster guitar kit” proper finishing is essential.
- Surface Preparation
Surface preparation is foundational to a successful finish. This involves sanding the wood to a smooth, even surface, removing imperfections, and ensuring proper adhesion of subsequent finishing layers. Failing to adequately prepare the surface can result in an uneven finish, visible scratches, and poor adhesion, leading to premature wear. Examples include using progressively finer grits of sandpaper (e.g., 120, 220, 320, 400) and employing a sanding block to maintain a flat surface. Proper surface preparation can give a “diy telecaster guitar kit” a professional appearance.
- Sealing
Sealing the wood prevents excessive absorption of subsequent finish coats and provides a uniform base for color application. Sealers, such as sanding sealer or shellac, penetrate the wood pores, creating a barrier that minimizes finish sinking and blotching. Different sealers offer varying degrees of protection and may affect the final finish’s tonal characteristics. For instance, shellac imparts a warmer tone than some synthetic sealers. The right sealing process gives the “diy telecaster guitar kit” improved protection.
- Color Application
Color application involves applying stains, dyes, or paints to achieve the desired aesthetic. Stains penetrate the wood fibers, highlighting the grain and providing a transparent color. Dyes offer more vibrant and intense colors, while paints provide opaque coverage. The choice of colorant depends on the desired visual effect and the type of wood being finished. For example, applying a transparent cherry stain to an ash body can enhance the wood’s grain and create a classic look. A good color application can elevate the look from a “diy telecaster guitar kit”.
- Topcoat Application
Topcoats, such as lacquer, polyurethane, or varnish, provide a durable, protective layer over the color coat, enhancing the finish’s gloss and resistance to scratches and chemicals. Different topcoats offer varying degrees of hardness, flexibility, and chemical resistance. Lacquer is known for its clarity and ease of repair, while polyurethane offers superior durability and chemical resistance. Proper application techniques, such as spraying multiple thin coats, are essential for achieving a smooth, even finish. Quality topcoat application will provide years of protection for a “diy telecaster guitar kit”.
The finishing process is an integral component of assembling a customizable electric guitar package, influencing both its visual appeal and its longevity. A well-executed finish not only enhances the instrument’s beauty but also protects the wood from environmental factors, ensuring years of enjoyment. While finishing may seem daunting, careful planning, proper preparation, and diligent execution will yield professional-looking results. The value of any “diy telecaster guitar kit” is greatly enhanced with quality finishing.
6. Wiring Accuracy
Within the context of a build-it-yourself electric guitar package, precise wiring of electronic components directly impacts the instrument’s functionality and tonal characteristics. Deviations from specified wiring diagrams can result in a non-operational instrument, compromised tone, or unwanted noise. Accuracy in this stage is paramount to realizing the potential of the component parts. For any “diy telecaster guitar kit” proper wiring is a must.
- Component Interconnection
Correctly linking potentiometers, capacitors, switches, and pickups according to the intended schematic is essential for proper signal flow. A misplaced connection or reversed polarity can prevent the signal from reaching the output jack or cause unexpected interactions between components. For example, swapping the hot and ground wires on a pickup will result in a thin, weak signal with reduced output. In a “diy telecaster guitar kit”, incorrect wiring affects the pickup selection.
- Grounding Scheme
Effective grounding minimizes unwanted noise and interference. A properly implemented grounding scheme provides a low-impedance path for stray electrical signals to return to ground, preventing them from being amplified and heard as hum or buzz. Common grounding techniques include connecting all metal parts, such as potentiometer casings and bridge, to a central grounding point. Failure to establish a solid grounding network will result in a noisy instrument, diminishing the playing experience. This is key with a “diy telecaster guitar kit”.
- Shielding Techniques
Shielding involves lining the control cavity with a conductive material, such as copper foil or conductive paint, to create a Faraday cage. This cage blocks external electromagnetic interference from entering the circuit and degrading the signal. Proper shielding reduces hum and buzz, particularly in environments with high levels of electrical noise. Effective shielding complements accurate wiring and grounding to create a clean, noise-free signal path. Without proper shielding the “diy telecaster guitar kit” may not function well.
- Solder Joint Integrity
A strong, reliable solder joint ensures a secure electrical connection between components. Cold solder joints, characterized by a dull, grainy appearance, are prone to failure and can cause intermittent signal loss or noise. Proper soldering technique involves heating the components and solder to the correct temperature, allowing the solder to flow smoothly and create a solid bond. Investing in a quality soldering iron and practicing proper technique are crucial for achieving reliable solder joints. Without proper soldering the “diy telecaster guitar kit” will fail to function properly.
Wiring accuracy is a cornerstone of a successful instrument assembly process. When building a “diy telecaster guitar kit,” attention to component interconnection, grounding, shielding, and solder joint integrity is paramount for achieving optimal performance and tone. Addressing these aspects diligently will ensure a functional, noise-free, and musically satisfying instrument.
Frequently Asked Questions
This section addresses common inquiries regarding build-it-yourself Telecaster-style guitar packages, providing clarity on aspects such as skill requirements, component quality, and potential challenges.
Question 1: What level of skill is required to assemble a build-it-yourself Telecaster guitar package?
Assembly generally necessitates basic woodworking skills, familiarity with soldering techniques, and an understanding of electrical circuits. Prior experience with guitar repair or modification is beneficial, though not strictly essential. The manufacturer-provided documentation may assume a degree of pre-existing knowledge.
Question 2: Are specialized tools necessary for assembly?
Yes. Essential tools include a soldering iron, wire cutters/strippers, screwdrivers (various sizes), a multimeter, a file, sandpaper, and possibly a fret leveling file. Certain tasks may require specialized guitar setup tools, such as a string action gauge or a radius gauge. The tool investment should be considered prior to purchase.
Question 3: What level of quality can b
e expected from the components included in these packages?
Component quality varies significantly between packages and price points. Lower-priced packages typically feature budget-grade hardware and electronics, which may impact performance and longevity. Higher-priced packages generally offer improved component quality, potentially including name-brand pickups and higher-quality tuning machines. Diligent research of the components is advisable.
Question 4: Is it possible to customize the instrument beyond the standard components provided?
Customization is a primary benefit of these packages. Components such as pickups, tuning machines, bridges, and potentiometers can be readily replaced with aftermarket parts to achieve specific tonal characteristics or aesthetic preferences. The extent of customization is limited only by the builder’s skill and budget.
Question 5: What are the most common challenges encountered during assembly?
Common challenges include incorrect wiring, improperly fitted necks, issues with fret leveling, and difficulties achieving a satisfactory finish. Detailed planning, careful execution, and access to online resources or experienced builders can mitigate these challenges.
Question 6: What is the potential cost savings compared to purchasing a factory-built instrument?
Potential cost savings depend on the package selected and the cost of any upgraded components. While budget-grade packages may offer substantial savings, the final cost can approach or even exceed that of a factory-built instrument if high-end components are incorporated or if professional assistance is required. The primary benefit is control over the final product specifications.
In summary, build-it-yourself Telecaster guitar packages present an opportunity for customization and cost savings, but demand a certain level of skill, access to tools, and a willingness to address potential challenges. Component quality varies, requiring careful evaluation prior to purchase.
The subsequent section will explore resources available to assist builders in the assembly and customization process, including online forums, instructional videos, and professional luthiers.
Conclusion
This examination of the “diy telecaster guitar kit” has traversed assembly considerations, component selection, and potential challenges. The process encompasses woodworking, soldering, and electrical expertise to produce a playable instrument. The quality of included components significantly impacts the final product’s performance and longevity.
The build-it-yourself guitar represents a unique avenue for instrument ownership. Prospective builders should carefully weigh their skills, resources, and expectations before embarking on such a project. The knowledge and experience gained can prove invaluable, regardless of the final outcome.


