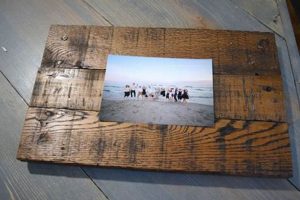
A custom-cut border placed within a picture frame, acting as a visual separator between the image and the frame itself, is frequently created using do-it-yourself methods. This border, typically made of cardstock or mat board, enhances the presentation of artwork or photographs. For example, a family portrait can be elevated by a carefully chosen and personally crafted border, drawing attention to the subject matter and providing a finished, professional appearance.
The application of personalized borders within picture frames offers numerous advantages. Historically, these borders were primarily used to protect delicate artwork from direct contact with the glazing of the frame. Beyond preservation, the strategic employment of such borders enhances aesthetic appeal. Benefits include increased perceived image size, the ability to complement a room’s dcor through color and texture choices, and a unique expression of individual creativity. The rise of digital photography has led to increased demand for custom framing solutions, fueling interest in cost-effective and personalized options.
The subsequent sections will address selecting appropriate materials, measuring and cutting techniques, design considerations, and various finishing options for producing these personalized borders. Detailed instructions and project ideas will also be explored.
Practical Guidance for Personalized Picture Frame Borders
The following tips offer guidance for achieving professional results when creating personalized borders for picture frames.
Tip 1: Material Selection is Paramount: Opt for acid-free mat board to prevent discoloration and deterioration of the image over time. Conservation-grade materials are recommended for valuable or irreplaceable photographs and artwork.
Tip 2: Precise Measurement is Essential: Accurate measurements of both the image and the frame’s inner dimensions are critical. A precise border requires careful calculation and execution to ensure a snug, visually appealing fit.
Tip 3: Utilize Specialized Cutting Tools: Invest in a quality mat cutter for clean, beveled edges. A sharp blade and a guiding system are crucial for achieving professional-looking results and preventing ragged edges.
Tip 4: Consider the Border’s Width Proportionally: The border’s width should be proportional to the size of the image and the frame. A border that is too wide can overwhelm the image, while one that is too narrow may appear insignificant.
Tip 5: Experiment with Color and Texture: The color and texture of the border should complement the image and the surrounding dcor. Sample swatches should be viewed under different lighting conditions to ensure compatibility.
Tip 6: Mitigate Dust and Debris: A clean workspace is essential. Dust and debris can easily become trapped between the border and the image, detracting from the overall presentation. Use a lint-free cloth to wipe surfaces before assembly.
Tip 7: Secure the Image and Border Appropriately: Use archival-quality tape or photo corners to securely attach the image to the back of the border. Avoid adhesives that may degrade over time or damage the image.
These guidelines facilitate the creation of personalized borders that enhance the presentation and preservation of framed images.
The subsequent sections will explore specific design styles and advanced techniques to further refine the craft.
1. Precise Measurements
The creation of a custom border for a picture frame inherently relies on precise measurements. A deviation from accuracy in the initial dimensions directly impacts the final product, potentially rendering it unusable. Accurate measurement serves as the foundational element, dictating the border’s fit within the frame and its proportionate relationship to the artwork or photograph it surrounds. The consequence of imprecise measurements can include gaps between the border and the frame, overlapping onto the image, or an overall aesthetically unbalanced presentation. For example, a border intended to be 2 inches wide may instead be 1.75 inches due to inaccurate cutting, resulting in an uneven or asymmetrical appearance within the frame.
Further, the measurement process involves not only the dimensions of the image but also the inner dimensions of the frame itself. Discrepancies between these measurements and the border can lead to difficulties during assembly. A border cut too large will not fit, while one cut too small will lack the necessary support and visual appeal. Consider a scenario where the internal dimensions of a frame are miscalculated, resulting in a border that slides around within the frame, failing to properly secure or showcase the image. This highlights the practical significance of accurate measurement in ensuring both the aesthetic integrity and functional purpose of a custom-made border.
In summary, the execution of a personalized border hinges on adherence to accurate measurement principles. The implications of neglecting this crucial step extend beyond mere aesthetics, impacting the overall structural integrity and presentation quality. Overcoming these challenges requires meticulous attention to detail and the utilization of appropriate measuring tools, underlining the pivotal role of precise measurements in the successful creation of customized picture frame borders.
2. Material Selection
Material selection constitutes a pivotal stage in creating personalized borders for picture frames. The chosen medium influences not only the visual aesthetic but also the archival properties and overall longevity of the finished product. Selecting the appropriate material ensures both the visual enhancement of the framed image and its long-term preservation.
- Acid-Free Mat Board
Acid-free mat board is a fundamental material choice. Its composition prevents the transfer of harmful acids to the photograph or artwork, thus mitigating discoloration, yellowing, and eventual degradation. An example includes the use of buffered pH-neutral boards, crucial for preserving valuable or irreplaceable items. Failure to utilize acid-free materials can result in irreversible damage over time, diminishing the value and appearance of the framed piece.
- Color and Texture Considerations
The color and texture of the chosen material serve as a visual complement to the artwork. Neutral tones offer versatility, while bolder colors or textured surfaces can introduce a specific mood or aesthetic. For instance, a dark gray linen texture can enhance the richness of a black and white photograph, while a bright white board can create a clean, modern look. Inappropriate color or texture choices can detract from the artwork, creating visual dissonance.
- Thickness and Rigidity
The thickness and rigidity of the material impact its structural integrity and resistance to warping. Thicker boards provide better support for larger images and prevent bending or buckling within the frame. The selection of an inadequate thickness can lead to a border that warps or buckles over time, compromising the presentation and potentially damaging the artwork.
- Surface Quality and Cutability
The surface quality of the board directly influences the ease and precision of the cutting process. Smooth surfaces allow for cleaner cuts and prevent tearing or fraying along the edges. Poor surface quality can result in ragged edges and an unprofessional appearance. Using low-quality boards requires additional effort and may still not yield satisfactory results.
The interplay between these facets dictates the success of a border project. Proper material selection is not merely an aesthetic consideration but a crucial element in preserving and enhancing the framed image. By carefully evaluating these factors, one can create borders that protect and complement framed artwork for years to come.
3. Cutting Technique
The successful creation of a personalized border for picture frames is significantly influenced by the cutting technique employed. The method by which the chosen material is shaped and refined directly impacts the aesthetic quality, structural integrity, and overall professional appearance of the final product. A meticulous and precise cutting technique is therefore paramount to the effective execution of the project.
- Bevel Cutting for Professional Finish
Bevel cutting, the practice of cutting the border’s inner edge at an angle, is essential for a professional finish. This angled cut not only enhances the visual appeal but also prevents shadowing and allows the image to sit slightly recessed within the frame. For example, a 45-degree bevel cut is commonly used to provide a clean, refined edge that directs the viewer’s eye towards the image. The absence of a bevel cut can result in a flat, uninspired appearance that detracts from the overall presentation.
- Utilizing a Mat Cutter for Precision
The use of a specialized mat cutter is critical for achieving accurate and consistent cuts. These tools are designed with a guiding system and a sharp blade, allowing for precise lines and minimizing the risk of errors. Consider the alternative: attempting to cut a border with a utility knife and a ruler. This method often results in uneven lines, ragged edges, and a higher likelihood of mistakes, thereby compromising the final product’s quality.
- Achieving Clean Corners and Avoiding Overcuts
Clean, precise corners are a hallmark of a well-executed border. Overcuts, where the blade extends beyond the intended line, are a common problem that can detract significantly from the finished piece. Proper technique involves starting and stopping the cut exactly at the corner point, using the mat cutter’s guiding system to ensure accuracy. A border with ragged or overcut corners appears amateurish and lacks the professional quality that can be achieved with careful technique.
- Consistent Blade Maintenance and Sharpness
The sharpness of the cutting blade is a critical factor often overlooked. A dull blade will tear the material, resulting in rough edges and an uneven cut. Regular blade replacement is essential for maintaining clean lines and minimizing the effort required for each cut. Attempting to cut through mat board with a dull blade not only produces poor results but also increases the risk of the blade slipping, potentially leading to injury or further damage to the material.
In conclusion, the cutting technique employed is inextricably linked to the quality of a custom border. Mastering bevel cutting, utilizing a mat cutter, achieving clean corners, and maintaining blade sharpness are all essential components of a successful project. These elements, when executed with precision and care, elevate the overall aesthetic and professional presentation of the framed image. Conversely, neglecting these facets compromises the final outcome, resulting in a border that fails to meet expectations.
4. Design Harmony
Design harmony, in the context of creating personalized borders, represents the cohesive interplay between various elements to achieve a visually pleasing and balanced presentation. It dictates how the border interacts with the artwork, the frame, and the surrounding environment, ultimately influencing the viewer’s perception. The selection of colors, textures, and proportions must align to create a sense of unity and visual equilibrium.
- Color Palette Integration
The chosen color palette of the border should complement the artwork and the existing dcor of the room where the framed piece will be displayed. Colors can evoke specific emotions and influence how the artwork is perceived. For example, a muted, neutral-toned border may allow a vibrant, colorful painting to take center stage, while a bolder, contrasting color might emphasize specific elements within a black and white photograph. Misalignment in color selection can lead to visual discord, detracting from the intended focus on the artwork.
- Textural Consistency
The texture of the border should harmonize with the artwork and the frame. Smooth, refined textures often complement delicate or detailed pieces, while rougher, more tactile textures can enhance the visual interest of simpler compositions. A heavily textured border paired with a highly detailed artwork could create a cluttered and overwhelming effect. Consistency in texture ensures that the border enhances, rather than competes with, the artwork’s inherent qualities.
- Proportional Balance
The width of the border should be proportional to the size of the artwork and the dimensions of the frame. An excessively wide border can overwhelm a small image, while a border that is too narrow may appear insignificant or inadequate. Establishing the correct proportional balance requires careful consideration of the artwork’s size, the frame’s dimensions, and the desired visual impact. A balanced border enhances the artwork’s presence without overpowering it.
- Style Compatibility
The style of the border, whether minimalist, ornate, or contemporary, should align with the artwork’s style and the overall aesthetic of the room. A modern, minimalist border may be well-suited for a contemporary photograph, while an ornate, antique-style border might complement a classic painting. Incompatible styles can create a jarring effect and detract from the artwork’s intended message or artistic merit.
The achievement of design harmony in the creation of personalized borders demands meticulous attention to detail and a thoughtful consideration of the various elements involved. A well-harmonized border enhances the artwork, integrates seamlessly with the frame and surrounding environment, and ultimately elevates the viewing experience. Conversely, a lack of design harmony can diminish the artwork’s impact and create a visually disjointed presentation, underscoring the critical role of cohesive design principles in this craft.
5. Image Protection
Image protection, in the context of creating a border, is not merely a supplementary consideration, but an essential component of the craft. The choice of materials and construction methods directly impacts the long-term preservation of the framed image, safeguarding it from environmental factors and physical degradation. The border serves as a critical barrier, mitigating potential damage and contributing to the longevity of the artwork or photograph.
- Acid-Free Materials and Archival Quality
The selection of acid-free mat board is paramount for preventing the deterioration of images. Acidic materials can cause yellowing, embrittlement, and eventual disintegration of photographs and artwork. Archival-quality boards, typically buffered to maintain a neutral pH, provide a stable environment that minimizes chemical reactions. For instance, the use of non-archival cardboard as a backing material can lead to irreversible damage to a vintage photograph within a few years, highlighting the importance of selecting appropriate materials.
- UV Protection and Light Exposure Mitigation
Exposure to ultraviolet (UV) light is a primary cause of fading and color shift in photographic prints and artwork. Utilizing UV-filtering glazing, in conjunction with the border, provides a degree of protection. The border itself, when properly constructed, creates a slight distance between the image and the glazing, further reducing the direct impact of UV exposure. While not a complete solution, this combination offers a crucial layer of defense against light-induced degradation.
- Physical Barrier Against Environmental Contaminants
The border functions as a physical barrier, shielding the image from dust, dirt, and other environmental contaminants. These particles can accumulate on the surface of the artwork, causing discoloration and abrasion over time. A well-sealed frame, incorporating a properly fitted border, minimizes the ingress of these contaminants, preserving the clarity and integrity of the image. An improperly sealed frame, conversely, allows pollutants to infiltrate, accelerating the deterioration process.
- Spacing and Prevention of Image-Glazing Contact
Direct contact between the image surface and the glazing (glass or acrylic) can lead to adhesion and potential damage, particularly in humid environments. The border creates essential spacing, preventing the image from sticking to the glazing. This is particularly important for photographs, which are susceptible to emulsion transfer and surface damage when in prolonged contact with glass. The absence of a border can result in irreversible damage and the loss of valuable or sentimental items.
These protective measures, facilitated by the thoughtful selection of materials and construction techniques, underscore the vital role of image protection. The implementation of these strategies, such as archival-quality components, UV mitigation, and the creation of a physical barrier, safeguards framed images, ensuring their continued enjoyment and preservation for future generations. The seemingly simple act of creating a border thus becomes a crucial step in protecting valuable and irreplaceable pieces of art and personal history.
6. Presentation Enhancement
The creation of a personalized border directly contributes to the enhanced presentation of framed images. The visual separation achieved through a custom border draws attention to the artwork or photograph, elevating its prominence and aesthetic appeal. This enhancement is not merely decorative; it influences the perception of the framed piece, directing the viewer’s focus and framing the subject matter in a deliberate and considered manner. For instance, a landscape photograph, when presented with a border of appropriate color and width, can evoke a sense of depth and perspective, enhancing its impact on the viewer.
Furthermore, the ability to customize the border offers opportunities to complement the dcor of the surrounding environment. By selecting materials, colors, and textures that harmonize with the room’s aesthetic, the framed image becomes an integral part of the overall design. This coordinated approach enhances the visual coherence of the space, transforming a simple framed picture into a carefully curated decorative element. A modern, minimalist interior, for example, may benefit from a clean, unadorned border that complements its streamlined aesthetic, while a more traditional setting might warrant an ornate border with intricate detailing.
In summary, the enhancement of presentation through personalized borders extends beyond mere aesthetics; it embodies a thoughtful integration of the framed image with its surroundings. The ability to customize the border allows for a deliberate manipulation of visual perception, creating a cohesive and visually appealing result. By understanding the principles of design and applying them to the creation of personalized borders, individuals can significantly elevate the presentation of their framed images, transforming them into impactful decorative elements.
Frequently Asked Questions
The following questions address common concerns and considerations regarding the creation and application of custom-made picture frame borders. These answers are intended to provide clarity and guidance.
Question 1: What type of material is most suitable for long-term image preservation when crafting a custom picture frame border?
Acid-free mat board is recommended to mitigate the risk of chemical degradation and discoloration. Conservation-grade boards offer superior protection for valuable or irreplaceable items.
Question 2: How does one ensure accurate measurements when creating a personalized border?
Precise measurements of both the image and the frame’s inner dimensions are critical. Utilizing a ruler or measuring tape with fine gradations and double-checking all figures minimizes the potential for error.
Question 3: What are the advantages of using a specialized mat cutter over a standard utility knife?
A mat cutter provides greater precision, cleaner cuts, and the ability to create beveled edges, resulting in a professional finish. Standard utility knives are more prone to slippage and uneven cuts.
Question 4: How does the width of the border affect the overall presentation of the framed image?
The border’s width should be proportional to the size of the image and the frame. A disproportionately wide border can overwhelm the image, while one that is too narrow may appear visually insignificant.
Question 5: Is it necessary to use UV-protective glazing in conjunction with a custom border?
While a custom border provides a degree of protection, UV-protective glazing offers an additional layer of defense against fading and discoloration caused by ultraviolet light exposure. It is highly recommended for preserving valuable or sensitive artwork.
Question 6: How does one prevent dust and debris from accumulating between the border and the image?
Maintaining a clean workspace and utilizing a lint-free cloth to wipe surfaces before assembly minimizes the risk of contamination. Proper sealing of the frame also helps prevent the ingress of dust and debris.
These considerations are paramount for achieving optimal results when creating and utilizing personalized picture frame borders.
The following sections will explore specific project ideas and creative applications.
Conclusion
This exploration of DIY photo frame mat construction has emphasized the necessity of precise execution, material selection, and design consideration for effective image presentation and preservation. Factors such as acid-free materials, accurate cutting techniques, and proportional balance are paramount for achieving aesthetically pleasing and long-lasting results. The discussed principles, when diligently applied, contribute to the enhanced visual impact and protection of framed artwork and photographs.
The art of personalized border creation offers a tangible method for elevating the presentation of valued images while simultaneously safeguarding them from degradation. Further research and experimentation with advanced techniques are encouraged to refine individual skills and contribute to the ongoing development of this craft. Continued adherence to established best practices ensures the preservation and appreciation of framed images for generations to come.


