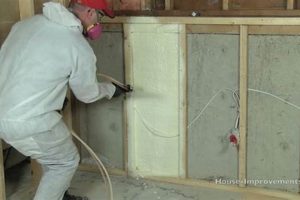
The endeavor of installing a particular type of insulation material oneself, designed with minuscule, sealed pockets to resist moisture and enhance structural integrity, necessitates careful planning and execution. For example, applying this material to a residential basement wall demands adherence to safety protocols and precise application techniques.
Implementing this process yields several advantages, including heightened energy efficiency, improved sound dampening, and increased resistance to mold and mildew growth within the structure. Historically, professional installation was the only option, but advancements in product availability and application tools now allow property owners to undertake these projects themselves, potentially reducing costs.
The following sections will delve into key considerations for a successful self-installation, encompassing necessary equipment, preparation steps, application methods, and crucial safety precautions. A thorough understanding of these aspects is paramount for achieving optimal results and ensuring a safe working environment.
Essential Considerations for Self-Installation
Achieving optimal results requires meticulous planning and adherence to best practices. The following points outline crucial aspects to consider prior to and during the application process.
Tip 1: Environmental Control: Maintain ambient and substrate temperatures within the manufacturer’s specified range. Improper temperatures can severely impact foam expansion and adhesion, resulting in diminished performance and potential product failure.
Tip 2: Surface Preparation: Thoroughly clean and dry all surfaces before application. Remove any loose debris, grease, or existing coatings. Insufficient preparation can lead to poor adhesion and compromise the insulation’s effectiveness.
Tip 3: Ventilation is Paramount: Ensure adequate ventilation throughout the application area. This mitigates the accumulation of potentially harmful vapors and promotes proper curing of the installed material. Consider using fans and respirators designed for this purpose.
Tip 4: Protective Gear is Not Optional: Full-body protective suits, gloves, and eye protection are mandatory. This material contains isocyanates that can cause severe skin and respiratory irritation. Ignoring safety measures can lead to serious health consequences.
Tip 5: Application Technique Matters: Maintain a consistent spray pattern and thickness. Avoid over-application, which can result in excessive expansion and wasted material. Multiple thin layers are preferable to a single thick layer.
Tip 6: Practice on a Test Area: Before tackling the main project, apply a small amount to a discrete area to familiarize yourself with the expansion rate and application properties of the specific product.
Tip 7: Adhere to Manufacturer Instructions: Always consult and strictly follow the manufacturer’s guidelines for mixing ratios, application techniques, and safety precautions. Deviations from these instructions can void warranties and compromise performance.
These considerations significantly enhance the likelihood of a successful installation, maximizing the insulation’s performance characteristics and minimizing potential hazards.
The subsequent section addresses common challenges encountered during self-installation and provides troubleshooting strategies.
1. R-value per inch
The insulating capacity of a material is quantified by its R-value, with a higher R-value indicating superior resistance to heat flow. In the context of self-installation, understanding the R-value per inch of a specific product is crucial for determining the required thickness to achieve desired thermal performance. For instance, a product boasting an R-value of 6 per inch necessitates approximately 3 inches of application to attain an R-18 rating. This relationship directly affects material costs and the scope of preparation work. Improper calculation can lead to under-insulation, resulting in energy inefficiency and elevated utility expenses, or over-insulation, increasing material costs without a commensurate increase in performance.
Different formulations exhibit varying R-values per inch. Selecting a product with a higher rating necessitates less material for a given level of insulation, potentially simplifying the installation process and reducing the overall project footprint. Consider, for example, a tight crawlspace where space constraints limit the thickness of insulation that can be applied. Choosing a higher R-value product in such a scenario becomes particularly advantageous, allowing for maximal insulation within the available space. Conversely, a product with a lower R-value may necessitate a thicker application, which could be impractical or impossible in constrained areas.
Therefore, R-value per inch serves as a primary factor in material selection. A precise understanding of this value enables informed decision-making regarding material quantity and application thickness, optimizing both thermal performance and cost-effectiveness. Overlooking this factor compromises the integrity of the installation and undermines the potential benefits of self-installation, diminishing energy savings and structural improvements.
2. Moisture resistance benefits
The capacity to resist moisture penetration is a fundamental characteristic when undertaking a self-installation of a specific insulation material. This aspect directly influences the longevity of the insulation itself and the structural integrity of the building to which it is applied.
- Reduced Risk of Mold and Mildew Growth
The inherent closed-cell structure minimizes water absorption, thereby inhibiting the proliferation of mold and mildew. These organisms thrive in damp environments and can compromise indoor air quality, leading to respiratory problems and structural damage. Self-installation with moisture-resistant materials creates a less hospitable environment for these contaminants.
- Protection Against Water Damage
Infiltration from external sources, such as rain or groundwater, can severely damage building components. By resisting water penetration, the material acts as a barrier, protecting wood framing, drywall, and other susceptible materials from rot, corrosion, and structural weakening. This protection is especially critical in basements and crawl spaces, which are prone to moisture accumulation.
- Enhanced Insulation Performance
Moisture significantly reduces the thermal resistance of many insulation materials. When water permeates insulation, it displaces air, a poor conductor of heat, with water, a much better conductor. This reduces the effective R-value, diminishing energy efficiency. Moisture-resistant products maintain their insulating properties even when exposed to humidity or minor water intrusion.
- Extended Lifespan of Building Materials
By preventing moisture-related degradation, the lifespan of the building’s structural elements is prolonged. Wood framing, sheathing, and other materials are less susceptible to rot, decay, and insect infestation, reducing the need for costly repairs or replacements. This long-term protection contributes to the overall value and sustainability of the structure.
These moisture resistance benefits directly contribute to the overall effectiveness and long-term value of the self-installation project. Minimizing water absorption not only preserves the insulating properties of the material but also safeguards the building’s structural integrity, leading to improved energy efficiency, enhanced indoor air quality, and reduced maintenance costs.
3. Structural integrity improvement
The application of a particular insulation material, installed via a self-directed process, significantly contributes to the enhancement of a structure’s load-bearing capacity and resistance to external forces. This outcome is a direct result of the material’s inherent properties and its method of application, creating a composite structure with improved overall strength.
- Bonding to Substrates
The insulation material adheres directly to the substrate, be it wood, concrete, or metal, creating a monolithic structure. This adhesion resists racking and shear forces, effectively tying the building components together. In wood-framed structures, for example, the material can act as a supplementary adhesive, reducing nail fatigue and enhancing resistance to wind loads.
- Increased Wall Stiffness
When applied within wall cavities, the cured insulation adds rigidity to the wall assembly. This increased stiffness minimizes deflection under load, preventing wall deformation and maintaining structural alignment. Consider a scenario involving a tall, unsupported wall subjected to lateral pressure; the added stiffness reduces the risk of buckling or collapse.
- Resistance to Impact Damage
The density of the material provides a degree of impact resistance, protecting the underlying substrate from damage. In areas prone to impacts, such as garage walls or industrial settings, the insulation acts as a buffer, distributing the force and minimizing the risk of penetration or fracture of the wall assembly.
- Reinforcement of Roof Structures
In roof applications, the insulation bonds to the underside of the roof deck, reinforcing the structure against wind uplift and snow loads. The added rigidity minimizes roof deflection and prevents water intrusion from damaged roofing materials. This reinforcement is particularly valuable in regions prone to severe weather conditions.
The structural integrity improvement derived from self-installation is a notable benefit, contributing to the longevity and resilience of the building. The adhesive properties and increased stiffness directly enhance the resistance to various forces, protecting the structure from damage and ensuring its stability over time. These factors highlight the critical role of the material in contributing to a robust and durable building envelope.
4. Proper safety measures
Self-installation of this particular insulation material mandates strict adherence to safety protocols due to the inherent chemical properties of the components and the potential for exposure during application. Failure to implement proper safety measures can result in immediate health risks, long-term health complications, and environmental contamination. For instance, isocyanates, a key ingredient, can cause respiratory sensitization, skin irritation, and allergic reactions upon direct contact or inhalation. This necessitates the use of personal protective equipment (PPE), including respirators, gloves, and protective clothing. Inadequate ventilation during application can lead to the accumulation of hazardous vapors, increasing the risk of respiratory distress and long-term health issues. The chemical reaction involved in curing generates heat and releases gases, requiring careful monitoring and ventilation to prevent fire hazards and ensure a safe working environment.
The practical significance of understanding and implementing safety measures extends beyond individual well-being. Improper disposal of waste materials can contaminate soil and water resources, posing environmental risks. Moreover, failure to adhere to safety guidelines can result in non-compliance with local building codes and regulations, potentially leading to fines, project delays, or legal liabilities. Consider a scenario where a homeowner attempts self-installation without proper respiratory protection, resulting in isocyanate sensitization. This could lead to chronic respiratory problems, medical expenses, and diminished quality of life. Conversely, a homeowner who invests in appropriate PPE, ensures adequate ventilation, and follows manufacturer’s instructions minimizes these risks and achieves a safer, more successful installation.
In summary, prioritizing safety is an indispensable component of self-installation. The potential consequences of neglecting safety measures range from immediate health hazards to long-term health complications, environmental contamination, and legal ramifications. A comprehensive understanding of the risks involved, coupled with strict adherence to safety guidelines, is essential for mitigating these risks and ensuring a successful and responsible insulation project.
5. Equipment rental options
The feasibility of undertaking the self-installation project is significantly influenced by equipment rental options. This is largely due to the specialized nature and high cost of the machinery required to effectively mix and apply the materials. Without access to rental services, the initial investment in equipment could be prohibitive for many homeowners, effectively excluding them from pursuing this type of project. For example, a professional-grade spray foam rig, essential for consistent mixing and application, can cost several thousand dollars. Renting such equipment distributes the cost across a shorter timeframe, aligning it with the duration of the specific project. Equipment rental allows individuals to leverage advanced application technologies without the long-term financial commitment.
Rental facilities frequently provide a range of options tailored to different project sizes and skill levels. These options can include small, portable systems for smaller applications, as well as larger, more powerful rigs for whole-house insulation projects. Furthermore, many rental companies offer training and support services, enabling individuals to gain proficiency in operating the equipment and applying the material correctly. This training is critical, as improper use of the equipment can lead to inconsistent application, wasted material, and potential safety hazards. Consider a scenario in which an individual rents a high-output system without adequate training; the resulting application could be uneven, leading to thermal bridging and reduced energy efficiency.
Therefore, the availability and accessibility of equipment rental options are crucial determinants of the viability of self-installation projects. These rental services not only lower the financial barrier to entry but also provide access to professional-grade equipment and the necessary training to ensure a successful and safe installation. Ignoring the equipment rental aspects could lead to project failure due to improper equipment operation or an unfeasible economic burden.
6. Curing time variations
The duration required for complete curing is a critical variable in self-installing this type of insulation, influencing project timelines and the attainment of optimal performance characteristics. Variations in curing time are influenced by several factors, including ambient temperature, humidity levels, and the specific formulation of the product. These factors directly impact the chemical reactions involved in the curing process, which dictates the rate at which the material hardens and achieves its intended properties. For instance, colder temperatures retard the chemical reactions, extending the curing time, while higher humidity levels can accelerate the process in some formulations. Deviations from the manufacturer’s recommended curing time can lead to incomplete expansion, compromised insulation value, and potential off-gassing issues. A project involving a basement insulation during winter months would likely experience extended curing times compared to an identical project conducted during summer.
Understanding these curing time variations is of practical significance for project planning and execution. Overlooking these variations can result in premature occupancy or finishing work, potentially leading to exposure to uncured chemicals and reduced insulation effectiveness. Proper scheduling of subsequent construction activities, such as drywall installation or painting, hinges upon the completion of the curing process. For example, installing drywall before complete curing can trap moisture within the insulation, fostering mold growth and undermining its insulation value. Manufacturers’ data sheets provide specific curing time guidelines under various environmental conditions, offering a crucial resource for informed decision-making. Furthermore, visual and tactile inspections can aid in determining the degree of curing, with the material typically exhibiting a firm, non-tacky surface upon completion.
In summary, the duration required for complete curing represents a critical consideration in successful self-installation projects. Variations in curing time, influenced by environmental factors and product formulation, must be carefully accounted for to ensure optimal performance and prevent potential complications. Adherence to manufacturer’s guidelines and vigilant monitoring of the curing process are essential elements of a responsible and effective insulation project.
7. Ventilation requirements
Effective ventilation is an indispensable element of self-installation involving a specific class of insulation material. This requirement stems from the chemical composition of the foam and the reactions that occur during its application and curing. Insufficient ventilation can lead to the accumulation of volatile organic compounds (VOCs) and isocyanates, posing immediate and long-term health risks to individuals in the vicinity. These compounds are released during the curing process and, without adequate air exchange, can reach concentrations exceeding permissible exposure limits. The consequences range from respiratory irritation and sensitization to more severe health problems, depending on the duration and level of exposure. Therefore, proper ventilation is not merely a recommendation but a mandatory safety precaution.
The practical implementation of ventilation requirements involves several considerations. The first is the establishment of adequate airflow through the application area. This often necessitates the use of mechanical ventilation systems, such as exhaust fans, to actively remove contaminated air and introduce fresh air from outside. The sizing and placement of these fans should be based on the volume of the space and the anticipated emission rates of the VOCs and isocyanates. Furthermore, the use of personal protective equipment (PPE), including respirators with appropriate cartridges, is essential to minimize exposure to airborne contaminants. A real-world example is the insulation of a confined attic space. Without mechanical ventilation, the concentration of hazardous compounds can rapidly escalate, creating an extremely dangerous environment for the installer. The presence of cross ventilation or a powered exhaust system will serve to reduce the concentration of these harmful substances.
In conclusion, ventilation requirements are inextricably linked to the safe and successful undertaking of self-installation projects using this specific type of insulation material. The health risks associated with inadequate ventilation are significant, and strict adherence to established guidelines is paramount. This includes employing mechanical ventilation, utilizing appropriate PPE, and monitoring air quality to ensure a safe working environment. Failure to address ventilation requirements adequately can compromise the health and safety of the installer and potentially render the project non-compliant with building codes, ultimately negating the intended benefits of the insulation.
Frequently Asked Questions
The following section addresses common inquiries regarding the application of this insulation material via a self-directed approach. These answers aim to provide clarity and assist in informed decision-making.
Question 1: Is prior experience necessary for self-installation?
While prior experience is not strictly mandatory, a basic understanding of construction principles and familiarity with power tools is highly recommended. Novices should invest time in research, training videos, and practicing on a small test area before attempting a full-scale project.
Question 2: What is the approximate cost savings compared to professional installation?
Cost savings can vary significantly based on the size and complexity of the project. However, self-installation can potentially reduce labor costs by 30% to 50%. This figure must be balanced against the cost of equipment rental, materials, and the value of the installer’s time.
Question 3: How long does it typically take to self-install this insulation in an average-sized house?
The timeline depends on the square footage, accessibility of the work areas, and the installer’s skill level. A typical 1,500 square foot home can take anywhere from 3 to 7 days to complete, accounting for preparation, application, and curing time.
Question 4: What are the potential risks associated with improper application?
Improper application can lead to a range of problems, including inadequate insulation performance, moisture accumulation, mold growth, and structural damage. Furthermore, exposure to uncured chemicals can pose health hazards. Careful adherence to manufacturer’s instructions is paramount to mitigating these risks.
Question 5: How can I determine the appropriate thickness of insulation for my specific climate zone?
Local building codes typically dictate minimum insulation requirements based on climate zone. Consulting these codes and utilizing online R-value calculators can assist in determining the appropriate thickness to achieve optimal energy efficiency.
Question 6: What is the best method for disposing of excess material and empty containers?
Excess material and empty containers should be disposed of in accordance with local environmental regulations. Contacting the local waste management authority or the product manufacturer can provide guidance on proper disposal procedures.
In summary, self-installation presents a viable option for achieving effective insulation, but necessitates thorough preparation, adherence to safety protocols, and a realistic assessment of one’s skills and capabilities.
The next section will address troubleshooting common issues encountered during self-installation projects.
Conclusion
This exploration of closed cell spray foam diy has illuminated critical aspects of the process, from assessing R-value per inch and understanding moisture resistance to addressing structural integrity, safety, equipment needs, curing times, and ventilation requirements. Successful self-installation necessitates meticulous planning, adherence to safety guidelines, and a thorough understanding of the material’s properties and application techniques. Overlooking any of these elements increases the risk of compromised performance, potential health hazards, and structural damage.
Therefore, while the potential benefits of this method, such as cost savings and increased energy efficiency, are significant, individuals must carefully weigh their capabilities and resources against the inherent challenges. Prioritizing safety, adhering to best practices, and continuously seeking information are paramount to achieving a positive outcome. Only with a responsible and informed approach can the full advantages of closed cell spray foam diy be realized, contributing to a more energy-efficient and structurally sound building envelope.


