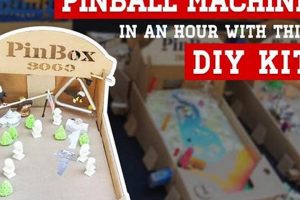
A scaled-down crafting package provides the components and instructions necessary to construct a small-scale replica of a larger object or scene. These sets typically contain precut materials, glue, paint, and detailed guides for assembly. For example, one might use such a package to build a miniature Victorian dollhouse or a tiny replica of a bustling city street.
The appeal of these projects lies in their ability to foster creativity, enhance problem-solving skills, and provide a sense of accomplishment upon completion. Their origins can be traced to the historical practice of creating dollhouses and model train sets, but modern iterations offer a wider range of subjects and complexity levels. The process can be therapeutic, allowing individuals to focus on a detailed task and reduce stress.
The following discussion will delve into the various types of available options, the techniques involved in their assembly, and the potential applications of the finished creations, from decorative display pieces to educational tools.
Essential Assembly Guidelines
Successful completion of scaled-down construction projects requires careful planning and execution. Adherence to the following guidelines can significantly improve the final product.
Tip 1: Inventory Components. Before commencing any assembly, verify all listed parts are present and undamaged. Discrepancies should be addressed with the supplier immediately.
Tip 2: Read Instructions Thoroughly. Carefully review the provided guide before beginning construction. Pay close attention to diagrams and sequential steps.
Tip 3: Maintain a Clean Work Area. A well-organized workspace minimizes errors and facilitates efficient component retrieval. Use containers to sort small parts.
Tip 4: Employ Appropriate Adhesives. Utilize glue formulated for the materials involved, ensuring a strong and lasting bond. Exercise caution to avoid excessive application.
Tip 5: Allow Adequate Drying Time. Permit sufficient drying time for adhesives and paints as instructed. Premature handling can compromise the structural integrity and finish.
Tip 6: Utilize Precision Tools. Employ fine-tipped tweezers, craft knives, and small files for accurate component placement and trimming.
Tip 7: Reference External Resources. Consult online forums, video tutorials, and community groups for additional guidance and troubleshooting assistance.
Following these recommendations will increase the likelihood of a satisfactory outcome, enhancing the enjoyment derived from the process. The result will be the satisfactory achievement of construction a scaled-down construction projects.
The subsequent section will provide advanced techniques for customization and enhancement of the finished article.
1. Scale and Proportion
Within the realm of scaled-down crafting projects, scale and proportion are of paramount importance, directly influencing the realism and aesthetic appeal of the finished piece. Scale defines the dimensional relationship between the replica and the original object, while proportion dictates the harmonious arrangement of individual components within the replica itself. Failure to maintain accurate scale and proportion can result in a distorted or unrealistic representation, diminishing the overall quality of the project. For example, a miniature chair with legs that are disproportionately thick compared to the seat will appear ungainly and detract from the intended aesthetic.
The practical significance of understanding these concepts is evident in every stage of assembly. Precut materials must adhere to the established scale, and individual pieces must be assembled in a manner that preserves the correct proportions. Accurate measurements and careful attention to detail are therefore essential. Consider a miniature building: if the windows are too large relative to the doors, the building will appear cartoonish rather than a realistic miniature. Similarly, if the brickwork is out of scale, the textural realism suffers. Skilled artisans and manufacturers of these kits dedicate significant resources to ensure dimensional accuracy, employing precision cutting tools and rigorous quality control measures.
In summary, accurate scale and harmonious proportion are the foundation upon which successful scaled-down projects are built. Disregard for these principles undermines the pursuit of realism and diminishes the overall value of the finished creation. These factors present a persistent challenge, demanding careful planning, precise execution, and a keen eye for detail. Appreciation of their interconnectedness is essential for achieving a satisfying result in this delicate art form.
2. Material Selection
Material selection is a critical determinant of the final aesthetic, structural integrity, and ease of assembly for any scaled-down construction project. The choice of materials impacts not only the visual realism but also the longevity and workability of the kit’s components.
- Wood Composition
Wood, frequently utilized for structural elements and furniture, demands consideration of grain, density, and ease of cutting. Balsa wood, due to its light weight and ease of manipulation, is common for beginner kits. Hardwoods, such as basswood, offer increased durability and finer detailing capabilities, suited for advanced projects. The type of wood affects the adhesives required and the tools necessary for successful assembly.
- Paper and Cardstock Grade
Paper and cardstock are essential for creating textures, replicating documents, and forming decorative elements. The weight and finish of these materials dictate their suitability for different applications. Heavy cardstock is ideal for creating rigid walls or flooring, while thin paper may be used for printing miniature books or wallpaper. Acid-free options ensure longevity and prevent discoloration over time.
- Plastics and Resins
Plastics and resins allow for the creation of intricate details and transparent components like windows or bottles. The type of plastic affects its ability to be painted, glued, or molded. Acrylics offer clarity and durability for glazing, while polystyrene is commonly used for molded details. Resin components require careful handling due to their brittleness and potential for warping.
- Fabric and Textiles
Fabric and textiles contribute to the realism of interiors, allowing for the creation of miniature curtains, upholstery, and carpets. The weave, texture, and color of these materials significantly impact the overall aesthetic. Fine fabrics like silk or linen offer a delicate appearance, while heavier fabrics like felt or velvet provide texture and warmth. Fabric choice also dictates the type of adhesive required for secure attachment.
These varied options present both opportunities and challenges. The judicious selection of materials contributes significantly to the final product’s authenticity and structural soundness. A successful construction project depends on understanding the properties of each material and employing appropriate assembly techniques. Mismatched material choices can compromise the structural integrity and visual appeal, thus careful attention to material properties is essential.
3. Assembly Complexity

Assembly complexity within scaled-down construction kits directly impacts the user experience and the ultimate satisfaction derived from the completed project. The level of intricacy, measured by the number of components, the precision required for their assembly, and the sophistication of the instructions, determines the target audience and the required skillset. Kits designed for beginners typically feature larger, simpler components with straightforward instructions and forgiving tolerances. Conversely, advanced kits may involve hundreds of tiny pieces, complex subassemblies, and instructions requiring meticulous attention to detail and a high degree of manual dexterity. The assembly complexity is, therefore, a critical factor in the selection and enjoyment of such kits.
The degree of assembly complexity directly correlates with the time investment necessary for completion. A simple kit might be completed in a few hours, while an elaborate project can span weeks or even months of dedicated work. The instructions’ clarity, the presence of accurate diagrams, and the availability of supplementary resources such as online tutorials are crucial for navigating the complexities of advanced kits. Errors in assembly can compound over time, leading to misalignment, structural instability, and ultimately, frustration. Successful completion of a complex assembly requires patience, problem-solving skills, and a willingness to learn from mistakes. Consider, for instance, a kit replicating a complex architectural structure. The accurate placement of each tiny brick, the alignment of window frames, and the integration of electrical components for lighting all contribute to the overall complexity and demand a high level of precision.
In summary, assembly complexity constitutes a pivotal aspect of scaled-down construction projects, influencing both the challenge and the reward. The careful consideration of one’s skill level and available time is essential before embarking on a particular project. The assembly complexity should be seen as a spectrum, where increasing intricacy can be a source of both great challenge and immense satisfaction, directly shaping the tangible outcome and the overall building experience. A fitting difficulty level ensures long-term engagement in the construction project.
4. Creative Customization
Creative customization forms an integral component of scaled-down construction endeavors. It allows individuals to transcend the confines of pre-designed templates, imbuing their projects with personal expression and unique character. The degree of permissible alteration distinguishes a static model from a dynamic artistic creation. This transformative process ranges from minor adjustments to radical redesigns, reflecting individual skill and vision.
- Paint and Finishing Techniques
The application of paint and various finishing techniques offers a primary avenue for customization. Altering the color palette, adding weathering effects, or applying specialized coatings can dramatically transform the appearance of the model. For instance, applying a crackle finish to miniature furniture can simulate age and wear, while metallic paints can add a touch of opulence. Such techniques necessitate careful planning and execution to achieve a desired aesthetic.
- Component Modification and Substitution
Creative customization frequently involves modifying or substituting original kit components. Replacing plastic windows with glass panes, adding hand-carved wooden details, or incorporating found objects introduces unique elements into the design. This process demands an understanding of material properties and construction techniques. A builder might replace the kit’s standard wallpaper with fabric or create custom miniature artwork to hang on the walls.
- Adding Lighting and Electronics
The integration of lighting and electronic components elevates the realism and functionality of scaled-down projects. Installing miniature LED lights, creating working fireplaces with simulated flames, or incorporating sound effects enhances the immersive experience. This level of customization requires knowledge of basic electronics and wiring. Skillful integration can transform a static model into a dynamic and interactive display.
- Diorama and Scene Creation
Expanding the scope of the project to include a diorama or scene provides extensive opportunities for creative customization. Constructing a miniature landscape, populating the scene with miniature figures, and adding environmental details creates a narrative context for the model. This approach demands artistic vision and attention to detail. A scaled-down Victorian house, for example, can be placed within a meticulously crafted garden scene, complete with miniature trees, flowers, and pathways.
These diverse customization options underscore the potential for scaled-down construction kits to serve as vehicles for artistic expression. Creative customization invites engagement beyond mere assembly, transforming a pre-packaged collection of components into a unique reflection of the builder’s imagination. The possibilities are as limitless as one’s creativity and skill.
5. Finished Display
The ultimate manifestation of a scaled-down construction project resides in its finished display. This stage represents the culmination of effort and precision, transitioning from a collection of components to a tangible, aesthetically pleasing object. The quality of the finished display directly reflects the meticulousness of the assembly process and the adherence to design principles. A well-executed display enhances the perceived value and evokes a sense of accomplishment, becoming a conversation piece or a cherished personal artifact. Consider, for instance, a completed miniature room box: its placement within a glass case not only protects the delicate contents but also elevates its presentation, transforming it from a mere model into a miniature work of art. The finished display is, therefore, an indispensable component, inextricably linked to the value proposition of the entire construction experience. The completed article becomes a reflection of the builder and a visual showcase for the completed project.
The manner in which the completed project is presented significantly impacts its overall appeal and perceived value. Careful consideration should be given to the choice of display environment. Options range from dedicated display cases, designed to protect and illuminate the creation, to integrated dioramas, which provide a contextual setting and enhance the narrative. Lighting plays a crucial role in accentuating details and creating visua
l interest. Strategically placed spotlights can highlight intricate features, while ambient lighting can create a sense of warmth and realism. Furthermore, the arrangement of the surrounding environment contributes to the overall aesthetic. A cluttered or poorly lit setting can detract from the beauty of the model, while a clean and well-organized display enhances its visual impact. For example, a miniature train set benefits from a carefully constructed landscape, complete with miniature trees, tunnels, and buildings, transforming it from a simple model into a dynamic and engaging scene.
In conclusion, the finished display serves as the final testament to the skill and dedication invested in the construction of scaled-down projects. It is not merely an afterthought but rather an integral aspect of the entire process, influencing the overall satisfaction and perceived value. Challenges in achieving a compelling display often stem from inadequate planning, poor lighting, or a lack of attention to detail. However, by carefully considering the display environment, employing appropriate lighting techniques, and maintaining a clean and organized presentation, the finished creation can be transformed from a simple model into a captivating work of art. The display becomes the final step and validation of the time and effort given during construction of the scaled-down project.
Frequently Asked Questions
The subsequent queries address common inquiries and concerns related to scaled-down construction packages.
Question 1: What is the typical scale used in these construction packages?
The scale varies considerably depending on the subject matter and intended purpose. Common scales include 1:12 (dollhouse scale), 1:24, 1:48, and smaller scales for architectural models or miniature trains. The scale is typically indicated in the product description.
Question 2: What tools are generally required for assembly?
Essential tools often include a craft knife, tweezers, small pliers, glue (appropriate for the materials involved), a cutting mat, a ruler, and sandpaper. Advanced projects may necessitate specialized tools such as miniature saws, drills, or painting equipment.
Question 3: What type of glue is best for assembling these construction packages?
The optimal glue depends on the materials being joined. Cyanoacrylate (super glue) is suitable for plastics and some metals. Wood glue is preferred for wooden components. White glue is a versatile option for paper and fabric. Epoxy provides a strong and durable bond for various materials, but may require longer drying times.
Question 4: How can one address missing or damaged parts?
The first step is to contact the kit manufacturer or retailer. Most reputable suppliers offer replacement parts or customer support to resolve such issues. Providing clear documentation, such as photographs of the damaged or missing items, can expedite the process.
Question 5: What are the recommended techniques for painting miniature components?
Acrylic paints are generally recommended due to their versatility, fast drying time, and ease of cleanup. Applying thin, even coats with a fine-tipped brush is crucial for achieving a smooth finish. Primer is often necessary to ensure proper adhesion and prevent colors from bleeding. Sealing the painted surface with a clear varnish protects the finish and enhances its durability.
Question 6: How should completed construction packages be stored and displayed?
Finished projects should be stored in a dry, dust-free environment away from direct sunlight to prevent fading and damage. Display cases offer protection from dust and handling. For delicate models, consider using archival-quality materials for mounting and display to ensure long-term preservation.
In summary, scaled-down construction kits present both challenges and rewards. Proper preparation, careful assembly, and appropriate display techniques contribute to a satisfying and enduring outcome.
The subsequent section delves into advanced techniques for weathering and detailing scaled-down constructions.
Concluding Remarks on Miniature DIY Kit
This exposition has illuminated various facets of the miniature DIY kit, emphasizing considerations of scale, material, complexity, and customization. The significance of meticulous assembly techniques and thoughtful display strategies has also been underscored. The potential for these kits to foster creativity, enhance problem-solving skills, and provide tangible rewards through the creation of detailed replicas is evident.
As the pursuit of detail and realism in miniature construction continues, the demand for sophisticated kits and advanced techniques will likely increase. The miniature DIY kit presents not only an opportunity for engaging in a challenging craft but also a means of preserving historical representations and capturing the essence of artistry in a scaled-down format. Further exploration and innovation in this domain are encouraged, ensuring the continued evolution of this intricate and rewarding pastime.