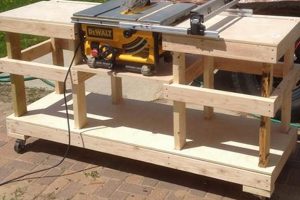
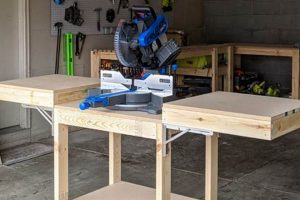
A self-constructed support system designed to elevate and stabilize a miter saw is the subject of this discussion. These systems typically consist of a platform to which the saw is mounted and extensions providing lateral support for longer workpieces. Such setups provide a dedicated workspace optimized for accurate and efficient crosscutting operations. For example, a basic version may utilize repurposed lumber to create a simple, stationary table with adjustable wings to accommodate varying material lengths.
Utilizing a customized saw station offers enhanced safety, improved accuracy, and increased productivity compared to operating the saw directly on the floor or a makeshift surface. Historically, woodworkers often relied on sawhorses and improvised supports. The emergence of more refined and dedicated systems represents a significant advancement, enabling greater precision and repeatability in cuts. The construction of such a station also provides an opportunity to tailor the workspace to specific needs and spatial constraints, optimizing workflow and minimizing material waste.
Subsequent sections will explore various design considerations, material selections, and construction techniques associated with building a suitable support structure. This exploration will cover topics such as incorporating dust collection, integrating material clamping mechanisms, and optimizing the overall ergonomics of the workstation.
Construction Insights
The following insights provide guidance for constructing a stable and functional miter saw support system. Careful consideration of these points will contribute to a safer and more efficient woodworking experience.
Tip 1: Material Selection: Opt for high-quality plywood or solid wood for the main frame and supporting surfaces. These materials offer superior stability and resistance to warping, crucial for maintaining accurate cuts.
Tip 2: Precise Measurements: Prioritize accuracy in all measurements. Inaccurate dimensions can compromise the overall structural integrity and lead to misalignment of the miter saw.
Tip 3: Sturdy Joinery: Employ robust joinery techniques, such as mortise-and-tenon joints or pocket hole screws with wood glue. Weak joints can compromise the stability of the support system over time.
Tip 4: Level Work Surface: Ensure the work surface is perfectly level. Use a spirit level and shims as necessary to achieve a flat and even platform for the miter saw and workpieces.
Tip 5: Integrated Dust Collection: Incorporate a dust collection port and hose connection to minimize sawdust accumulation. This improves visibility and reduces the risk of respiratory irritation.
Tip 6: Adjustable Outfeed Supports: Implement adjustable outfeed supports to accommodate longer workpieces. These supports should be easily adjustable to maintain consistent material alignment.
Tip 7: Secure Miter Saw Mounting: Fasten the miter saw securely to the platform using bolts and washers. This prevents movement during operation and ensures precise cuts.
Tip 8: Mobile vs. Stationary: Determine whether a mobile or stationary system is more appropriate based on workspace constraints and usage patterns. Consider adding locking casters for mobility and stability.
Adhering to these construction insights will result in a durable, accurate, and user-friendly support system, contributing to improved woodworking outcomes.
The subsequent section will address potential modifications and enhancements to further optimize the support system for specific applications.
1. Customizable Dimensions
The dimensional parameters are a critical component of a self-constructed miter saw support system. Variability in workspace size and the range of materials typically processed necessitate a tailoring of the support system’s length, width, and height. Failure to adequately account for these factors can result in a system that is either unwieldy within the available space or insufficiently sized to support common workpiece lengths. For instance, a carpenter working primarily with trim and molding might opt for a compact, portable design, while a furniture maker requiring the ability to process longer boards would demand a more extensive setup with wider support arms.
Effective customization involves careful consideration of both the miter saw’s footprint and the anticipated maximum workpiece length. Support arms, often constructed from wood or metal, must extend far enough to prevent material from sagging or tipping during cutting. Furthermore, the height of the work surface should be optimized to reduce back strain and promote proper posture. Some designs incorporate adjustable legs or folding wings to accommodate uneven surfaces or allow for compact storage when not in use. The inclusion of integrated measuring scales or stops further enhances the system’s utility, allowing for rapid and accurate repetitive cuts.
Understanding the relationship between dimensional adaptability and the overall effectiveness of a miter saw support system is essential for optimizing its performance. Challenges such as maintaining structural rigidity while incorporating adjustable elements require careful engineering and material selection. By prioritizing customizable dimensions, users can create a saw station that is both tailored to their individual needs and capable of enhancing the accuracy and efficiency of their woodworking projects. This adaptability underscores the fundamental principle of “do-it-yourself” construction: creating tools and solutions that precisely meet specific requirements.
2. Material Optimization
Material optimization, in the context of a self-constructed miter saw support system, represents the strategic selection and utilization of materials to achieve structural integrity, functionality, and cost-effectiveness. This process extends beyond simply choosing the cheapest available option and encompasses a thoughtful evaluation of material properties, availability, and suitability for the intended application.
- Cost-Benefit Analysis
The foundation of material optimization involves a thorough cost-benefit analysis of various materials. While solid hardwoods offer superior strength and aesthetic appeal, their higher cost may not be justified for all components of the support system. Plywood, MDF, or even reclaimed lumber can provide adequate structural support for the frame and table surface at a significantly lower cost. The analysis considers not only the initial purchase price but also factors such as ease of workability, finishing requirements, and expected lifespan.
- Structural Considerations
Material selection is inherently linked to structural considerations. Key load-bearing components, such as the frame and leg supports, demand materials with high tensile and compressive strength. Pine or fir, while less expensive than hardwoods, can be suitable for these elements if properly dimensioned and joined. The table surface, responsible for supporting the miter saw and workpieces, requires a rigid material that resists warping or deflection under load. Plywood, particularly Baltic birch plywood, offers an excellent balance of strength, stability, and workability for this application.
- Material Sourcing and Repurposing
Material optimization frequently involves exploring alternative sourcing options and repurposing existing materials. Reclaimed lumber, sourced from construction sites or deconstruction projects, can provide a cost-effective and environmentally conscious alternative to purchasing new materials. Careful inspection and preparation of reclaimed lumber are essential to ensure its structural integrity and suitability for the intended application. Similarly, surplus materials from other woodworking projects can be effectively integrated into the support system, minimizing waste and reducing overall material costs.
- Fastener Selection
Beyond the primary building materials, fastener selection plays a crucial role in material optimization. The type and size of screws, bolts, or nails used to assemble the support system directly impact its structural integrity and long-term durability. High-quality fasteners, specifically designed for woodworking applications, ensure a secure and lasting connection between components. Over-engineered fasteners, while providing a higher margin of safety, can unnecessarily increase material costs and complicate the assembly process. A balanced approach, considering the specific load requirements and material properties of each joint, is essential for optimizing fastener selection.
These facets contribute to a greater understanding of the core ideas. Material optimization, therefore, is a multifaceted process that requires a deep understanding of material properties, cost considerations, and structural requirements. A well-optimized miter saw support system not only minimizes material costs but also maximizes functionality, durability, and overall value.
3. Ergonomic Height
Ergonomic height, in the context of a self-constructed miter saw support system, represents a critical design parameter directly impacting user comfort, safety, and long-term physical well-being. The height at which the miter saw and workpieces are positioned relative to the user’s body profoundly influences posture, reach, and the forces exerted during cutting operations. A support system of improper height can induce musculoskeletal strain, leading to fatigue, discomfort, and potentially chronic injuries over time. For instance, a support system that is too low requires the user to bend over excessively, placing undue stress on the lower back. Conversely, a system that is too high forces the user to raise their arms and shoulders, leading to shoulder and neck pain. The correct ergonomic height minimizes these stresses, allowing for efficient and comfortable operation.
The determination of optimal ergonomic height requires consideration of individual anthropometric data, specifically the user’s height and arm length. A general guideline suggests that the top surface of the miter saw should be approximately at the same height as the user’s elbows when standing upright. This position allows for a natural and comfortable reach to the saw’s controls and provides adequate leverage for accurate cuts. Furthermore, the height of the outfeed supports should be carefully adjusted to match the miter saw’s table, preventing material from sagging or binding during the cutting process. The integration of adjustable legs or shims facilitates fine-tuning of the support system’s height to accommodate uneven surfaces or individual user preferences. Real-world examples demonstrate the practical significance of ergonomic considerations. Woodworkers who prioritize proper workstation design report reduced fatigue, increased productivity, and a lower incidence of work-related injuries.
In summary, ergonomic height is a fundamental element of a well-designed miter saw support system. Failure to address this parameter can result in a workstation that is not only uncomfortable but also potentially hazardous. By prioritizing ergonomic considerations, users can create a support system that promotes safe and efficient woodworking practices, contributing to long-term physical well-being. The challenges associated with achieving optimal ergonomic height are primarily related to individual variability and the need for adjustability. However, by adhering to established ergonomic principles and incorporating adjustable elements into the design, these challenges can be effectively mitigated.
4. Integrated Features
The incorporation of integrated features into a self-constructed miter saw support system significantly enhances functionality, efficiency, and user experience. These features, beyond the basic function of supporting the saw, address common woodworking challenges and streamline the cutting process. The following outlines key integrated elements frequently encountered in custom-built systems.
- Dust Collection Systems
The integration of dust collection is crucial for maintaining a clean and safe working environment. Effective systems often involve a dedicated port connected to a shop vacuum or dust collector. Enclosing the rear of the miter saw with a partial hood or shroud further minimizes dust dispersion. Examples include custom-built enclosures with integrated dust ports positioned directly behind the saw blade. Such systems reduce airborne particulates, improving visibility and minimizing respiratory hazards.
- Material Clamping Mechanisms
Securely clamping workpieces is essential for accurate and safe cuts. Integrated clamping mechanisms, such as toggle clamps or quick-release vises, provide a hands-free method of securing materials to the support system. These mechanisms are typically mounted directly to the table surface or outfeed supports, allowing for rapid and precise workpiece positioning. Examples range from simple hold-down clamps to more elaborate systems with adjustable clamping pressure. The use of integrated clamping significantly reduces the risk of material slippage and improves cut accuracy.
- Measuring and Stop Systems
For repetitive cuts, integrated measuring and stop systems offer significant time savings and improved accuracy. These systems typically consist of a linear measuring scale affixed to the outfeed supports, coupled with adjustable stop blocks that can be precisely positioned to the desired length. Examples include T-track systems with sliding stop blocks and digital measuring scales for enhanced precision. Integrated measuring systems streamline the cutting process, minimizing errors and improving overall efficiency.
- Power Outlets and Cord Management
The integration of power outlets and cord management solutions simplifies the operation of the miter saw and other related tools. Integrated power strips with multiple outlets provide a convenient source of power for the saw, vacuum, and lighting. Cord management systems, such as cord reels or cable trays, prevent tangled cords and tripping hazards. Examples include recessed power outlets mounted directly to the support system’s frame and retractable cord reels for easy access. Power integration contributes to a safer and more organized workspace.
The strategic integration of these features transforms a basic miter saw support into a comprehensive and highly functional workstation. The decision to incorporate specific features depends on individual needs, workflow preferences, and construction skills. The benefits, however, are undeniable: enhanced safety, improved accuracy, and increased efficiency in woodworking tasks.
5. Structural Stability
Structural stability is a paramount consideration in the construction of a self-made miter saw support system. The capacity of the structure to withstand imposed loads and maintain its intended geometry directly affects user safety, cutting accuracy, and the longevity of the workstation. Inadequate structural integrity compromises the performance of the miter saw and introduces potential hazards.
- Material Rigidity
The selection of materials with sufficient rigidity is fundamental to achieving structural stability. Materials such as solid hardwoods, plywood, and steel offer varying degrees of resistance to bending and deformation under load. The choice of material depends on the intended weight-bearing capacity of the support system and the desired level of stability. For example, a support system designed to accommodate heavy miter saws and long workpieces necessitates the use of thicker materials and robust framing techniques. Conversely, a smaller, portable system may utilize lighter materials, provided that adequate reinforcement is incorporated into the design. The material’s ability to resist deflection under load directly impacts the accuracy of cuts.
- Joint Integrity
The methods used to join the various components of the support system are critical to its overall structural stability. Weak or improperly executed joints can compromise the integrity of the entire structure, leading to instability and potential failure under load. Common joinery techniques include screws, bolts, and wood glue. Interlocking joints, such as mortise-and-tenon or dovetail joints, provide superior strength and resistance to racking. The selection of appropriate fasteners and joinery techniques depends on the materials being joined and the expected stress on the joints. For example, butt joints secured with screws alone may be insufficient for load-bearing components, while mortise-and-tenon joints with adhesive provide a stronger and more durable connection. The use of gussets or bracing can further reinforce joints and prevent deformation.
- Load Distribution
Effective load distribution is essential for minimizing stress concentrations and preventing localized failures. The design of the support system should distribute the weight of the miter saw and workpieces evenly across the supporting structure. This can be achieved through the strategic placement of legs, cross members, and reinforcing elements. Concentrated loads, such as those imposed by heavy workpieces, should be supported by robust structural members designed to withstand the applied forces. For example, incorporating additional legs or reinforcing a specific area of the table can mitigate the risk of deflection or collapse. Proper load distribution ensures that the support system operates within its design limits, maintaining stability and preventing structural damage.
- Bracing and Reinforcement
The incorporation of bracing and reinforcement elements can significantly enhance the structural stability of a self-constructed miter saw support system. Braces, such as diagonal supports or corner gussets, provide additional resistance to racking and deformation. Reinforcing elements, such as steel plates or metal angles, can strengthen critical joints and prevent failure under load. The strategic placement of braces and reinforcement elements can significantly improve the stiffness and load-bearing capacity of the support system. For example, attaching diagonal braces to the legs of the support system can prevent it from swaying or collapsing under lateral forces. Reinforcing the corners of the table with metal angles can prevent them from splitting or cracking under heavy loads. These elements contribute to overall stability.
The preceding facets highlight the interconnectedness of material properties, joinery techniques, load distribution, and reinforcement strategies in achieving adequate structural stability. A miter saw support system that exhibits these characteristics offers a safe and reliable platform for woodworking tasks. Careful attention to these considerations is essential for constructing a durable and functional workstation.
Frequently Asked Questions About Self-Constructed Miter Saw Support Systems
The following questions address common inquiries and concerns regarding the design, construction, and utilization of user-built miter saw stands.
Question 1: What is the minimum acceptable material thickness for the support system’s table surface?
The minimum acceptable thickness for the table surface depends on the material and the miter saw’s weight. For plywood, a minimum thickness of inch is generally recommended to prevent sagging. Thicker materials, such as 1-inch solid wood or reinforced plywood, may be necessary for heavier saws or longer workpieces.
Question 2: How critical is it to ensure the support system is perfectly level?
Achieving a perfectly level support system is essential for accurate cuts, particularly when working with long materials. Even slight variations in level can result in skewed cuts. Use a spirit level to check the surface and adjust the legs or add shims as needed.
Question 3: What is the best method for securing the miter saw to the support system?
The miter saw should be securely bolted to the support system’s table using bolts, washers, and nuts. Ensure the bolts are of sufficient length to pass through both the saw’s mounting holes and the table surface. Use lock washers to prevent the bolts from loosening due to vibration.
Question 4: Is it necessary to incorporate dust collection into the support system design?
While not strictly necessary, incorporating dust collection is highly recommended for maintaining a clean and safe working environment. Sawdust accumulation can obscure the cutting line and pose a respiratory hazard. A simple dust port connected to a shop vacuum can significantly reduce airborne particles.
Question 5: How important is it to consider ergonomics when building the support system?
Ergonomics are crucial for minimizing fatigue and preventing musculoskeletal strain. The height of the support system should be adjusted to allow for a comfortable and natural working posture. The top of the miter saw’s table should ideally be at or slightly below elbow height.
Question 6: What are the key safety considerations when operating a miter saw on a self-built support system?
Always wear appropriate personal protective equipment, including eye and ear protection. Ensure the workpiece is securely clamped or supported before making any cuts. Never reach across the blade while the saw is running. Follow all safety guidelines provided by the miter saw manufacturer.
These FAQs provide guidance on fundamental aspects of DIY miter saw stand construction and usage. Adhering to these recommendations enhances safety, accuracy, and overall efficiency.
The subsequent section will explore various design modifications and advanced techniques for optimizing the miter saw support system for specific woodworking applications.
Conclusion
The preceding discussion comprehensively explored the design, construction, and optimization of self-constructed miter saw support systems. From material selection and ergonomic considerations to integrated features and structural stability, each element contributes to a safe, efficient, and accurate woodworking experience. These systems, when properly executed, represent a significant enhancement over makeshift alternatives, providing a dedicated platform for precision cutting operations.
The effective implementation of a diy miter stand requires careful planning, precise execution, and a thorough understanding of woodworking principles. The ultimate result is a customized tool that reflects individual needs and enhances the overall quality of craftsmanship. Continued innovation and refinement in design and construction techniques will undoubtedly lead to further advancements in this area, empowering woodworkers to achieve greater precision and efficiency in their craft.


