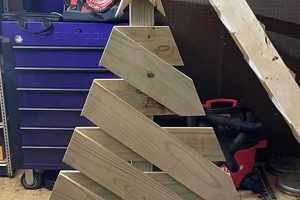
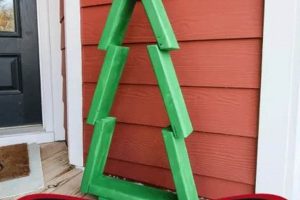
The construction of shelving units resembling trees is a creative do-it-yourself project. This involves utilizing materials such as wood to fabricate a structure that mimics the branching form of a tree, providing a visually appealing and functional storage solution. An example would be crafting a bookshelf where the shelves extend outwards like branches from a central trunk.
Such projects offer several advantages, including space optimization and aesthetic enhancement of interior environments. Historically, bespoke shelving has been a common practice, but the tree-inspired design introduces an element of artistic expression. The customizability inherent in the process allows for adaptation to specific spatial constraints and personal preferences, adding value to the living space.
The following sections will delve into the various aspects of building a tree-shaped shelving unit. Topics will include material selection, design considerations, step-by-step construction techniques, and finishing methods. This information is aimed at empowering individuals to successfully undertake this rewarding DIY endeavor.
Tips for Constructing a Tree-Inspired Shelving Unit
The successful creation of a tree-inspired shelving unit hinges on careful planning and execution. These tips offer guidance for achieving a structurally sound and visually appealing result.
Tip 1: Prioritize Structural Integrity. Proper weight distribution is critical. Shelves designed as branches must be securely attached to the central support, often referred to as the ‘trunk,’ to prevent collapse. Utilize strong joinery techniques, such as mortise and tenon or dowel joints, reinforced with appropriate adhesives.
Tip 2: Employ Accurate Measurement and Cutting. Precise measurements and cuts ensure a seamless fit and a visually balanced aesthetic. A miter saw or table saw with appropriate safety measures is recommended for accurate angle cuts on the shelving components.
Tip 3: Select Appropriate Materials. The type of wood utilized significantly impacts the shelving units durability and appearance. Hardwoods, like oak or maple, provide superior strength and resistance to wear compared to softwoods like pine. Consider the aesthetic qualities of the wood grain when making a selection.
Tip 4: Incorporate a Stable Base. The base of the ‘trunk’ must be stable to prevent tipping. A wider base or the addition of weighted elements ensures the entire structure remains upright, especially when loaded with items.
Tip 5: Plan for Secure Wall Anchoring. Especially for taller units, anchoring the shelving to a wall stud is essential for safety. This prevents the unit from toppling over, particularly in homes with children or pets. Use appropriate wall anchors and hardware rated for the expected weight load.
Tip 6: Consider Shelf Depth and Spacing. Determine the intended use of the shelves before finalizing dimensions. Adjust shelf depth and spacing to accommodate books, decorative items, or other planned contents. Inconsistent spacing can detract from the overall visual appeal.
Tip 7: Apply a Durable Finish. Protect the wood and enhance its appearance with a durable finish. Options include varnish, polyurethane, or wood stain. Ensure proper ventilation during application and allow sufficient drying time per the manufacturers instructions.
Adherence to these guidelines will increase the likelihood of producing a functional and aesthetically pleasing tree-inspired shelving unit, enhancing both the storage capacity and visual character of any space.
These tips provide a solid foundation for the construction phase. The subsequent section will focus on potential design variations and aesthetic embellishments.
1. Design Complexity
Design complexity, in the context of a tree shelf DIY project, represents the level of intricacy and detail involved in the structural and aesthetic components of the shelving unit. It directly correlates with the required skill level, time investment, and potential challenges encountered during the fabrication process. Careful consideration of design complexity is paramount to ensuring a successful outcome that aligns with both the builder’s capabilities and the intended aesthetic.
- Branching Pattern Complexity
The branching pattern dictates the number, angle, and curvature of the “branches” extending from the central support. A simple design might utilize straight, evenly spaced branches, whereas a complex design could incorporate varying angles, asymmetrical arrangements, and intricate curves to mimic a more natural tree form. Increased branching complexity demands precise measurements, accurate cutting techniques, and robust joinery methods to maintain structural integrity.
- Joinery Intricacy
The joinery methods employed to connect the branches to the central support significantly contribute to the overall design complexity. Basic butt joints are relatively straightforward but may lack sufficient strength. More intricate joinery techniques, such as mortise and tenon joints or dovetail joints, provide superior stability and a more refined aesthetic. However, these methods require specialized tools and a higher level of woodworking expertise.
- Material Manipulation Techniques
The complexity of the design may necessitate advanced material manipulation techniques. Bending wood to create curved branches, for instance, requires specialized tools and knowledge of wood properties. Similarly, incorporating different types of wood with varying grains and colors adds visual interest but demands careful consideration of material compatibility and finishing techniques.
- Assembly Precision
Even with a well-defined plan, the assembly process can introduce complexity. Ensuring accurate alignment and secure fastening of all components is crucial for a stable and visually appealing final product. Complex designs with numerous branching elements require a methodical approach and meticulous attention to detail to prevent errors that could compromise the structural integrity or aesthetic balance of the tree shelf.
In summary, the level of design complexity chosen for a tree shelf DIY project directly impacts the required skillset, the time commitment, and the potential challenges encountered. A balance between aesthetic aspirations and practical capabilities is essential to achieve a successful and satisfying result. Starting with a simpler design and gradually increasing complexity with experience is a prudent approach for aspiring DIYers.
2. Material Selection
Material selection is a critical determinant in the successful execution and longevity of a tree shelf DIY project. The choice of materials directly impacts the structural integrity, aesthetic appeal, and overall cost-effectiveness of the finished product. Different materials exhibit varying degrees of strength, workability, and resistance to environmental factors, influencing the shelves’ load-bearing capacity, ease of construction, and susceptibility to warping or decay. For example, using low-density softwood, such as pine, may result in a shelf that is prone to sagging under heavy loads, requiring additional support structures and potentially detracting from the intended aesthetic. Conversely, selecting high-density hardwood, such as oak or maple, provides superior strength and stability but may increase the material cost and require more specialized woodworking tools and techniques.
Beyond structural considerations, material selection significantly affects the visual character of the tree shelf. The natural grain patterns, color variations, and texture of different wood species contribute to the overall aesthetic. Reclaimed wood, for instance, offers a rustic and environmentally conscious option, while commercially sourced lumber provides a more uniform and predictable appearance. Furthermore, the choice of finishing materials, such as stains, paints, and sealants, plays a crucial role in protecting the wood from moisture damage, UV exposure, and wear and tear, while simultaneously enhancing its visual appeal. Consideration must also be given to the compatibility of different materials used in conjunction, such as ensuring that adhesives and fasteners are appropriate for the chosen wood species to prevent joint failure or discoloration.
In conclusion, thoughtful material selection is paramount for a successful tree shelf DIY project. Factors such as structural requirements, aesthetic preferences, budget constraints, and environmental considerations must be carefully weighed to ensure that the chosen materials are well-suited for the intended purpose. Failure to prioritize material selection can result in a shelf that is structurally unsound, visually unappealing, or prone to premature degradation. Therefore, a thorough understanding of the properties and characteristics of different materials is essential for achieving a durable, aesthetically pleasing, and functional tree shelf that meets the specific needs and preferences of the builder.
3. Joint Strength
Joint strength represents a critical engineering factor in the construction of any shelving unit, and its importance is magnified in the context of a tree shelf DIY project due to the unique structural demands inherent in the design. The integrity of the joints directly determines the stability, load-bearing capacity, and overall longevity of the finished product. Weak or poorly executed joints can lead to catastrophic failure, resulting in damage to property and potential injury.
- Load Distribution and Shear Stress
The branching design of a tree shelf concentrates load at the joints connecting the “branches” (shelves) to the central support. These joints are subjected to significant shear stress, especially when the shelves are loaded unevenly. The joint must be strong enough to resist this shear force and prevent the shelf from detaching or collapsing. Dovetail joints, mortise and tenon joints, and adequately sized screw or bolt connections are examples of strong joinery techniques suitable for distributing load effectively.
- Material Compatibility and Adhesive Selection
The strength of a joint is inherently linked to the materials being joined. Different wood species possess varying densities and adhesive bonding properties. Combining dissimilar materials, such as softwood and hardwood, requires careful consideration of adhesive compatibility and joint design to ensure a reliable bond. Furthermore, the selection of an appropriate adhesive is crucial. Epoxy resins, polyurethane adhesives, and specialized wood glues provide varying levels of strength and resistance to moisture and temperature fluctuations, each with its own specific application within the DIY context.
- Joint Geometry and Surface Area
The geometric design of the joint directly influences its strength. Increasing the surface area of the joint provides a larger bonding surface, distributing the load more evenly and enhancing the overall strength. Angled joints, characteristic of branching structures, require precise cutting and fitting to maximize surface contact. Reinforcing joints with gussets or additional fasteners can further increase the load-bearing capacity and mitigate the risk of failure.
- Fastener Selection and Placement
When employing mechanical fasteners, such as screws or bolts, proper selection and placement are paramount. Using fasteners that are too small or spaced too far apart will compromise the joint’s integrity. The type of fastener must be appropriate for the wood species and the applied load. For example, using coarse-threaded screws in softwood provides better grip than fine-threaded screws, while bolts with washers distribute pressure more effectively than screws in high-stress applications. Proper pilot hole drilling prevents wood splitting and ensures a secure fastener installation.
The interconnectedness of these facets underscores the importance of a comprehensive approach to joint design and execution in tree shelf DIY projects. Neglecting any of these considerations can result in a structurally unsound and potentially hazardous shelving unit. A thorough understanding of joint mechanics and material properties is essential for creating a safe, functional, and aesthetically pleasing tree shelf.
4. Weight Distribution
Weight distribution is a fundamental principle in structural engineering and a critical consideration in the design and construction of a tree shelf DIY project. The unique branching structure necessitates careful planning to ensure stability and prevent collapse. Improper weight distribution can lead to uneven stress on joints, potential material failure, and a compromised aesthetic.
- Center of Gravity and Base Support
The center of gravity of the shelving unit, including the anticipated load, must be positioned appropriately relative to the base of support. A higher center of gravity or a narrow base increases the risk of tipping. Wider bases, weighted elements at the base, or anchoring to a wall can improve stability. The further the center of gravity extends beyond the base, the greater the likelihood of instability, especially when shelves are loaded unevenly.
- Shelf Load Capacity and Material Stress
Each shelf, acting as a “branch,” possesses a limited load capacity based on its material composition and dimensions. Overloading shelves can induce excessive bending stress, potentially leading to material fatigue, cracking, or complete failure. The distribution of weight across each shelf should be considered. Concentrated loads near the outer edge of the shelf create higher stress than evenly distributed loads. Reinforcement techniques, such as thicker shelving material or strategically placed supports, can increase load capacity.
- Joint Stress and Structural Integrity
Weight distribution directly influences the stress experienced by the joints connecting shelves to the central support. Uneven loading can create disproportionate shear and tensile forces on specific joints, potentially exceeding their design capacity. Employing robust joinery techniques, such as mortise and tenon or dovetail joints, and using high-strength adhesives are crucial for withstanding these forces. Regular inspection of joints is advisable to detect early signs of stress or weakening.
- Asymmetrical Designs and Counterbalancing
Asymmetrical tree shelf designs, where branches extend unevenly, present unique challenges for weight distribution. Heavier items placed on one side of the shelf can create a significant imbalance, increasing the risk of tipping or structural failure. Counterbalancing techniques, such as strategically placing heavier items on the opposite side or incorporating a weighted element on the lighter side, can mitigate these risks. Alternatively, designing the shelf to lean slightly against the wall can provide additional stability.
Effective weight distribution is not merely an aesthetic consideration but a fundamental requirement for the safety and functionality of a tree shelf DIY project. By carefully considering the center of gravity, load capacity, joint stress, and potential imbalances, builders can create shelving units that are both visually appealing and structurally sound. The interplay of these elements underscores the importance of meticulous planning and execution throughout the entire construction process.
5. Finishing Technique
Finishing technique, in the context of a tree shelf DIY project, represents the final stage of construction, crucial for both aesthetic enhancement and long-term preservation of the wood. The selection and application of a suitable finish significantly impacts the appearance, durability, and resistance to environmental factors of the shelving unit. It serves as a protective barrier against moisture, ultraviolet radiation, and physical wear, extending the lifespan and maintaining the visual appeal of the crafted piece.
- Surface Preparation
Proper surface preparation is foundational to any successful finishing technique. This entails sanding the wood to a smooth, uniform texture, removing any imperfections, dust, or debris that could compromise the adhesion or appearance of the finish. Techniques range from coarse sanding to remove significant irregularities to fine sanding for achieving a polished surface. For example, failing to adequately sand a tree shelf before staining can result in uneven color absorption and a blotchy appearance, detracting from the intended aesthetic.
- Staining and Coloring
Staining and coloring techniques alter the natural hue of the wood, enhancing the grain pattern or achieving a desired color scheme. Various stain types, including oil-based, water-based, and gel stains, offer different levels of penetration, color intensity, and ease of application. The correct choice depends on the wood species, desired effect, and environmental considerations. For instance, applying a dark stain to a tree shelf crafted from knotty pine can accentuate the rustic character of the wood, while a clear coat preserves the natural color.
- Sealing and Top Coats
Sealing and top coats provide a protective layer over the stained or natural wood, safeguarding it from moisture, scratches, and UV damage. Options include varnishes, lacquers, polyurethanes, and waxes, each offering varying levels of durability, sheen, and application requirements. Polyurethane, for example, is known for its high durability and resistance to water damage, making it suitable for a tree shelf placed in a humid environment, while wax offers a more natural look but requires periodic reapplication.
- Application Methods and Techniques
The method of applying the finish directly impacts the final appearance and performance. Brushing, spraying, and wiping are common techniques, each requiring specific skills and equipment. Spraying typically yields a smoother, more even finish, while brushing can be more practical for smaller projects or intricate details. Consistent application, avoiding drips or runs, and allowing adequate drying time between coats are essential for achieving a professional-looking result. Uneven application can result in blotches, drips, or pooling of the finish, detracting from the overall aesthetic of the tree shelf.
In conclusion, the finishing technique represents a critical aspect of any tree shelf DIY project, influencing both the visual appeal and long-term durability of the piece. A carefully selected and properly applied finish not only enhances the natural beauty of the wood but also provides essential protection against environmental factors, ensuring the longevity and aesthetic integrity of the shelving unit. The combination of proper surface preparation, appropriate stain and sealant selection, and skilled application techniques contributes to a finished product that is both aesthetically pleasing and functionally durable.
6. Space Optimization
Space optimization is a primary driver behind the popularity and practicality of the tree shelf DIY concept. Traditional shelving units often occupy significant floor space and can appear bulky within a room. A tree shelf, due to its vertical design and often asymmetrical branch-like structure, offers an alternative that maximizes vertical space utilization while minimizing its horizontal footprint. This is particularly valuable in smaller living spaces, apartments, or rooms where efficient use of available area is paramount.
The tree shelf’s customizable nature further enhances its space optimization capabilities. The dimensions, number of “branches,” and their arrangement can be tailored to fit specific spatial constraints and storage needs. For example, a narrow tree shelf can be designed to fit snugly in a corner, transforming otherwise unusable space into a functional storage area. The height and depth of the shelves can also be adjusted to accommodate items of varying sizes, maximizing storage capacity without encroaching excessively into the room. Real-world applications include utilizing a tall, narrow tree shelf in a hallway to store books or decorative items, or implementing a wider, shorter version in a child’s room to organize toys and games.
Understanding the interplay between space optimization and tree shelf DIY is of significant practical value. It allows individuals to create storage solutions that are not only functional and aesthetically pleasing but also uniquely tailored to their living environments. While challenges may arise in designing and constructing structurally sound and balanced tree shelves, particularly in asymmetrical designs, the benefits of efficient space utilization and customized storage make it a worthwhile endeavor. This understanding links directly to the broader theme of efficient interior design and maximizing the usability of limited living spaces.
Frequently Asked Questions
The following questions address common concerns and misconceptions regarding the design, construction, and maintenance of tree-shaped shelving units. These answers aim to provide clarity and guidance for individuals undertaking such projects.
Question 1: What are the primary structural considerations for a tree shelf DIY project?
The primary structural considerations involve ensuring adequate load-bearing capacity and stability. The joints connecting the shelves (branches) to the central support (trunk) must be robust enough to withstand the anticipated weight. A stable base is crucial to prevent tipping, particularly with taller designs. Weight distribution across the shelves should be balanced to minimize stress on individual joints.
Question 2: What types of wood are best suited for a tree shelf DIY endeavor?
Hardwoods, such as oak, maple, or walnut, offer superior strength and durability compared to softwoods like pine. However, softwoods may be more cost-effective and easier to work with for less experienced builders. The choice depends on the desired aesthetic, budget constraints, and the anticipated load that the shelves will bear.
Question 3: How can the risk of the tree shelf tipping over be mitigated?
Several methods can minimize the risk of tipping. A wider base provides a more stable foundation. Adding weight to the base, such as by incorporating a concrete slab or using heavier wood, lowers the center of gravity. Anchoring the shelf to a wall using appropriate hardware is highly recommended, especially for taller units.
Question 4: What tools are essential for constructing a tree shelf?
Essential tools include a saw (circular saw, miter saw, or hand saw), a drill with various drill bits, a measuring tape, a level, sandpaper, and appropriate fasteners (screws, nails, or bolts). Depending on the complexity of the design, additional tools such as a router or chisel may be required.
Question 5: How should the wood be finished to ensure longevity and aesthetic appeal?
The wood should be properly sanded to a smooth surface before applying any finish. A stain can be used to enhance the wood grain or alter the color. A sealant, such as varnish or polyurethane, protects the wood from moisture and UV damage. The application should be even and allowed to dry completely between coats, following the manufacturer’s instructions.
Question 6: What are some common design variations for tree shelves?
Design variations include asymmetrical branching patterns, incorporating different types of wood, integrating lighting, adding decorative elements, and customizing the shelf dimensions to fit specific spaces. The design should be tailored to the user’s aesthetic preferences and functional requirements.
These answers provide a foundational understanding of key considerations for tree shelf DIY projects. Careful planning, material selection, and construction techniques are essential for creating a safe, functional, and visually appealing shelving unit.
The subsequent section will explore advanced design concepts and alternative construction methods.
Conclusion
The preceding discussion has thoroughly examined various facets of tree shelf DIY projects, encompassing design principles, material considerations, structural integrity, and finishing techniques. The exploration underscored the importance of meticulous planning, careful execution, and a comprehensive understanding of woodworking principles to ensure both the aesthetic appeal and functional durability of the resulting shelving unit. The customizable nature and space-optimizing potential of this approach were also highlighted.
Individuals considering undertaking a tree shelf DIY project are urged to approach the endeavor with diligence and attention to detail. Successful implementation hinges on a commitment to craftsmanship and a thorough understanding of the principles outlined. The rewards, however, extend beyond mere functionality, offering the opportunity to create a unique and visually striking addition to any living space. The principles of tree shelf DIY can be a stepping stone to further exploration of woodworking and creative design.


